sMobile ? "width=device-width,initial-scale=1.0,minimum-scale=1.0,maximum-scale=1.0" : "width=1100"' name='viewport'/> android xda: Android Tutorials
Showing posts with label Android Tutorials. Show all posts

Tuesday, 27 December 2016

Install ADB & Fastboot Drivers On Computer Easily

You can learn the fastest way to install ADB & Fastboot on Windows computer, the tutorials written here will elaborate the quickest and easiest way for installing those useful tools to optimize our Android powered device.
Advertisements.

As we know, in the realm of Android we are familiar with the activities like rooting, tweaking and modding our Android OS. Those kind of activities without doubt need the involvements of fasboot (Or mostly).

A little bit about ADB and Fastboot.

Install ADB & Fastboot Drivers On Computer Easily
What is ADB?

ADB means Android Debug Bridge. With this tool you can send Linux or Android commands from computer to connected Android powered smartphones or tablets.

What is Fastboot?

Fastboot is a tool that works in fasboot / bootloader mode. You can perform number of things, for example re-flashing your system partition. To use Fastboot, then your device should already in the bootloader unlocked stage. You can do a manual update using this tool.

I think that's sufficient to figure out what these tools can benefit your Android device. It's time to bring the tools to your Windows computer.

So that's why installing ADB & Fastboot drivers are required. And fortunately it's not a hard task. That's credit should be given to one of the XDA senior memberS namely, Snoop05 who have released a tiny size yet very handful app, ADB Installer for us to use. And it works.
Advertisements.

It's almost an instant process. And will benefit you so big. If you are ready then we can start the flashing process.

But before we explore the tutorials, I recommend you to read the following preconditions, please read them.

Preconditions.
  • A computer Windows.
Features and the details of ADB Installer app.
  • Size only 9.18 MB.
  • Only 15 seconds installation period.
  • AIO - ADB, Fastboot and also Drivers.
  • The installation procedurs are easy -- simply run it then done.
  • Clean. ADB and Google Drivers from latest SDK.

Download ADB Installer setup file by an XDA member @Snoop05


Requirement.
  • Get the ADB installer app from the download links based on the versions of your choice.

Install ADB & Fastboot Drivers On Computer Easily.

Instructions.
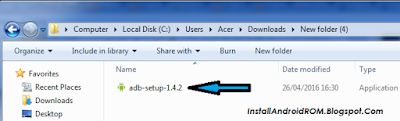
  1. Double-click on the ADB-Setup-1.4.2.exe you previously stored on your computer.
    ADB Setup Android
  2. A CMD or command prompt will then appear with blue color.
  3. Just Yes to all the section (Just type Y then enter, that means Yes).
    Install ADB & Fastboot Drivers On Computer
  4. After ADB & Fasboot and Drivers are entirely installed, the command box will close automatically. That means ADB & Fastboot is now running to your system now.
    How to Install ADB and Fastboot on Windows
  5. Finish.
Once you have done it then you can do several unofficial activities such as install TWRP on any Android devices.

Congratulations for your success installing the ADB & Fastboot on your Windows computer.

Monday, 26 December 2016

How To Install TWRP Recovery On Android Via Fastboot Mode

How to install TWRP recovery on Android Via Fastboot mode. Installing TWRP recovery on Android device is important thing that you should have done in order to perform tweaks that will help improving or optimizing your Android powered device.
Advertisements.

TWRP recovery is a non-stock recovery image that offers more technical abilities compared to the stock recovery, surely you have familiars with activities like rooting and custom ROMs. Yes with TWRP you can install SuperSU rooting package and custom ROMs like CynogenMod to your device.

TWRP recovery is one of the most used custom recoveries now days, not only it does exactly the same as the popular CWM recovery, it is more user friendly since it's offering touch screen ability so you don't need to use your device's physical buttons like Power or Volume like other custom recovery environments. With TWRP, all you need just tapping the menu using your fingers and done.

Are you convinced to install TWRP recovery on your Android device? Just follow the full instructions written on this post. You will be correctly guided.
Advertisements.

In this post you will be guided to install TWRP recovery on Android via Fastboot. The process is quite simple. Just keep reading guys.
How To Install TWRP On Android Via Fastboot Mode

But you need to firstly read the following points.
  • Your Android device's bootloader should already be unlocked.
  • You have a working Windows computer.
  • Have installed original USB drivers and a USB cable.
  • You have set Fasboot and ADB to your computer.
  • Make sure you have enabled your Android debugging mode.
Since you have read all the points. You are now recommended to grab the following TWRP recovery image file. Please.

How to install TWRP recovery on Android via Fastboot

  1. You need to install adb and fasboot to your computer.
  2. When done. Put the TWRP img file you downloaded previously to the Adb & Fasboot folder on your PC.
  3. Then launch the command prompt inside the ADB & Fasboot folder, by pressing Shift + Right click on anywhere within the folder, then choose Open Command Window here.
    How To Install TWRP Recovery On Android Via Fastboot Mode
  4. You can connect your Android device to your PC. And then type the command below.
    adb reboot bootloader
    adb reboot bootloader.png
  5. If you are asked for permission just choose OK to Allow USB debugging.
  6. When your Android device is in bootloader mode, just type the command below to install TWRP.img file.
    fastboot flash recovery twrp-2.8.x.x-xxx.img
  7. Change the twrp.img with the name of your TWRP recovery.img, or simply use the twrp.img name.
  8. After the TWRP is fully installed to your Android device, you can reboot it then, just use this command guys.
    fastboot reboot
    Fastboot Reboot
Great! You just finish installing the TWRP recovery on Android via Fastboot mode. Congratulations because you can now carry out a host of major hacks and tweaks, from creating a full backups to flashing awesome custom ROMs.

Monday, 28 November 2016

Enable Partial Screenshot On CM14.1 ROM

Today I would like to share tutorials to enable Partial Screenshot on CM14.1 ROM. As we know that  recently we are given with great news from CyanogenMod team about the upcoming of finished nightly build of CM for many devices.

The news say that devices such as Nexus 5X, Nexus 6P, OnePlus One, OnePlus 2 and 3 are among others supported device. Therefore prepare yourself for the coming of CM14.1 final build with all the tremendous features along to your device.
Advertisements.

However there is something that is apparently left behind from this build, the one we like too much, which is the Partial Screenshot feature. The CM14.1 doesn't make this feature enable by default. We need to enable it first to use it.
Enable Partial Screenshot On CM14.1 ROM

Those who don't know, Partial Screenshot feature allows us to take screenshoot only on the selected area of your screen. Thus you don't need to take the whole screen while taking a screenshot, only the parts you after. This feature is already there on Samsung Galaxy devices for long time. Somehow Google has not placed it on the Android stock yet.

Therefore on this post, I will share to you the trick to enable the Partial Screenshot on your device, the requirement you need to have to apply the trick is; your device's powered with CM14.1 ROM, or else install it first guys!

Useful tutorials here.
Preconditions.
  • Apply the guides written on this post only if your device using CM14.1.
  • Be sure you make backups first.
  • Your device should have CWM or TWRP recovery. Learn to install TWRP on any Android device.
  • Charge your device's battery power if it's considered has less power.
  • Enable USB debugging mode of your Android OS powered device.
  • Follow the guides and don't skip any steps, oke, guys?
  • Good luck guys.

Download Mod Partial Screenshot file.

How to enable Partial Screenshot on CM14.1 ROM

Note. Perform the instructions written on the post at your own risk. Make sure you have made backups.
Advertisements.


  1. If your device is on, then power it off and boot it into the recovery mode.
  2. On the CWM or TWRP recovery mode, head to Install, then choose the file you previously downloaded from the download link above.
  3. Now install it, by swiping to confirm the installation / flash, and the flashing processes will start.
  4. You need to reboot your device now once the file is installed.
  5. Finish.
Well done my friend because you have successfully enabled Partial Screenshot feature on CM14.1 ROM. If you have any questions on your mind. Then don't be shy to reveal them on the provided comment area below. Tell all your friends about this post. Will you guys?

Sunday, 6 November 2016

How To Install Google Pixel Camera On Any Android Phone

How To Install Google Pixel Camera On Any Android Phone
How to install Google Pixel Camera on any Android phone. Recently this year Google released Google Pixel that comes with remarkable software to offer. Many of us were amazed when seeing what the latest Google phone comes up with. One of the goodies that we expect to have is Google Pixel Camera app.
Advertisements.

And so far only Nexus 6P and Nexus 5X that can enjoy the Google Pixel camera without hustle by simply flashing the zip file. That of course seems to be unfair for the rest of us who expect the same. But fortunately we can now install the Google Pixel Camera on our Android

The app was successfully re-patched by an Android developer, so the result the app is just now a normal apk file that can be installed on our device. And according reports I read that the apk file supports many and variants of Android device. But of course there is one requirement you can not avoid is that your device should already powered with Android 7.0 or newer version to run this Google Pixel Camera app wrapped with apk extension.

Requirement.
  • Your device must use Android 7.0 Nougat or higher version.
Advertisements.

How to install Google Pixel Camera on any Android Phone

  1. Firstly you need to download the Google Camera APK file from here. And then transfer the apk file to your device's SD card.
  2. Once you have done it, then you need to enable the Unknown Sources option through Settings -> Security. Enable the option by check the box beside the Unknown Sources option. (This action is needed to be able to install Google Pixel Camera APK file in your device.
    Unknown Sources Android
  3. Now open the file manager app on your device then find the Google Pixel Camera APK file within your Android device.
  4. To install the APK simply tap on it. Then Next and then tap on Install.
  5. The installation processes will begin, wait till it's fully complete, then open the Google Camera app.
Well done because you have successfully installed Google Pixel Camera on your Android.

Wednesday, 7 September 2016

How To Install ViPER4Android On Android 7.0 Nougat Device

Install ViPER4Android on Android 7.0 Nougat device. He is guitardedhero, a recognized contributor user over at XDA forum has made the ViPER4Android available on Android 7.0 Nougat. As we know that there is some technical issue to run the sound MODs on the several Android versions starting from Android 5.0 Lollipop. That is because of the policy changing on SELinux that caused VIPER4Android broke quite awful.

However some smart people came out with solution to make ViPER4Android running on Android Lollipop by setting SELinux in enforcing mode to keep the device secured. The same trick proven to work on the newer Android version, Marshmallow (Android 6.0).
Advertisements.

How about in the Android 7.0 Nougat era? Can we still use the trick? Well the guitardedhero from XDA jump into the wagon offering a lot easier solution to bring ViPER4Android FX to our Nougat powered device with Selinux Policy set to enforcing.

Those who haven't heard or used ViPER4Android FXis the sound MODs to optimize your music experience, using it you will enjoy great and enriched audio sound without the need to buy any sound hardware.

And on this post I would like to guide you to the entire process to install ViPER4Android on your Android 7.0 Nougat device.
How to Install Viper4Android on Nougat 7.0

Features.
  • 5.x uses ViPER4Android 2.4.0.1 with its driver preinstalled
  • 4.x uses ViPER4Android 2.3.4.0 with its Super Quality driver preinstalled
  • Dark Material theme
  • Works in Permissive and Enforcing Selinux
  • Works with no root as long as a Permissive kernel is installed
  • Installed in /system/priv-app
  • Advanced Linux Sound Architecture
  • Sony™ and Beats™ libraries and effects (No apk's or settings to look for!)
  • Library & Effect entries in /system/ect/audio_effects.conf, /system/vendor/etc/audio_effects.conf, /vendor/etc/audio_effects.conf, and /system/etc/htc_audio_effects.conf
  • Five custom audio_effects.conf files for the Sony™ Beats™ Editions
  • Deep Buffer removal from /system/etc/audio_policy.conf
  • Backup script to survive ROM updates
Advertisements.

Requirements.
  • Root access. (How to root Android 7.0 Nougat).
  • TWRP recovery installed.
  • Enable Unknown Sources option from your device.
A file you need to follow the instructions.

You will need the recovery flashable ViPER4Android 2.5.0.5 zip file made by guitardedhero from the following link.


How to Install ViPER4Android on Nougat

  1. Now boot into the TWRP recovery mode in order to flash the ViPER4Android_2.5.0.5_guitardedhero.zip file to your smartphone or tablet
  2. Now you need to reboot your device.
  3. You now need to install a root file explorer app -- ES File Explorer is recommended. (Inside the root explorer app, swipe-in from left then turn Root explorer on. And be sure you grant root access when prompted.
  4. Inside the root explorer app in your device, head to this path; /vendor/etc/ directory then find this file; audio_effects.conf and then rename it into this name; audio_effects.conf.bak.
  5. You can now launch ViPER4Android FX app from your device (The app was installed once you flashed the file from step 2 above).
  6. Choose Yes to install V4A driver.
  7. The installation process for V4A driver can take sometime, therefore be patient, during the process your screen will act as if it's stuck, don't get upset, it's normal, that means it will complete in minutes.
    Tips. If you receive message error about app gets stuck / stopped. Just choose the wait option. Never choose force close it. Okey. Guys?
  8. After the Driver installed, you will get message appear on your screen.
  9. Now just reboot your beloved device.
Well done my friends you have the ViPER4Android running on your Android 7.0 Nougat device.

Via guitardedhero from XDA developer.

Tuesday, 6 September 2016

How To Enable Tethering On Android 7.0

How To Enable Tethering On Android 7.0

How to enable tethering on Android 7.0 Nougat. You have updated to Android 7.0 Nougat software, but now you are facing the unexpected situation of which your device's tethering feature stop working. That is the situation faced by some users that already updated to Android Nougat.

But do not worry too much because you can fix it and make the tethering back to work. Firstly we need to thank tabormeister from XDA who provides to us a short and quick fix for you.
Advertisements.

However there is some unavoidable requirements in order to enable Tethering on Nougat, you need to firstly root your device and have TWRP recovery installed.

But you can unroot your device once the tethering enabled by simply using OTA updates and utilize Android Pay.

If you are interested then you may proceed to the instructions. I must remind you again that this post requires you to have root access.

How to enable Tethering on Android 7.0 Nougat

  1. You need to root your Android 7.0 Nougat powered device.
  2. You need to edit your build.prop file by adding this line net.tethering.noprovisioning=true line on the bottom of the build.prop file. Don't know how to edit that file? Just head to how to edit build.prop file.
  3. Once you have finished editing build.prop file, reboot your device, now!
  4. Now download and then install an app called Terminal emulator app via Google Play Store.
  5. Now launch the Terminal emulator app from your device, then type the following command one by one;
    su
    settings put global tether_dun_required 0
    exit
    └ You will be asked to grant root access by the app, just grant it, okey?
  6. Restart your device.
  7. Finish.
Advertisements.

Well done as you have enabled Tethering on Android 7.0 Nougat now. If you for some reasons want to unroot your device. You can simply follow the short trips below. Please

Instructions to unroot.

  1. On your device, launch SuperSU app.
  2. Go to Settings.
  3. Inside Settings, find the option called Full Unroot.
  4. Now you can click the option.
  5. Done and now your device is unrooted.
I hope you find this post useful for you.

How To Fix Bluetooth Battery Drain On Android Nougat

Android 7.0 Nougat is a great and very sophisticated Android operating system, however that doesn't mean the OS is a bug-free software. Because recently a stream of reports (Complaints precisely) screamed by users on the XDA forum and some other places regarding the Bluetooth battery drain issue on Android Nougat (7.0).
Advertisements.

The condition makes device lose battery power so fast to which users find it so disturbing. So it's not surprising that some of them want to downgrade their OS back to Marshmallow.

So far there is no official fix released by Google, but I believe the company is aware about the situation. But fortunately an XDA member namely spencersir2 comes up with explanation and solution.

He explained about the Bluetooth battery drain issue is not caused by the Bluetooth antenna issue itself, but the culprit is because the Nougat's doze mode doesn't optimize the Bluetooth connection correctly. As the result making the battery to drain so quick during streaming or sharing contents using Bluetooth feature.

And spenecirsir2 also share his tricks to deal with Bluetooth battery drain bug on Nougat for all to use to fix the issue. You are invited to use his tricks as the current and temporarily solutions before Google release the update in the future.
How To Fix Bluetooth Battery Drain On Android Nougat

How to fix Nougat Bluetooth battery drain bug

  1. Turn on your device then head to Settings -> Battery.
  2. Now tap on the 3-dot menu that's on top-right corner from screen then choose Battery optimization.
  3. Now tap on drop down menu to further choosing All Apps.
  4. Now search and then choose Bluetooth share -> select Don’t optimize -> Done.
  5. Again deactivate all optimization for other apps you use with Bluetooth such as music streaming apps, etc.
  6. Done.
Advertisements.

You did it guys, you have managed to fix Android Nougat bluetooth draining issue on your beloved device, congratulations.

Via spenecirsir2 XDA.

Tuesday, 30 August 2016

How To Install TWRP Recovery On Samsung Galaxy Note 7

Samsung Galaxy Note 7 is here, any of you have already owned it. Since its release, any good things come afterward like we are able to root it, and so on. Now on this post I would like to share to you another good news which is ow to flash TWRP recovery on Samsung Galaxy Note 7 device.

TWRP recovery is one of the top and most used recoveries these days, it's not just bringing very handy and great abilities, it also comes with very user friendly and neat interface to which so easy for us to navigate and use this non-stock recovery.
Advertisements.

Once TWRP recovery installed on our Galaxy Note 7, we can perform several things that are impossible to be done on a stock-recovery image such as rooting, flashing mod, tweaks, make Nandroid backups, and any other non-official activities.

Now the TWRP 3.0.2 custom recovery is available and designed to support the latest Samsung Galaxy Note flagship. If you intend to tweak your device to perform greater that it already does now. You should install TWRP recovery.

If you are interested, you are welcomed to continue reading this post, let's do it.

How To Install TWRP Recovery On Samsung Galaxy Note 7
Preconditions.
  • A computer based on Windows operating system.
  • Has USB drivers for Samsung Galaxy Note 7.
  • Has a USB cable.
  • Your device's bootloader should already be unlocked.
  • Enable USB debugging mode.
  • Follow the guides to install TWRP recovery on Samsung Galaxy Note 7 without skipping any steps.
  • Your device's warranty will likely be nullified for installing this kind of custom recovery.
TWRP version 3.0.2 custom recovery image.
Odin tool.

How to install TWRP recovery on Samsung Galaxy Note 7

  1. Now power off your device to boot into the Download mode. (Learn how to boot into Download mode on Samsung Galaxy Note 7).
  2. If your device is already in the Download Mode, then go to your PC to launch Odin.
    Odin3 v3.07
  3. Connect your device to computer once Odin is launched using a USB cable.
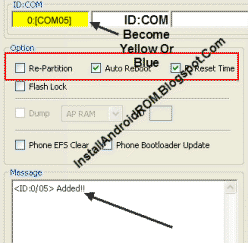
  4. Your device will be identified by Odin, and you will see the Added!!!, like in the following picture.
    Successfully Connected Phone To PC From Odin
  5. Click the PDA or PA, on Odin to further find the TWRP recovery file you downloaded to PC -- the file extension should be .tar.md5.
    PDA On Odin
  6. Click the Start button on Odin interface to start flashing the recovery .tar.md5 file.
    Start Odin To Flash Tool
  7. After the file was successfully flashed then you will see Pass notification.
  8. Finish.
Advertisements.

Well you did it guys, now your Samsung Galaxy Note 7 is powered with one of the best custom recoveries which is TWRP custom recovery, you be happy.

Source install TWRP recovery on Samsung Galaxy with Odin.

Sunday, 28 August 2016

How To Disable Auto Correction On Android Nougat

Here you will be guided to disable Auto Correction feature on Android Nougat. The steps are simple and easy to follow for those wish to turn off Auto Correction on Google Android Nougat.

Auto Correction feature that's planted on every Android OS version can be troublesome for some, especially myself. Since we don't need to be suggested and forced to use which are the right spellings for the words we are typing.
Advertisements.

Beside my chatting friends understand already what the meaning of the misspelled words from me, therefore why should I correct them first?

Let alone when I type messages (SMS, BBM, WhatsApp, Line, Viber, etc) in a language different from my phone's default language. On that situation the existence of auto correct telling me the suppose to be correct words can be very annoying.

On the latest Android Nougat, we are also handed with the Auto Correct feature that's supposed to be a guide when typing. But on this version we are given with two keyboard types, one is Virtual Keyboard and the other is Physical keyboard type.

On the Virtual keyboard type we can find all the available keyboard apps including Google keyboard, while the Physical keyboard type is for those using hardware keyboard to be connected either wiredly or wirelessly to our Android device.

As to disable auto correction on Android Nougat we must go to virtual keyboard settings then choose the keyboard app we are using.
How To Disable Auto Correction On Android Nougat Google
So the exact steps to turn off auto correction on Google Android Nougat as follow.

How to turn off auto correction on Android Nougat


  1. On your device go to Settings.
  2. Then choose Languages & Input -> Choose Virtual keyboard.
    How to turn off auto correct on Google Android Keyboard
  3. Now select the keyboard app you are using. For example is Google Keyboard.
    How to turn off auto correct on Google Nougat
  4. Choose Text correction.
    How to turn off auto correction on Google Android Keyboard
  5. Then find the Auto-Correction toggle and then turn if off.
    How to turn off auto correction on Android Nougat
    On this page, you will also find other options regarding this issue, toggle on/off any options there based on your need.

How to turn off auto correction on Google Indic Keyboard


If you use Google Indic keyboard, and wish to turn the auto correction feature off, do as follow.

  1. Go to Settings -> Languages & input -> Virtual keyboard.
  2. Now choose Google Indic Keyboard on the list.
  3. Choose Input -> turn Off Auto spell correction toggle on these sections; English input and Indic languages input.
Advertisements.

Done. You have succesffuly turned off auto correct feature on Google Android Nougat. Now nothing will disturb your typing experiences.