sMobile ? "width=device-width,initial-scale=1.0,minimum-scale=1.0,maximum-scale=1.0" : "width=1100"' name='viewport'/> android xda: Google Pixel Tutorials
Showing posts with label Google Pixel Tutorials. Show all posts

Sunday, 25 December 2016

How To Unlock Bootloader Of Google Pixel / Pixel XL

Perhaps this news is a bit late, but it's better than not sharing it, you will be guided to unlock bootloader of Google Pixel and Pixel XL. These two phones are considered new, released this year as phones by Google and have everything you can expect from Google to always pour their best abilities to provide as the best and the best Android powered device. Just like we expect the phones indeed meet all our expectations.

If you one of the lucky guys who have bought either Google Pixel or Pixel XL, then you probably want to increase your device's performance to higher stage, like rooting it or installing tweaks that you need most. But before you think about doing those unofficial development. Then you need to firstly unlock bootloader your Google Pixel and Pixel XL.
Advertisements.

And you are in luck because you will be guided completely to unlock the bootloader of your Google Pixel and Pixel XL from this post. And be ready for that. But beforehand then I would like you to firstly read the preconditions because they are important.
How To Unlock Bootloader Of Google Pixel / Pixel XL

Preconditions.
  • The tutorials on this post only work on the Google Pixel or Pixel XL you bought from Google's official website not from third party networks seller such as Verizon. I again I remind you that do not apply this post if your device was bought from Verizon, or any such networks.
  • Enable your device's USB debugging mode first by heading to Settings -> About Phone -> Tap for 7 times on build number. Then back to Settings, there you will find the Developer Options. Open that option and find the USB Debugging and enable that option. (Or learn it from how to enable USB debugging mode on Android).
  • A Windows computer and a USB cable.
  • Then install ADB drivers and ADB tool on your PC.
  • Charge your device's battery power if it's less power.
  • Backup all data you regard important.
  • Good luck guys to follow the unlocking instructions from this post.

How to unlock bootloader of Google Pixel and Pixel XL

Perform the guides to unlock your Google Pixel / Pixel XL bootloader below at your own risks.
Advertisements.

  1. Now connect your Google Pixel or Pixel XL to your computer (Make sure you have enabled USB debugging of your Google Pixel / Pixel XL).
  2. Then download minimal ADB then open that tool.
    How to unlock bootloader of Google Pixel and Pixel XL
  3. Make a check first guys, to see whether everything works, by typing the adb device command.
    Unlock bootloader of Google Pixel and Pixel XL
  4. If there is a popup showing up on your device's screen then click OK, Just like on the above picture guys.
    Allow USB Debugging
  5. Now to unlock your bootloader of your Google Pixel and Google Pixel XL, just type this command; fastboot oem unlock. A warning message will show up. Just hit Yes.
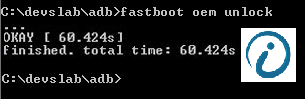
    How to unlock bootloader of Google Pixel and Pixel XL
  6. The action will lead your device to the factory reset. Just wait guys. Once done your Google Pixel / Pixel XL's bootloader is unlocked now. And the procedures are quite simple. Right. Therefore you should be happy.
  7. Reboot your device now by using and typing this command; fastboot reboot.
Now you do the following activities.
Congratulations because you have successfully unlocked bootloader of your Google Pixel and Google Pixel XL. And if you have any questions regarding the Google Pixel and Pixel XL bootloader unlocking tutorials above. Then do not be a shy person to reveal them on the provided comment area. And I hope you find this post useful. And see you again on my next posts.

Saturday, 17 December 2016

How To Install TWRP Recovery On Google Pixel

How to install TWRP Recovery on Google Pixel. Now I would like to invite you to follow the guides to install TWRP on Google Pixel device. As we know that all the benefits your device will get once it's powered with a custom recovery such as TWRP.

TWRP is offering the more and bigger abilities that the stock recovery is unable, you can perform the whole backups to your device, you can root your device by flashing the zip file of rooting package, you can also install all the great modified ROM such as CM, AOSP, AICP, crDroid and more.
Advertisements.

If you are interested then you can proceed to the tutorials to deliver the TWRP recovery on your Google Pixel device. Anyway the TWRP here is in 3.0.2 version. It's the newest one comes with several awesome things.

How To Install TWRP Recovery On Google Pixel
Preconditions.
  • Of course you will need to firstly make necessary backups over all the data you regard important.
  • Do not forget to enable your USB debugging mode. (How to enable USB debugging mode on Android).
  • Follow the online tuition from here only if your device is Google Pixel guys.
  • Be sure that your Google Pixel's bootloader is already unlocked to perform the guides from here. Learn the full instructions on how to unlock bootloader of Google Pixel and Pixel XL.
  • Prepare everything needed, what's that? Your computer and a USB cable.
  • Do not skip any steps just follow them all entirely.

How to install TWRP 3.0.2 recovery on Google Pixel

Perform the instructions from this post but all the possible risks are yours to bear.
Advertisements.

  1. Now you must download Android SDK from its official website's page and install it. Set it up with downloading platform-tools and also USB drivers package within SDK.
  2. Or. You can download Fastboot / ADB package based on your OS from the below links to your PC guys.
  3. Now you need to download twrp-pixel-installer-sailfish-3.0.2-0-RC1.zip to your device's root directory and then power off your Google Pixel XL.
  4. Now you need to use your USB cable to connect your device to PC.
  5. Download Twrp-pixel-installer-sailfish-3.0.2-0-RC1.zip to your PC and save the file in the same directory as the Fastboot/ADB package files you extracted on the step1.
  6. Now enter to the Fastboot / ADB mode pressing the Volume Up + Volume Down + Power till the screen showing the text. That means your on the Bootloader mode.
  7. Now head to the directory where you put Fastboot (i.e. Step 1) and then do the following; for Windows; Open Command Prompt (Shift + Right-click > Open Command Prompt). For Mac OS X also Linux, utilize the Terminal to head to the directory.
  8. Now type and execute the command below.
    fastboot boot twrp-3.0.2-0-RC1-fastboot-sailfish.img
  9. Now back to the TWRP main menu then you need to tap the Install button. And then choose the TWRP zip file.
    Install Button TWRP Recovery Android
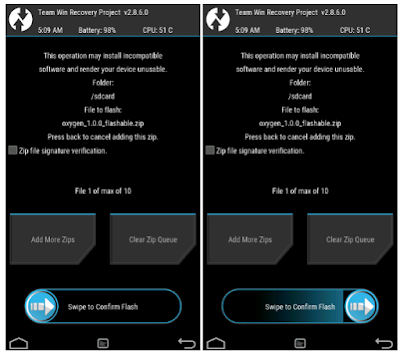
  10. Now confirm the installation by simply swiping the Swipe to Confirm Flash option. You will see the installation will begin.
    Swipe To Confirm
  11. Now you need to tap the Reboot System button.
    TWRP Reboot System
  12. Finish.
See also how to install TWRP on Google Pixel XL device.

Congratulation my friend because you have managed to install TWRP 3.0.2 recovery on Google Pixel device. You can now install modified / custom ROM, root your device and doing anything you desire to take your device to the next level. Again congratulation guys. Okey?

Friday, 16 December 2016

How To Install TWRP On Google Pixel XL

Here is the guide to install TWRP on Google Pixel XL. It is the TWRP recovery version 3.0.2 that you can flash on your beloved and shiny Google Pixel XL. Those who own the said device can come here and follow all the needed instructions to bring the TWRP 3.0.2 recovery on Google Pixel XL. And you will be thankful for doing so.

With TWRP recovery installed on your Google Pixel XL, then you can flash the custom ROMs, root your device, install Kernel and tweaks to lift up your device's performance to the level of your dream. And remember, doing so will effect of losing your device's warranty, that's the unavoidable consequence. Therefore perform at your own risk. Okey?
Advertisements.

But considering the benefits you will enjoy after having the TWRP recovery powering your Google Pixel XL, I guess losing the warranty will not be a big thing for you guys.

How To Install TWRP On Google Pixel XL
Preconditions.
  • I recommend you to firstly backup all your data.
  • Be sure that you firstly enable your USB debugging mode. (How to enable USB debugging mode on Android). Okey??
  • Remember to only apply the guides written here if your device is Google Pixel XL.
  • Make sure that your device's bootloader is already unlocked. Or you can learn on how to unlock bootloader of Google Pixel and Pixel XL.
  • I believe you will need a computer and a USB cable.
  • Follow all the instructions written on this post and do not skip anything.

How to install TWRP 3.0.2 recovery on Google Pixel XL

Perform the instructions from this post but all the possible risks are yours to bear.
Advertisements.

  1. Now you must download Android SDK from its official website's page and install it. Set it up with downloading platform-tools and also USB drivers package within SDK.
  2. Or. You can download Fastboot / ADB package based on your OS from the below links to your PC guys.
  3. Now you need to download twrp-pixel-installer-marlin-3.0.2-0-RC1.zip to your device's root directory and then power off your Google Pixel XL.
  4. Now you need to use your USB cable to connect your device to PC.
  5. Download TWRP (twrp-3.0.2-0-RC1-fastboot-marlin.img to your PC and save the file in the same directory as the Fastboot/ADB package files you extracted on the step1.
  6. Now enter to the Fastboot / ADB mode pressing the Volume Up + Volume Down + Power till the screen showing the text. That means your on the Bootloader mode.
  7. Now head to the directory where you put Fastboot (i.e. Step 1) and then do the following; for Windows; Open Command Prompt (Shift + Right-click > Open Command Prompt). For Mac OS X also Linux, utilize the Terminal to head to the directory.
  8. Now type and execute the command below.
    fast boot twrp-3.0.2-0-RC1-fastboot-marlin.img
  9. Now back to the TWRP main menu then you need to tap the Install button. And then choose the TWRP zip file.
    Install Button TWRP Recovery Android
  10. Now confirm the installation by simply swiping the Swipe to Confirm Flash option. You will see the installation will begin.
    Swipe To Confirm
  11. Now you need to tap the Reboot System button.
    TWRP Reboot System
  12. Finish.
Do not forget to also learn about how to install TWRP on Google Pixel device.

Well done my friend because you have successfully flashed the TWRP 3.0.2 recovery on Google Pixel XL and enjoy guys.

Sunday, 6 November 2016

How To Root Google Pixel & Pixel XL

Here is the full instructions on how to root Google Pixel and Pixel XL phone as the Google's latest flagships. We will use the famous SuperSu rooting tool. Chainfire as the only developer of the app has made great updates to its app in order to support rooting either Google Pixel and Pixel XL.
Advertisements.

All you need is simply flashing the SuperSU 2.78 SR2 via fastboot commands to further root your device. This new SuperSU comes with systemless root. That means you can perform some modifications through boot image only instead via system partition.
How To Root Google Pixel And Pixel XL
With that any users who rooted their Google Pixel and Pixel XL get superuser access without the need to change anything in system partition and able to toggle dm-verity. So in case you encounter any bootloop, you can fix that by installing the stock 'boot.img' via factory image on your device.

Preparations.
  • Be sure that your Google Pixel or Pixel XL is already in bootloader unlocked condition. In case your device is Verizon network then you can unlock it using dePixel8tool. Or if you bought it from Google's official website then please head to how to unlock bootloader of Google Pixel and Pixel XL.
  • Now download the boot-to-root SuperSU image file then extract the file to get the get boot-to-root.img.
  • Now head to Settings> About phone> Build number, then tap it for 7 times in order to enable the Developer Option. Then go back to Settings -> Developer Options to enable USB debugging mode and OEM unlocking.
    Allow OEM Unlocking
  • Then download and install Minimal ADB and Fastboot driver on your PC.
  • Don't forget to backup all the data you regard important.
  • Charge your battery power if it's considered less.
Advertisements.

How to root Google Pixel and Pixel XL

  1. Now power off your Google Pixel or Pixel X to boot into the Bootloader Mode. Do so by pressing and holding the Volume Down + Power buttons for about 3 seconds.
  2. Now connect your device to PC with a USB cable.
  3. Now on your PC. head to the ADB and fastboot directory. Since you already installed the Minimal ADB Fastboot setup, head to the directory you installed it, then go to the folder.
  4. Now copy and paste the boot-to-root.img file to this folder.
    How To Root Google Pixel And Pixel XL Tutorials
  5. Open command window now / cmd and then type and execute this command; fastboot flashing unlock.
    Root Google Pixel and Pixel XL
  6. Follow all the on-screen instruction on your Google Pixel and Pixel XL.
  7. Now execute this command; fastboot oem unlock.
    Root Google Pixel and Pixel XL
  8. Your phone is now unlocked, reboot your device to the Bootloader mode for one more time then execute this command on the CMD; fastboot boot boot-to-root.img.
    Root Google Pixel and Pixel XL
  9. The above action will install the boot-to-root image file on your Google Pixel or Pixel XL. The flashing processes will take several minutes. And during that your device will perform 2 times of rebooting. Therefore just wait.
  10. After your device is on again, then it has now be rooted, your device has full root access now.
How to install Google Pixel Camera app on any Android device.

Well done because you have successfully rooted your Google Pixel and Pixel XL with SuperSU systemless then you use root checker to verify it.