sMobile ? "width=device-width,initial-scale=1.0,minimum-scale=1.0,maximum-scale=1.0" : "width=1100"' name='viewport'/> android xda: How To Android
Showing posts with label How To Android. Show all posts

Friday, 18 November 2016

Debloat CM13, CM14.1 Of CM Apps With This Flashable Zip File

When we are thinking of having the non-stock ROM installed, we expect something different from it. One of which is the ROM should not come with futile apps - debloat apps -- that of course the reasons we root our device to get to the core system to claim the abilities of getting rid off these kind useless of apps.

And unexpectedly the famous CyanogenMod itself has it own apps that for some users they shouldn't be there. Because instead of being useful, they make things harder. For example the AudioFX that is reported to reduce the speaker volume into very low level.
Advertisements.

Fortunately a developer namely pogui from XDA has came out with a workaround to deal with the debloating apps on CM ROM, you can utilize his simple recovery flashable zip that will automatically get rid off the CM apps. Do you want to know what they are. Read the following.
  • AudioFX (Effecting to device's speaker to low).
  • CMFileManager.
  • DownloadProviderUi (Only an app that display download folder).
  • Eleven.
  • Gello.
  • Stk.
Debloat CM13, CM14.1 Of CM Apps With This Flashable Zip File
If you are here in finding on how to get rid off those apps, then you can flash the following script that is different version of CM. Wuth it you can debloat the CM13 and CM14 and the following are the download links of the script.

Download CM Debloat Script

How to flash Systemless root on Android with PHH SuperUser.

To install the script above simply flash the zip file like flashing any other zip file via custom recovery mode.
Advertisements.

Saturday, 8 October 2016

How To Install Android SDK On PC

Android SDK (Software Development Kit) is kind of Android simulator that you can install on the Windows OS based computer, so you can flash the APK apps to your Android SDK, without the need to have a Android smartphone or tablet. Just use a Windows than you can run the apps.
Advertisements.

Tools you need to install Android SDK.

How to install Android SDK on PC.


The process is quite easy and it takes only patient and focus on following the flashing steps
  1. Install the Java to your PC.
  2. Extract the Android SDK on your PC.
  3. Now find the SDK Manager on the extracted Android SDK folder.
  4. Now run the SDK Manager, find the Android version such as Android 4.0.3 (API 15) or newer (Remember the newer means take your memory more). 
  5. Check the SDK Platform, Sample SDK, ARM EABI, Google APIs, or you can check all the options.
    How To Install Android SDK On PC
  6. Still on the SDK Manager. Find the Tools -> Manager AVDs -> New. Then create AVD name, Device. I suggest you to setting just like settings on the following picture.
    How To Install Android SDK On PC
  7. Now you can click OK then run the Android SDK by pressing Star –> Launch --> Wait till the Android opens. It takes sometime, my advice is you to have 2G free space.
  8. Once the Android is running, don't close the Android SDK, instead just click Minimize and do not click Close because it is to install the APK.
  9. Re-open the extracted Android SDK folder and then extract ADB -> SDK -> Tools, you will find 3 files inside ADB. You need to extract these three files for ADB or download from here.
  10. Now copy and paste the APK to the Tools folder you extracted before.
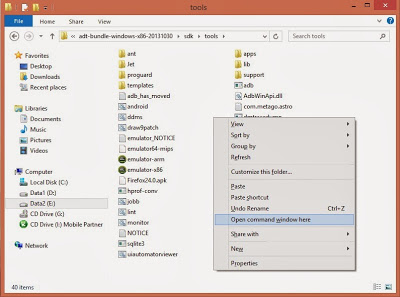
  11. Still inside the Tools folder, point your cursor to the empty space then press Shit and right click to Open Command Window Here.
    How To Install Android SDK On PC
  12. After it's opened then type your APK name, for example KakaoTalk3.9.9.apk or such and then hit Enter to begin installations.
    How To Install Android SDK On PC
  13. Wait. Once done the APK will automatically be installed on Android SDK (Remember during the process don't close the Android SDK).
    How To Install Android SDK On PC
  14. In case the installations failed, then open Task Manager then search for the ADB and close it by selecting End Task. 
  15. Done and now you can as many Android apk files on your Android SDK.
Advertisements.

That's it and congratulations because you have now master the instructions to install Android SDK on your PC.

Thursday, 6 October 2016

How To Install Magisk Universal Systemless Interface On Android

Learn how to install Magisk Universel Systemless on Android with TWRP. As we all know each time the new Android version released it's not only bringing new features, improvements, bug-fixes but it also more secure than before.

The situation is of course forcing the third-party developers to work harder to find the possible loop to get root access and modifying the system files.
Advertisements.

And Chainfire had made its way to bring systemless root along with SuperSU last year and it offered users to root their Android device without the need to modify the system partition, as to which can still receives the official and automatic OTA updates on their rooted Android devices.
How To Install Magisk Universal Systemless Interface On Android

Now we have handed with the new systemless interface that was built on systemless from Chainfire, namely Magisk that is developed and released by topjohnwu from XDA. The Magisk can be used not only to make custom Mod but also to create custom ROMs.

With Magisk you can either create custom MODs and ROMs without modifyin your device's system files. And now I am providing you the instructions in order to walk you through the entire process to flash Magisk Universal Systemless Interface using TWRP recovery image.

Requirements.

A TWRP recovery image. Learn to install TWRP on any Android device.

How to Install Magisk using TWRP Recovery

  1. Download the Magisk zip v7. file to your device's storage (Suggestion; use your computer to download the zip file then transfer it to your device).
  2. Now enter to the TWRP recovery mode.
  3. Once you are on the TWRP recover mode. 
  4. You need to tap Install button then find the Magisk zip file you previously store your device's storage.
    Install Button TWRP Recovery Android
    Choose Zip File TWRP Recovery
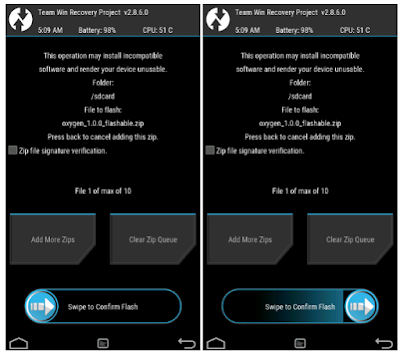
  5. Once you found it, then select the Magisk zip file, then confirm the installation by swiping the Swipe to Confirm Flash button located on the lower of your screen.
    Swipe To Confirm
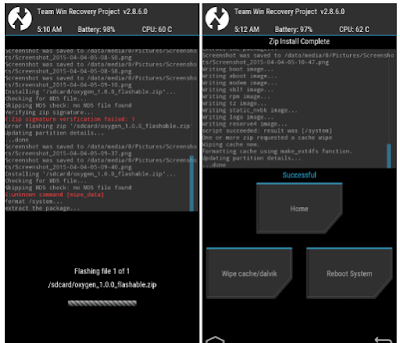
  6. The flashing process will begin.
  7. Once they are finish, just reboot your beloved device, using Reboot System now guys.
    TWRP Finished Install
Advertisements.

Done and congratulations because you have finished following the entire procedures to install Magisk Universal Systemless Inteface on Android using TWRP recovery.
""
How to install Systemless root on Android of yours.

Via XDA forum by topjohnwu.

Monday, 19 September 2016

How To Enable Root Access On CM14 ROM

You can follow the instructions to enable root access on CyanogenMod 14 / CM14 ROM on your Android powered device. And those who haven't been notified yet that CM14 ROM is simply a pre-rooted ROM, that means the modified ROM is presented with root manager.

However the root manager itself it deactivated by default on the settings area. We need to enable it first through manual way to enjoy root access offered by CyanogenMod 14 ROM.
Advertisements.

And fortunately the procedures needed to enable root access on CM14 ROM is not a hard task. Because the ROM's developer has made it easy to things to do. You are given with choices to allow what apps should be given root access. The process is simply like giving root Apps only or ADB only, or both of them.

CyanogenMod is one of the most used non-official Android software today. The CM14 itself is based on Android 7.0 Nougat. And it's not going to give you any bloatware and other stuffs you rarely need. And as one of the few ROMs that offering almost 100% similar to the stock firmware.

Of course CM14 is offering more than the stock ROM, the developers behind the CM team have planted number of handy tweaks and features to make it more user friendly.
How To Enable Root Access On CM14 ROM
Requirements.
  • Your device has already have CyanogenMod 14 ROM running.
  • Backup everything you regard important.
  • Charge your device's battery power.

How to enable root access on CM14 / CyanogenMod 14 ROM

  1. Now enable developer option and USB debugging on your Android powered device.
  2. Then launch Developer Options now.
  3. Search for the Root Access option, then choose the option you need whether you want seti it Apps only or ADB only or both of them which is Apps and ADB.
    How To Enable Root Access On CyanogenMod 14 ROM
  4. Reboot your device.
  5. Done.
Advertisements.

Easy and simply, right? Your CM14 ROM powered device has root access now. Just enjoy it.