sMobile ? "width=device-width,initial-scale=1.0,minimum-scale=1.0,maximum-scale=1.0" : "width=1100"' name='viewport'/> android xda: Motorola Tutorials
Showing posts with label Motorola Tutorials. Show all posts

Tuesday, 29 November 2016

How To Install MIUI 8 On Moto G 2015

How to install MIUI 8 ROM on Moto G 2015. Moto G 2015 is a decent phone, albeit it's not a high-end one, that could be the reason the manufacture and the OEM don't put their attentions to much on it. However since it's an Android powered phone. We have outsiders called third-party developers that in many times be helpers to delivers goodies to the forgotten phone.
Advertisements.

As for this case, you as the owner of Moto G 2015 are awarded with the MIUI 8 ROM, it's the Xiaomi owned firmware to serve the Xiaomi's devices. But in the hand of the very creative people the firmware was juggled to support the Moto G 2015 phone. And the one who actualize this amazingness is jhenrique09 at XDA. Now we are handed with the MIUI 8 ROM's port.

On this post I am offering you to taste the flavors offered by the MIUI 8 ROM on your Moto G 2015. See how well it runs, how stable it performs, how smooth it delivers. So you will get the new experiences of having the ROM that are not for you.
How To Install MIUI 8 On Moto G 2015
Preconditions.
  • Only perform the MIUI 8 flashing instructions if your device is Moto G 2015.
  • Now backup your device's data before proceeding.
  • Your Moto G 2015 should already has CWM or TWRP recovery. On this post, I use TWRP recovery. Learn to install TWRP on any Android device.
  • Make sure you have already enabled your USB debugging mode. Learn to enable USB debugging mode on Android device.
  • Be sure that your computer and a USB cable are ready to use.
  • Follow the instructions on this post without you skipping any steps.
Download MIUI 8.

How to install MIUI 8 ROM on Moto G 2015

Perform the instructions written on this. However about all the risks which may happen during or after the flashing processes are yours to bear. Don't blame anyone.
Advertisements.


  1. Now transfer the MIUI 8 ROM file from computer to your device's SD Card.
  2. Once done, boot your device into the TWRP recovery mode, do it guys.
  3. When you are inside the TWRP recovery mode, do the following action; full data wipe by selecting the Wipe button -> Swipe to Factory Reset button.
    Wipe Data TWRP Recovery Android
    Wipe TWRP Recovery
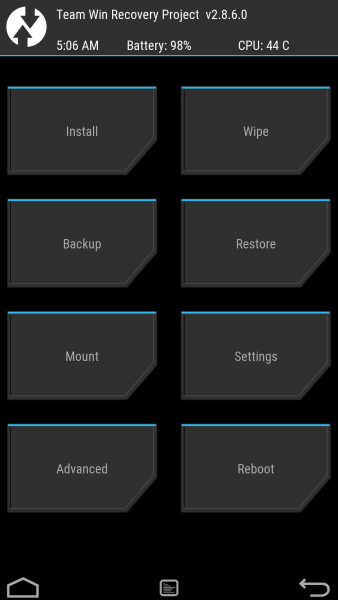
  4. Back to the TWRP main menu, then select the Install button. Continue your step with search for the ROM zip file that you transferred earlier to your device's SD card on first step above.
    Install Button TWRP Recovery Android
    Choose Zip File TWRP Recovery
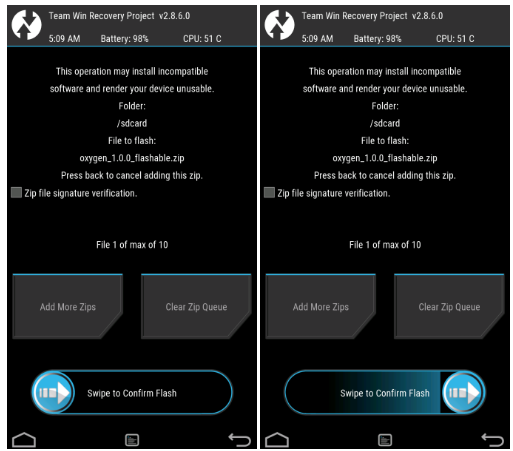
  5. You need to confirm installations swiping the Swipe to Confirm Flash button. The flashing process will start.
    Swipe To Confirm
  6. After the installation is complete, then install the Gapps if you have, okey?
    TWRP Finished Install
  7. Once finished, just tap Wipe cache/dalvik button only if you face the bootloop or errors.
  8. You need to tap the Reboot System button.
    TWRP Reboot System
  9. Finish.
Well done your Moto G 2015 is now powered with MIUI 8 ROM.

Friday, 4 November 2016

Update Moto Droid Turbo To Android 7.0 With crDroid Android ROM

How to update Moto Droid Turbo to Android 7.0 with crDroid Android ROM. The crDroid Android ROM has been updated recently bringing the Android 7.0 Nougat support to number of Moto flagships, and for that we should give our thanks to the bhb27, as the XDA senior member. And the post you are reading now will guide you to the full instructions on flashing Android 7.0 Nougat crDroid Android ROM on Moto Droid Turbo.
Advertisements.

And this ROM is proven stable and smooth enough to which some who have given the ROM a try have decided to set it to be their daily drivers. And of course you can try this ROM too for a few days, if you like it, don't uninstall it instead use it as your daily drivers too. And to know it, you need to firstly flash the ROM of course.

And crDroidAndroid is built based on AOSP and have all the CM14 features and mods already upgraded within it. And you are also invited to see the full list of features brought by this ROM. So you are in luck. You can learn more about this ROM by simply read the features list below and find out whether you like it or not.
Update Moto Droid Turbo To Android 7.0 With crDroidAndroid ROM
Features.
  • CyanogenMod 14.0 - all mods and features, Upgrade to 14.1 soon
  • StatusBar: Network Traffic
  • StatusBar: SU icon toggle
  • StatusBar: Ticker
  • StatusBar: Hide/Show icons
  • StatusBar: BatteryBar customization
  • StatusBar: Battery styles
  • StatusBar: Tap to Sleep
  • StatusBar: Clock styles
  • StatusBar: crDroid logo customization
  • QuickSettings: Tiles customization
  • QuickSettings: Brightness slider toggle
  • QuickSettings: Optional brightness icon
  • QuickSettings: Vibrate on Touch
  • QuickSettings: WiFi easy toggle
  • QuickSettings: Bluetooth easy toggle
  • QuickSettings: Data easy toggle
  • Navigation: Toggle navbar
  • Navigation: PIE navigation
  • Navigation: DUI - SmartBar / Fling Toggle
  • Navigation: Pulse - smart visualization
  • Notifications: Power notification controls
  • Notifications: Force expanded notifications
  • Notifications: Toggle immersive mode messages
  • LockScreen: Screen shortcuts
  • LockScreen: Toggle longpress for screen shortcuts
  • LockScreen: Swipe shortcuts
  • LockScreen: Toggle media cover art
  • LockScreen: Toggle clock
  • LockScreen: Toggle date
  • LockScreen: Toggle alarm
  • LockScreen: Tap to sleep
  • LockScreen: Toggle longpress torch
  • LockScreen: Cutomize number of notifications
  • LockScreen: Toggle power menu for secure lockscreen
  • Recents: Immersive Recents
  • Recents: Hidden apps
  • Recents: Toggle OmniSwitch as default Recents
  • Sound: Toggle screenshot sound.
  • Sound: Live customization for number of volume steps.
  • Sound: Less frequent notification sounds.
  • Sound: DND customizations.
  • Miscellaneous: Clock Widget.
  • Miscellaneous: Toggle suggestions on Settings dashboard.
  • Miscellaneous: Toggle summaries in Settings.
  • Miscellaneous: Toggle auto-start music player on headset detection.
  • Settings/Display: Expanded Desktop customization.
  • Settings/Sound: Increasing Ringtone.
  • 12 New Quick Settings Tiles including Caffeine mode, Expanded Desktop and Sync.
  • Settings/Security: Quick PIN/Password Unlock.
  • Default sounds from latest Nexus image.
  • Stability and performance improvements.
What works.
  • Everything that works on Android Marshmallow.
What' doesn't work.
  • CM14 is WIP. CM specific functions may not be completely functional. (CM Themes).
Preconditions and information.
  • The crDroid Android ROM must be flashed only if you own the Moto Droid Turbo.
  • Your Moto Droid Turbo should already be used either CWM or TWRP recovery, and I use TWRP recovery on this post.
  • Be sure you have a computer and a USB cable.
  • Remember that you must firstly enable USB debugging mode of your Moto Droid Turbo because it is important.
  • Charge your device's battery power if it's needed.
  • Follow the entire steps without skipping any steps or else you will fail.
  • Make a necessary backups before proceeding.
Advertisements.

How to update Moto Droid Turbo to Android 7.0 Nougat crDroid Android ROM

Your warranty will be voided. Perform the guides below and all the risks are yours to take.
  1. Download the Android 7.0 crDroidAndroid ROM and Gapps to your PC.
  2. Now you need to use your USB cable to connect your device to PC. Once they're connected then transfer all the zip files to your device's SD card.
  3. Now power off your Moto Droid Turbo then unplug it from USB cable.
  4. Now enter to the recovery mode.
  5. Inside the TWRP mode, perform the following action full data wipe by choosing the Wipe button -> Swipe to Factory Reset button.
    Wipe Data TWRP Recovery Android
    Wipe TWRP Recovery
  6. Now back to the TWRP main menu then you need to tap the Install button. And then choose the ROM zip file you previously transferred to your device's storage on step 2.
    Install Button TWRP Recovery Android
    Choose Zip File TWRP Recovery
  7. Now confirm the installation by simply swiping the Swipe to Confirm Flash option. You will see the installation will begin.
    Swipe To Confirm
  8. Once the installation has been completed then repeat the above action to flash the Gapps.
    TWRP Finished Install
  9. Now you need to tap Wipe cache/dalvik button in case you experience bootloop or other technical problem.
  10. Now you need to tap the Reboot System button.
    TWRP Reboot System
  11. Done.
You may also like update OPPO Find 7 to Android 7.0 Nougat.

Awesome my friend because you just updated your Moto Droid Turbo to Android Nougat 7.0 using the crDroid Android ROM.

Wednesday, 12 October 2016

How To Update Moto X To Android 7.0

Hei guys here is the full instructions to update Moto X to Android 7.0 Nougat using a custom ROM namely CM14, unofficial build developed and released by one of the XDA senior members, seannyM.

In case you have been waiting for the chance to taste the Android N on your Moto X device then now it's the time, since there is no official news about the coming of Android 7.0 Nougat for your device. Fortunately we have rooted and installed TWRP / CWM recovery so we can flash modified ROM.
Advertisements.

If you are interested to give this ROM a try, then I invite you to continue reading this post, please.

How To Update Moto X To Android 7.0

Developer Alexander seannyM at XDA.

Preconditions and information.
  • Build status is unofficial, beta build.
  • Support Moto X 2014.
  • Your Moto X has already have TWRP installed or CWM.
  • Prepare your computer and a USB cable.
  • Your Moto X bootloader should already be unlocked, head to this to unlock any Motorola's device bootloader.
  • Your USB debugging mode should already be set enable. Learn to enable USB debugging mode on Android.
  • Make sure you firstly make necessary backups, do Nandroid backup if you think it's must.
  • Your device battery should be enough.
  • Follow the guides here without skipping anything.
  • Gapps doesn't include on this CM14 ROM therefore you need to flash the apps separately..

Issues.

Video recording doesn't work on a stock camera, therefore you are recommended to use another app.

In case your box permission doesn't work as expected then do the following.
  1. Create a text file and name it "gapps-config.txt".
  2. Write this "PackageInstallerGoogle" on the text file you created.
  3. Now download the Open GApps (Latest version).
  4. Then put the text and Gapps in the same folder within your Moto X device.
  5. Install the GApps, then re-flash the custom ROM.

Download these files to your computer.


How to update Moto X to Android 7.0 Nougat with CM14 custom ROM

  1. Connect your device to PC, then transfer all the zip files (CM14 and GApps) to your device's internal storage.
  2. Now power off your device then disconnect it from USB cable.
  3. Boot into the recovery / TWRP mode now.
  4. On the TWRP recovery mode, perform this; full data wipe -> Wipe button -> Swipe to Factory Reset option.
    Wipe Data TWRP Recovery Android
    Wipe TWRP Recovery
  5. Once done, just tap on the Install button. On the list then find CM14 zip file inside your Moto X internal storage.
    Install Button TWRP Recovery Android
    Choose Zip File TWRP Recovery
  6. Confirm the installation and swiping the the Swipe to Confirm Flash button.
    Swipe To Confirm
  7. Repeat the above step to install Gapps once the ROM is fully installed.
    TWRP Finished Install
  8. Tap Wipe cache/dalvik button in case you are experiencing bootloop or other errors.
  9. Now reboot your device using the Reboot System button.
    TWRP Reboot System
  10. Done and enjoy.
Advertisements.

Awesome my friend now your Moto X is powered with Android 7.0 Nougat with CM14 ROM.

Saturday, 1 October 2016

How To Install TWRP On Moto G4 Play

Here you will be guided to install TWRP recovery on Moto G4 Play. The reason we do this is because once we have TWRP recovery installed then we can perform several handy things such as rooting our device, flashing custom ROMs, Kernel and make Nandroid backups.

The TWRP version is 3.0.2 and it is a free software developed by third-party developers to Android powered device owners make several non-official activities in order boosting their device's performance.
Advertisements.

And if you are ready, then we can continue to the steps in installing TWRP recovery on Moto G4 Play.

How to install TWRP on Moto G4 Play

How to root Moto G4 Play.
How To Root Moto G4 Play
Preconditions.
Follow the instructions here but all the risks that could happen are your responsible.
  1. Now download Android SDK on the Android Developers official website and then install it on your PC.
  2. Download Fasboot and ADB package based on your OS.
  3. Now you need to power off your device.
  4. Then connect your device to computer using the USB cable.
  5. Download TWRP twrp-3.0.2-0-athene.img then save it in the same folder as the extracted Fasboot / ADB package files.
  6. Boot your Moto G4 Play to Fasboot/Bootloader mode by pressing Volume UP + Volume Down + Power keys for a few seconds til you see the text appear on screen.
  7. Now go inside to the directory where Fasboot are stored, then Open Command Prompt on computer and then execute this command.
    • fastboot flash recovery twrp-3.0.2-0-athene.img
  8. Once it's done, select Recovery from the Fasboot menu using Volume Keys and enter Recovery Mode.
    How To Install TWRP On Moto G4 Play
  9. Finish.
Advertisements.

Well done my friend you have successfully installed TWRP recovery on your Moto G4 Play.

How To Root Moto G4 Play

Here is the complete instructions to root Moto G4 Play using TWRP recovery. If you happen to have that smart device and wishing to bring root access to it. Then you are at the post.

Moto G4 Play is a superb phone powered with Qualcomm MSM8916 Snapdragon 410 chipset and as the latest Moto G series released at Agust this year.
Advertisements.

By default this phone is already great but if you want to add more greatness to it then you can root it. We will guide you to the entire procedures to root it so you are invited to follow them.

How To Root Moto G4 Play

How to root Moto G4 Play with TWRP recovery.

Preconditions.
  • Certainly that you have installed TWRP recovery image on your Moto G4 Play. Learn to install TWRP Recovery on Moto G4 Play.
  • Backup any data you regard importan.
  • Enable USB Debugging mode.
  • Your device should already be bootloader unlocked. Or you can learn on how to unlock any Moto's bootloader.
  • Remember that rooting will void your warranty.
  • Follow the entire procedures here without skipping any steps.
Instructions.
  1. Now download SuperSU Root / SuperSU-beta.zip for Moto G4 Play to your PC.
  2. You need to connect your device to computer now using the USB cable.
  3. You need to copy and paste the SuperSU-beta.zip you downloaded earlier to your device's internal storage -- in the root folder.
  4. Power off your device now then disconnect it from computer.
  5. Now boot into the Recovery Mode / TWRP Recovery by powering on your device while your fingers pressing Volume Down and Power together.
    Root Android OS TWRP Recovery
  6. You must now create a new file, do it by tap on Advanced option on TWRP menu then click on the Terminal. You need to write the command below.
    • echo SYSTEMLESS=true>>/data/.supersu
  7. When you have done it, just tap the Install button on the list, select the zip file you previously pasted on your device's internal storage.
    Root Android TWRP Recovery Image
  8. Confirm to install on the next screen by swiping the Swipe to confirm flash. The installation will begin now.
    Root Android TWRP
  9. After the installation completed, you will view a screen like this.
    Root Android With TWRP Recovery
  10. Reboot your device now by choosing the Reboot System now.
Advertisements.

Done. Now your Moto G4 Play is rooted. Enjoy all the fun guys.