sMobile ? "width=device-width,initial-scale=1.0,minimum-scale=1.0,maximum-scale=1.0" : "width=1100"' name='viewport'/> android xda: Install Android OS
Showing posts with label Install Android OS. Show all posts

Sunday, 6 November 2016

How To Update Galaxy A5 SM-A500F With Official Android 6.0.1 Marshmallow

How to update Samsung Galaxy A5 SM-A500F with official Android 6.0.1 Marshmallow. Recently we found a news about the major updates Samsung has released over their mid-range device, it is Samsung Galaxy A5 SM-A500F getting the Android 6.0.1 Marshmallow official update. And the phone was firstly announced and launched in December 2015 last year, came with Android Lollipop out of the box.
Advertisements.

After about a year of its first launch, Samsung has now decided to pour the major update by releasing the Android 6.0.1 Marshmallow to several regions. You should now see the update availability via OTA or Samsung KIES.

However if your device is rooted or powered with a custom ROM then there is no way you will get an official update notifications. If you are so eager to flash this official firmware. Then you can follow the manual installation procedures from this post.

How To Update Galaxy A5 SM-A500F With Official Android 6.0.1 Marshmallow
Preconditions.

Download the official Android 6.0.1 Marshmallow for your Samsung Galaxy A5 SM-A500F based on your region and extract the zip file to your computer.

How to install stock ROM on Samsung Galaxy using Odin


Instructions.
  1. You need to shut down your Samsung Galaxy A5 phone now.
    Power Off Samsung Galaxy Device
  2. Once your device is totally shut down, then you need to enter to the Download Mode by pressing and holding these three buttons altogether Volume Down + Power + Home to enter to the Download Mode.
    Boot Samsung Galaxy Download Mode
  3. You will see a Warning notification, release all the three buttons, then press Volume UP button to access the Download Mode.
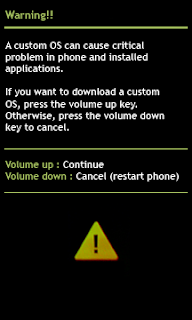
    Warning Download Mode
  4. Once your device is in the Download Mode, now launch Odin you previously downloaded to your computer, by double-clicking on the file.
    Odin On PC
  5. After Odin is opened, connect your Samsung Galaxy A5 to your computer.

    Connect Android Device To PC
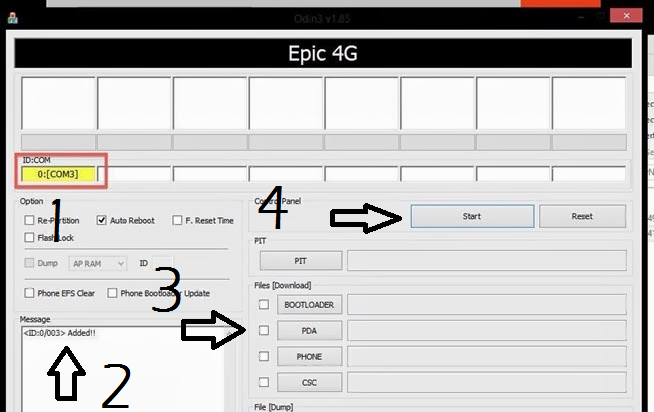
  6. And Odin will detect your device, if your device is successfully detected, you will a notification saying Added!!! like on the following picture.
    Added Root Odin
  7. Now click the PDA button on Odin to search the firmware file / stock ROM you downloaded earlier to your PC guys.
    PDA Root Odin
  8. It is time to click the Start button for the installation to begin. This action will command Odin to install the official Android 6.0.1 Marshmallow firmware file to your Samsung Galaxy A5 SM-A500F phone.
    Start Root Odin
  9. The firmware file is with tar.md5 extenstion that you need to click.
    How to install stock ROM on Samsung Galaxy using Odin
  10. After Odin finished installing the firmware, you will see Pass notification, just like in the picture.
    Pass Notification Odin
  11. Done.
Advertisements.

Source how to install stock ROM on Samsung Galaxy device with Odin tool.

Well done my friend because you have successfully updated your Samsung Galaxy A5 SM-A500F to the official Android 6.0.1 Marshmallow firmware.

Sunday, 23 October 2016

Manually Install Android 7.0 Official OTA On Moto G4 Plus

Certainly you have already known that Moto G4 Plus receives Android 7.0 Nougat official update. But the update has not been sent to all regions yet. The lucky region that currently gets the first visit from Nougat is Brazil. That's so unfortunate for others who don't live in that area.
Advertisements.

So if you live in that region then you should been notified from the System Update feature on the About Phone area. There you can simply head to Settings -> About Phone -> System Update to lift up your current Android version to the Android 7.0 Nougat with about 953MB in size. Afterward, your beloved Moto G4 Plus could enjoy the best things Nougat is offering such as;
  • Improved Doze Mode.
  • Multiwindows.
  • Notifications have been improved.
  • Vulkan API.
  • Seamless Update.
  • New Messaging Apps.
  • And so on.
The easiness of the system update only for those living in the Brazil. But don't worry too much, Motorola is reported to release the global updates soon. Since then all you can do is waiting. Unless you want to use the manual update by flashing the update that's for Brazil to your existing Moto G4 Plus.
Manually Install Android 7.0 Official OTA On Moto G4 Plus

And the post you are reading now will guide you to the whole instructions to install Android Nougat 7.0 zip file to your Moto G4 Plus device.
Advertisements.

Download.

How to manually install Android 7.0 Nougat Official On Moto G4 Plus

  • Now make backups before beginning.
  • Then download the above official Nougat zip file to your device's memory.
  • Or download to your computer first then transfer the zip file to your device's memory.
Once you've done that follow the instructions below.

How to install Android 7.0 Nougat official to Moto G4 Plus via stock recovery.

  1. Now boot your device to the recovery mode.
  2. Then inside the recovery mode use the Volume buttons to navigate up or down to choose the certain options just use the Power button.
  3. Select the OTA update zip you previously moved to your device's memory.
  4. Then choose the Apply Update or Apply update from phone storage features provided by the Stock Recovery.
  5. Now choose the OTA zip file.
  6. The installation will begin, then just wait, once it's done reboot your device using the Reboot System option on the Stock Recovery main menu.
  7. Well done my friend you have successfully updated your Moto G4 Plus to the Android 7.0 Nougat official.
You can now enjoy every possible things you regard excitements on your beloved Moto G4 Plus because you just updated your Moto G4 to Android 7.0 Nougat official OTA.

Sunday, 2 October 2016

G531HUBU0AOH3 Android 5.1.1 For Galaxy Grand Prime VE SM-G531H

Here is the full instructions to update Samsung Galaxy Grand Prime VE SM-G531H to the G531HUBU0AOH3 (firmware version UBU0AOH3) Android 5.1.1 Lollipop as the latest official firmware released recently by Samsung. The instructions are combined with pictures to assist you in installing the G531HUBU0AOH3 Android 5.1.1 Lollipop to you Samsung Galaxy Grand Prime VE SM-G531H device.

And we will use manual roads to bring the G531HUBU0AOH3 Android 5.1.1 Lollipop firmware and that will help those who have not getting any update notifications either via Samsung KIES or Over The Air / OTA.
Advertisements.

And as always we will be using the computer and Odin tool to flash the firmware to your device. And be sure you already understand that installing an official firmware like this could effect of losing your root access, custom recovery image and probably the existing custom ROM that you might have.
Samsung Galaxy Grand Prime VE SM-G531H
Preconditions.
  • A Windows based computer, USB drivers installed and a USB cable.
  • Be sure you already have set your device's USB debugging enabled. If you haven't head to the how to enable USB debugging mode. Learn it then.
  • Make necessary backups to the data you regard need to be saved.
  • Charge your device's battery power if it's low.
  • Do not skip any steps written on this post but follow them entirely.
Files you need (Extract the zip files to your computer).

How to Update Samsung Galaxy Grand Prime VE SM-G531H to G531HUBU0AOH3 Android 5.1.1 Lollipop.


  1. You need to enter the Download Mode, by powering off your device then press and hold these keys; Power Down + Home + Power.
  2. Once you see a warning like in the picture, just release all the keys you are pressing, followed with pressing Volume Up to access to the Download Mode.
    Warning Download Mode
  3. If your device's in Download Mode, now go to your computer to find and open Odin by clicking its .exe file.
    Odin
  4. Connect your device to computer using your USB cable once Odin is opened.
  5. Odin will detect your device. And you will a notification saying Added and you will also see your ID:COM color turns to yellow.
  6. Click PDA button on Odin interface then find the firmware file you previously downloaded and extracted to your computer.
  7. Then hit the Start button on Odin to start the flashing process.
    Odin Added, PDA, Start
  8. Pass notification will show up indicating that the firmware was successfully installed on your device.
    Odin Pass Notification
  9. Reboot your device now to finish all the steps.
Advertisements.

You may verify it by heading to Settings -> About Phone -> See the firmware that is now running on your device guys.

Saturday, 1 October 2016

Install T585XXU1APG1 Android 6.0.1 On Galaxy Tab A 10.1 SM-T585

Here is the full instructions to update Samsung Galaxy Tab A 10.1 SM-T585 to the T585XXU1APG1 Android 6.0.1 Marshmallow as the latest official firmware released recently by Samsung. The instructions are combined with pictures to assist you in installing the T585XXU1APG1 Android 6.0.1 Marshmallow to you Galaxy Tab A 10.1 SM-T585 device.

And we will use manual roads to bring the T585XXU1APG1 Android 6.0.1 Marshmallow firmware and that will help those who have not getting any update notifications either via Samsung KIES or Over The Air / OTA.
Advertisements.

And as always we will be using the computer and Odin tool to flash the firmware to your device. And be sure you already understand that installing an official firmware like this could effect of losing your root access, custom recovery image and probably the existing custom ROM that you might have.

Preconditions.
  • A Windows based computer, USB drivers installed and a USB cable.
  • Be sure you already have set your device's USB debugging enabled. If you haven't head to the how to enable USB debugging mode. Learn it then.
  • Make necessary backups to the data you regard need to be saved.
  • Charge your device's battery power if it's low.
  • Do not skip any steps written on this post but follow them entirely.
Files you need (Extract the zip files to your computer).

How to Update Galaxy Tab A 10.1 SM-T585 to T585XXU1APG1 Android 6.0.1 Marshmallow.


  1. You need to enter the Download Mode, by powering off your device then press and hold these keys; Power Down + Home + Power.
  2. Once you see a warning like in the picture, just release all the keys you are pressing, followed with pressing Volume Up to access to the Download Mode.
    Warning Download Mode
  3. If your device's in Download Mode, now go to your computer to find and open Odin by clicking its .exe file.
    Odin
  4. Connect your device to computer using your USB cable once Odin is opened.
  5. Odin will detect your device. And you will a notification saying Added and you will also see your ID:COM color turns to yellow.
  6. Click PDA button on Odin interface then find the firmware file you previously downloaded and extracted to your computer.
  7. Then hit the Start button on Odin to start the flashing process.
    Odin Added, PDA, Start
  8. Pass notification will show up indicating that the firmware was successfully installed on your device.
    Odin Pass Notification
  9. Reboot your device now to finish all the steps.
Advertisements.

You may verify it by heading to Settings -> About Phone -> See the firmware that is now running on your device guys.

N930VVRS2APHE Android 6.0.1 Marshmallow On Samsung Galaxy Note 7 SM-N930V

Here is the full instructions to update Samsung Galaxy Note 7 SM-N930V to the N930VVRS2APHE Android 6.0.1 Marshmallow as the latest official firmware released recently by Samsung. The instructions are combined with pictures to assist you in installing the N930VVRS2APHE Android 6.0.1 Marshmallow to you Galaxy Note 7 SM-N930V device.

And we will use manual roads to bring the N930VVRS2APHE Android 6.0.1 Marshmallow firmware and that will help those who have not getting any update notifications either via Samsung KIES or Over The Air / OTA.
Advertisements.

And as always we will be using the computer and Odin tool to flash the firmware to your device. And be sure you already understand that installing an official firmware like this could effect of losing your root access, custom recovery image and probably the existing custom ROM that you might have.

Preconditions.
  • A Windows based computer, USB drivers installed and a USB cable.
  • Be sure you already have set your device's USB debugging enabled. If you haven't head to the how to enable USB debugging mode. Learn it then.
  • Make necessary backups to the data you regard need to be saved.
  • Charge your device's battery power if it's low.
  • Do not skip any steps written on this post but follow them entirely.
Files you need (Extract the zip files to your computer).

How to Update Galaxy Note 7 SM-N930V to N930VVRS2APHE Android 6.0.1 Marshmallow.


  1. You need to enter the Download Mode, by powering off your device then press and hold these keys; Power Down + Home + Power.
  2. Once you see a warning like in the picture, just release all the keys you are pressing, followed with pressing Volume Up to access to the Download Mode.
    Warning Download Mode
  3. If your device's in Download Mode, now go to your computer to find and open Odin by clicking its .exe file.
    Odin
  4. Connect your device to computer using your USB cable once Odin is opened.
  5. Odin will detect your device. And you will a notification saying Added and you will also see your ID:COM color turns to yellow.
  6. Click PDA button on Odin interface then find the firmware file you previously downloaded and extracted to your computer.
  7. Then hit the Start button on Odin to start the flashing process.
    Odin Added, PDA, Start
  8. Pass notification will show up indicating that the firmware was successfully installed on your device.
    Odin Pass Notification
  9. Reboot your device now to finish all the steps.
Advertisements.

You may verify it by heading to Settings -> About Phone -> See the firmware that is now running on your device guys.

Update Galaxy A5 SM-A500W To A500WVLU1BPG4 Android 6.0.1

Here is the full instructions to update Samsung Galaxy A5 SM-A500W to the A500WVLU1BPG4 Android 6.0.1 Marshmallow as the latest official firmware released recently by Samsung. The instructions are combined with pictures to assist you in installing the A500WVLU1BPG4 Android 6.0.1 Marshmallow to you Galaxy A5 SM-A500W device.

And we will use manual roads to bring the A500WVLU1BPG4 Android 6.0.1 Marshmallow firmware and that will help those who have not getting any update notifications either via Samsung KIES or Over The Air / OTA.
Advertisements.

And as always we will be using the computer and Odin tool to flash the firmware to your device. And be sure you already understand that installing an official firmware like this could effect of losing your root access, custom recovery image and probably the existing custom ROM that you might have.

Preconditions.
  • A Windows based computer, USB drivers installed and a USB cable.
  • Be sure you already have set your device's USB debugging enabled. If you haven't head to the how to enable USB debugging mode. Learn it then.
  • Make necessary backups to the data you regard need to be saved.
  • Charge your device's battery power if it's low.
  • Do not skip any steps written on this post but follow them entirely.
Files you need (Extract the zip files to your computer).

How to Update Galaxy A5 SM-A500W to A500WVLU1BPG4 Android 6.0.1 Marshmallow.

  1. You need to enter the Download Mode, by powering off your device then press and hold these keys; Power Down + Home + Power.
  2. Once you see a warning like in the picture, just release all the keys you are pressing, followed with pressing Volume Up to access to the Download Mode.
    Warning Download Mode
  3. If your device's in Download Mode, now go to your computer to find and open Odin by clicking its .exe file.
    Odin
  4. Connect your device to computer using your USB cable once Odin is opened.
  5. Odin will detect your device. And you will a notification saying Added and you will also see your ID:COM color turns to yellow.
  6. Click PDA button on Odin interface then find the firmware file you previously downloaded and extracted to your computer.
  7. Then hit the Start button on Odin to start the flashing process.
    Odin Added, PDA, Start
  8. Pass notification will show up indicating that the firmware was successfully installed on your device.
    Odin Pass Notification
  9. Reboot your device now to finish all the steps.
Advertisements.

You may verify it by heading to Settings -> About Phone -> See the firmware that is now running on your device guys.

Install G850WVLU1BPG1 Android 5.0.2 Lollipop On Galaxy Alpha SM-G850W

Here is the full instructions to update Samsung Galaxy Alpha SM-G850W to the G850WVLU1BPG1 Android 5.0.2 Lollipop as the latest official firmware released recently by Samsung. The instructions are combined with pictures to assist you in installing the G850WVLU1BPG1 Android 5.0.2 Lollipop to you Galaxy Alpha SM-G850W device.

And we will use manual roads to bring the G850WVLU1BPG1 Android 5.0.2 Lollipop firmware and that will help those who have not getting any update notifications either via Samsung KIES or Over The Air / OTA.
Advertisements.

And as always we will be using the computer and Odin tool to flash the firmware to your device. And be sure you already understand that installing an official firmware like this could effect of losing your root access, custom recovery image and probably the existing custom ROM that you might have.

Preconditions.
  • A Windows based computer, USB drivers installed and a USB cable.
  • Be sure you already have set your device's USB debugging enabled. If you haven't head to the how to enable USB debugging mode. Learn it then.
  • Make necessary backups to the data you regard need to be saved.
  • Charge your device's battery power if it's low.
  • Do not skip any steps written on this post but follow them entirely.
Files you need (Extract the zip files to your computer).

How to Update Galaxy Alpha SM-G850W to G850WVLU1BPG1 Android 5.0.2 Lollipop.


  1. You need to enter the Download Mode, by powering off your device then press and hold these keys; Power Down + Home + Power.
  2. Once you see a warning like in the picture, just release all the keys you are pressing, followed with pressing Volume Up to access to the Download Mode.
    Warning Download Mode
  3. If your device's in Download Mode, now go to your computer to find and open Odin by clicking its .exe file.
    Odin
  4. Connect your device to computer using your USB cable once Odin is opened.
  5. Odin will detect your device. And you will a notification saying Added and you will also see your ID:COM color turns to yellow.
  6. Click PDA button on Odin interface then find the firmware file you previously downloaded and extracted to your computer.
  7. Then hit the Start button on Odin to start the flashing process.
    Odin Added, PDA, Start
  8. Pass notification will show up indicating that the firmware was successfully installed on your device.
    Odin Pass Notification
  9. Reboot your device now to finish all the steps.
Advertisements.

You may verify it by heading to Settings -> About Phone -> See the firmware that is now running on your device guys.

Install N915SKSU2DPH6 Android 6.0.1 Marshmallow On Galaxy Note Edge SM-N915S

Here is the full instructions to update Galaxy Note Edge SM-N915S to the N915SKSU2DPH6 Android 6.0.1 Marshmallow as the latest official firmware released recently by Samsung. The instructions are combined with pictures to assist you in installing the N915SKSU2DPH6 Android 6.0.1 Marshmallow to you Galaxy Note Edge SM-N915S device.

And we will use manual roads to bring the N915SKSU2DPH6 Android 6.0.1 Marshmallow firmware and that will help those who have not getting any update notifications either via Samsung KIES or Over The Air / OTA.
Advertisements.

And as always we will be using the computer and Odin tool to flash the firmware to your device. And be sure you already understand that installing an official firmware like this could effect of losing your root access, custom recovery image and probably the existing custom ROM that you might have.

Preconditions.
  • A Windows based computer, USB drivers installed and a USB cable.
  • Be sure you already have set your device's USB debugging enabled. If you haven't head to the how to enable USB debugging mode. Learn it then.
  • Make necessary backups to the data you regard need to be saved.
  • Charge your device's battery power if it's low.
  • Do not skip any steps written on this post but follow them entirely.
Files you need (Extract the zip files to your computer).

How to Update Galaxy Note Edge SM-N915S to N915SKSU2DPH6 Android 6.0.1 Marshmallow.


  1. You need to enter the Download Mode, by powering off your device then press and hold these keys Power Down + Home + Power.
  2. Once you see a warning like in the picture, just release all the keys you are pressing, followed with pressing Volume Up to access to the Download Mode.
    Warning Download Mode
  3. If your device's in Download Mode, now go to your computer to find and open Odin by clicking its .exe file.
    Odin
  4. Connect your device to computer using your USB cable once Odin is opened.
  5. Odin will detect your device. And you will a notification saying Added and you will also see your ID:COM color turns to yellow.
  6. Click PDA button on Odin interface then find the firmware file you previously downloaded and extracted to your computer.
  7. Then hit the Start button on Odin to start the flashing process.
    Odin Added, PDA, Start
  8. Pass notification will show up indicating that the firmware was successfully installed on your device.
    Odin Pass Notification
  9. Reboot your device now to finish all the steps.
Advertisements.

You may verify it by heading to Settings -> About Phone -> See the firmware that is now running on your device guys.

Wednesday, 28 September 2016

How To Update Galaxy A9 A9000 (2016) To ZCU1BPE2 Android 6.0.1

Here is the full instructions to update Samsung Galaxy A9 A9000 (2016) to the ZCU1BPE2 Android 6.0.1 Marshmallow as the latest official firmware released recently by Samsung. The instructions are combined with pictures to assist you in installing the ZCU1BPE2 Android 6.0.1 Marshmallow to you Galaxy A9 A9000 device.

And we will use manual roads to bring the ZCU1BPE2 Android 6.0.1 Marshmallow firmware and that will help those who have not getting any update notifications either via Samsung KIES or Over The Air / OTA.
Advertisements.

And as always we will be using the computer and Odin tool to flash the firmware to your device. And be sure you already understand that installing an official firmware like this could effect of losing your root access, custom recovery image and probably the existing custom ROM that you might have.

Preconditions.
  • A Windows based computer, USB drivers installed and a USB cable.
  • Be sure you already have set your device's USB debugging enabled. If you haven't head to the how to enable USB debugging mode. Learn it then.
  • Make necessary backups to the data you regard need to be saved.
  • Charge your device's battery power if it's low.
  • Do not skip any steps written on this post but follow them entirely.
Files you need (Extract the zip files to your computer).

How to Update Galaxy A9 A9000 (2016) to ZCU1BPE2 Android 6.0.1 Marshmallow.


  1. You need to enter the Download Mode, by powering off your device then press and hold these keys; Power Down + Home + Power.
  2. Once you see a warning like in the picture, just release all the keys you are pressing, followed with pressing Volume Up to access to the Download Mode.
    Warning Download Mode
  3. If your device's in Download Mode, now go to your computer to find and open Odin by clicking its .exe file.
    Odin
  4. Connect your device to computer using your USB cable once Odin is opened.
  5. Odin will detect your device. And you will a notification saying Added and you will also see your ID:COM color turns to yellow.
  6. Click PDA button on Odin interface then find the firmware file you previously downloaded and extracted to your computer.
  7. Then hit the Start button on Odin to start the flashing process.
    Odin Added, PDA, Start
  8. Pass notification will show up indicating that the firmware was successfully installed on your device.
    Odin Pass Notification
  9. Reboot your device now to finish all the steps.
Advertisements.

You may verify it by heading to Settings -> About Phone -> See the firmware that is now running on your device guys.

And you can now root Samsung Galaxy A9 (2016) device.

Wednesday, 7 September 2016

Update Nexus 5X To NRD90S Android 7.0 Nougat Official Factory Image

Update Nexus 5X to Android 7.0 Nougat NRD90S official factory image. The post here contains the full instructions to flash the NRD90S Android 7.0 official factory image on Nexus 5X. If you want to update your device to the said firmware. Just follow the guides from here.

Preconditions.
  • Just install Android NRD90S Nougat only if your device is Nexus 5X. 
  • NRD90S can be flashed on device that is using either Stock or custom ROM.
  • Be sure that you already have set USB Debugging mode enabled on your Nexus 5X.
  • Take a precaution backups before starting.
  • Follow all instructions compiled with steps below and don't skip any steps.
  • Charge your device battery power if it's in low percentage.
  • Good luck guys.
Update Nexus 5X To Android 7.0 Nougat NRD90M OTA Official Firmware

How to update Nexus 5X to Android 7.0 Nougat NRD90S Factory Image

  1. You need to download Android 7.0 factory image to your computer. The file name is;bullhead-nrd90s-factory-d6bf1f56.zip.
  2. Now you need to use your USB cable to connect your Nexus 5X to your PC.
  3. Be sure that Fastboot is already configured on your PC. Haven't done it? Just go to how to install ADB and Fastboot on PC.
  4. Now power off your Nexus 5X.
  5. Boot your Nexus 5X into the Fastboot or Bootloader mode. Do so by turning on your device while your fingers pressing the Volume Up + Volume Down + Power buttons until the screen showing up Fastboot menu and Start on top side.
  6. You must now extract the downloaded file of the factory image on your computer. Then head to the bullhead-NRD90S folder and then copy and paste all the existing files to your Fastboot directory.
  7. Tips. If you manage to follow the steps on setting Fastboot on PC, there is almost 100% possibility that your Fastboot folder is in the platform-tools folder inside your Android SDK directory.
  8. Now inside the factory image files in Fastboot directory, execute the commands based on your operating system.
    Windows; Run the file “flash-all.bat”.
    Mac; Run the file “flash-all.sh” using Terminal.
    Linux; Run the file “flash-all.sh”.
  9. The above is a command to flash the stock recovery image on your Nexus 5X. Just wait for the process to be complete. Or do what the on-screen instructions tell you if your device's bootlaoder is unlocked.
  10. Once the installation process done, your device will boot and the process will take about 5 minutes, yes it's longer than usual because it's booting for the first time with a new firmware.
Well done my friend you have underwent all the necessary steps to bring the official Android 7.0 NRD90S Nougat software update on your Nexus 5x. Check it by going to Settings -> About Phone. Just to make that sure.