sMobile ? "width=device-width,initial-scale=1.0,minimum-scale=1.0,maximum-scale=1.0" : "width=1100"' name='viewport'/> android xda: Nexus Tutorials
Showing posts with label Nexus Tutorials. Show all posts

Saturday, 17 December 2016

How To Update Nexus 7 (2013) To Android 7.1.1 Nougat With AICP ROM

How to update Nexus 7 (2013) to Android 7.1.1 Nougat with AICP ROM. The Google Nexus 7 (2013) gets another option to bring the Android 7.1.1 Nougat after Android Ice Cold Project team released an update AICP that comes with modified Android 7.1.1 Nougat. The ROM is armed with several great things such as FC Notification Disabler and many more for you to use.

The AICP is a stable ROM can run fast, smooth and responsive not to mention it's attentively maintained and updated by the developers therefore it's not too much if I say that you can consider it to be your daily driver if you like it.
Advertisements.

And on this post I would like to guide you through the entire needed processes to install AICP Android 7.1.1 ROM on your Google Nexus 7 (2013).

Preconditions.
  • First thing first, backup your data first.
  • Be sure that you set your USB debugging mode enabled first. (How to enable USB debugging mode on Android).
  • Only apply the guides written on this if your device is Nexus 7 (2013) and back away if yours is not guys.
  • Be sure that your Nexus's bootloader is unlocked.
  • Firstable to apply the guides from here that your device should already have CWM or TWRP recovery installed. (How to install TWRP recovery on any Android devices).
  • Prepare your computer and a USB cable to be used for the zip file transferring.
  • AICP doesn't come with Google Apps, therefore you will need to install the Google Apps separately, oke?
  • Neither Google nor Asus has anything to do with the AICP ROM, it's the result of the third-party Android team, therefore flashing this ROM will nullify your device's warranty.
  • Follow all the guides from this post without skipping any steps.

How to update Nexus 7 (2013) to Android 7.1.1 Nougat AICP ROM

Perform the guides on this post with all the risks are yours to bear.
Advertisements.

  1. Now you must download Android 7.1.1 AICP ROM and Gapps to the computer of yours.
  2. Now you need to use your USB cable to connect your device to PC. Once they're connected then transfer all the zip files to your device's SD card.
  3. Now power off your Nexus 7 (2013) then unplug it from USB cable.
  4. Now enter to the Recovery Mode / TWRP mode.
  5. Inside the TWRP mode, perform the following action full data wipe by choosing the Wipe button -> Swipe to Factory Reset button.
    Wipe Data TWRP Recovery Android
    Wipe TWRP Recovery
  6. Now back to the TWRP main menu then you need to tap the Install button. And then choose the Android 7.1.1 Nougat AICP ROM zip file you previously transferred to your device's storage on step 2.
    Install Button TWRP Recovery Android
    Choose Zip File TWRP Recovery
  7. Now confirm the installation by simply swiping the Swipe to Confirm Flash option. You will see the installation will begin.
    Swipe To Confirm
  8. Once the installation has been completed then repeat the above action to flash the Gapps.
    TWRP Finished Install
  9. Now you need to tap Wipe cache/dalvik button in case you experience bootloop or other technical problem.
  10. Now you need to tap the Reboot System button.
    TWRP Reboot System
  11. Done.
Well done my friend because you have fully installed AICP Android 7.1.1 Nougat ROM on Nexus 7 (2013) device therefore you can verify it by going to the Settings -> About -> To find out what is the ROM running on your device right now.

Sunday, 27 November 2016

How To Install CM14.1 Android 7.1 On Nexus 7 (2013)

It is already reported and widely known that the Asus Nexus 7 (2013) will not be one of the lucky device to get the Android Nougat updates officially. But do not be dissapointed with the fact because you still can go to the custom ROM. And yes there is a custom ROM, a famous one, CM14.1 that brings Android 7.1 Nougat for your Nexus 7.
Advertisements.

And CM14.1 is not the only custom ROM to serve the device with Nougat, but there are others too, and on this blog I have previously shared the tutorials to update Nexus 7 (2013) and you can read the instructions from this page and from this page.

Back to the main topic, you can follow the flashing processes by the instructions written here, but remember that doing so will require you to unlock bootloader and install a csutom ROM, on this post I use TWRP. As the result your device's warranty will be nullified. So all the risks are your to face!
How To Install CM14.1 Android 7.1 On Nexus 7 (2013)

How to update Asus Nexus 7 (2013) to Android 7.1 Nougat with CM14.1 Custom ROM Tutorials

Your warranty will be voided. Perform the guides written on the post and all the risks are yours to take.
Advertisements.


  1. Download CM14.1.zip and Gapps to your PC.
  2. Now you need to use your USB cable to connect your device to PC. Once they're connected then transfer all the zip files to your device's SD card.
  3. Now power off your Asus Nexus 7 (2013) then unplug it from USB cable.
  4. Now enter to the Recovery Mode / TWRP mode.
  5. Inside the TWRP mode, perform the following action full data wipe by choosing the Wipe button -> Swipe to Factory Reset button.
    Wipe Data TWRP Recovery Android
    Wipe TWRP Recovery
  6. Now back to the TWRP main menu then you need to tap the Install button. And then choose the ROM zip file you previously transferred to your device's storage on step 2.
    Install Button TWRP Recovery Android
    Choose Zip File TWRP Recovery
  7. Now confirm the installation by simply swiping the Swipe to Confirm Flash option. You will see the installation will begin.
    Swipe To Confirm
  8. Once the installation has been completed then repeat the above action to flash the Gapps.
    TWRP Finished Install
  9. Now you need to tap Wipe cache/dalvik button in case you experience bootloop or other technical problem.
  10. Now you need to tap the Reboot System button.
    TWRP Reboot System
  11. Done.
You are the man because you have successfully update your Asus Nexus 7 (2013) to Android 7.1 Nougat with CM14.1 ROM. You should be happy now. And tell your friend about this wonderful news.

Tuesday, 22 November 2016

Update Nexus 4 To Android 7.1 Nougat XenonHD Custom ROM

Update Nexus 4 to Android 7.1 Nougat XenonHD custom ROM. You can now update Nexus 4 to Android 7.1 Nougat, and this is not a lie. People that we regard very creative and intelligent have done amazing works to compile all the codes from AOSP into the one custom ROM.
Advertisements.

The custom ROM I am talking about is XenonHD, it's amazing software that is widely popular among Android users. And it's offering many amazing features aside from its stable and fast performance.

And this post contains all the needed steps to update Nexus 4 to Android 7.1 Nougat software. And to do that you will need to install XenonHD that comes with the Android 7.1 software. However, your device should already have either CWM or TWRP installed.
Update Nexus 4 To Android 7.1 Nougat XenonHD Custom ROM
Preconditions.
  • Your device bootloader should already be unlocked.
  • Your device should already have CWM or TWRP recovery installed.
  • Backup all data you regard important.
  • Enable USB debugging mode first before beginning.
  • You need to follow all the steps without skipping even one step.
  • Charge your Nexus 4 device battery power if it's not enough.
  • Gapps are not included on this ROM therefore you will need to install them separately.
Now you need to download these files to your computer.

How to update Nexus 4 to Android 7.1 Nougat using XenonHD custom ROM

Follow the instructions written on this post but all the possible risks are yours to bear.
Advertisements.

  1. Now use your USB cable to connect your Google Nexus 4 to computer.
  2. When the devices are connected then you need to transfer the files to computer.
  3. After that you must disconnect your phone from computer.
  4. Turn off your smartphone then turn it on again to boot into the CWM recovery.
  5. Within CWM recovery then you need to select the Wipe Data/Factory Reset.
    Wipe Data Factory Reset CWM
  6. After that, you must choose the Wipe Cache Partition. Continue your step by selecting the Wipe Dalvik Cache.
    CWM Wipe Cache Parition

    Wipe Dalvik Cache
  7. And then choose the Install Zip From SD Card -> Choose Zip From SD Card to further search the XenonHD  Android 7.1 Nougat ROM on your smartphone.
    Install zip from SDCard

    Choose Zip From SD Card
  8. Now back to the main menu then choose the *****Go Back***** -> Reboot System Now.
    Reboot System Now CWM Recovery
  9. Reboot the phone.
  10. Done.
You did it my friend because you have successfully updated your Nexus 4 to Android 7.1 Nougat.

Update Nexus 7 (2013) To Android 7.1 Nougat Using CyanideN

How to update Nexus 7 (2013) to Android 7.1 Nougat using CyanideN custom ROM and the ROM itself is considered stable, fast and smooth. And once you installed the ROM, then you will enjoy the custom LCD density, statusbar ticker, gesture control, privacy guard and many other modifications added by the ROM developer for you guys.
Advertisements.

Since the Google Nexus 7 (2013) is reported will not be getting the official Android Nougat update, therefore this CyanideN custom ROM should be a good news for you, let alone the ROM comes with the latest version of Nougat which is version 7.1. So you can take this one. And enjoy whatever the CyanideN ROM is offering for you.

And of course the Install Android ROMs blog will guide you through the entire processes needed to flash the CyanideN Android 7.1 Nougat on your Google Nexus 7 therefore prepare everything and read the preconditions section.

Update Nexus 7 (2013) to Android 7.1 Nougat using CyanideN custom ROM

Preconditions.
  • Remember that your Google Nexus 7 (2013) bootloader should already been unlocked.
  • You need to already installed either CWM or TWRP recovery in order to flash the CyanideN ROM.
  • Backup everything needed before starting the guides.
  • Enable USB debugging mode first.
  • Follow the entire steps without skipping anything.
  • Charge your device's battery power if it's not sufficient.
Files that you need and download them to your PC.

How to update Nexus 7 (2013) to Android 7.1 Nougat using CyanideN custom ROM

Follow the instructions written on this post but all the possible risks are yours to bear.
Advertisements.

  1. Now use your USB cable to connect your Google Nexus 7 (2013) to computer.
  2. When the devices are connected then you need to transfer the files to computer.
  3. After that you must disconnect your phone from computer.
  4. Turn off your smartphone then turn it on again to boot into the CWM recovery.
  5. Within CWM recovery then you need to select the Wipe Data/Factory Reset.
    Wipe Data Factory Reset CWM
  6. After that, you must choose the Wipe Cache Partition. Continue your step by selecting the Wipe Dalvik Cache.
    CWM Wipe Cache Parition

    Wipe Dalvik Cache
  7. And then choose the Install Zip From SD Card -> Choose Zip From SD Card to further search the CyanideN  Android 7.1 Nougat ROM on your smartphone.
    Install zip from SDCard

    Choose Zip From SD Card
  8. Now back to the main menu then choose the *****Go Back***** -> Reboot System Now.
    Reboot System Now CWM Recovery
  9. Reboot the phone.
  10. Done.
Now your Goolge Nexus 7 (2013) is powered with Android 7.1 Nougat with CyanideN custom ROM.

Saturday, 5 November 2016

How To Install NitrogenOS Android 7.1 ROM On Nexus 4

Anyone who wish to install NitrogenOS Android 7.1 Nougat on Nexus 4 are invited to visit this post. Of course you have already known that Android 7.1 is already announced and released for public. By that Android third party developers around the world compete to each other to plant it on their projects that are widely known as custom ROMs.
Advertisements.

And recently we are handed with a great ROM namely NitrogenOS bringing Android 7.1 Nougat in hand plus with additional features that are not found on the official Nougat version. And the developer of the ROM opens a wide invitation for Nexus 4 users to flash his ROM to their device.

If you are here because of searching for the how to guide to bring the said custom ROM on your beloved Nexus 4 then you are at the right place. Here we will walk you through the entire processes to flash the NitrogenOS on your Nexus 4.

How To Install NitrogenOS Android 7.1 ROM On Nexus 4

Preconditions and information.
  • The NitrogenOS Android 7.1 Nougat is dedicated for the Nexus 4 only.
  • Make sure you already installed TWRP recovery on your device.
  • This ROM was made based on AOSP therefore unlock your bootloader first before proceeding.
  • A computer with a USB cable are required to transfer data.
  • One more thing, you also need to firstly enablee USB debugging mode of your Nexus 4.
  • If your Nexus 4 battery power is less then charge it.
  • Follow all the steps without you skip any steps.
  • Don't forget to backup all your data before starting to follow the tutorials.
Advertisements.

How to update Nexus 4 to NitrogenOS Android 7.1 Nougat ROM

Your warranty will be voided. Perform the guides below and all the risks are yours to take.
  1. Download the Android 7.1 Nougat NitrogenOS Custom ROM to your PC.
  2. Now you need to use your USB cable to connect your device to PC. Once they're connected then transfer all the zip files to your device's SD card.
  3. Now power off your Nexus 4 then unplug it from USB cable.
  4. Now enter to the recovery mode.
  5. Inside the TWRP mode, perform the following action full data wipe by choosing the Wipe button -> Swipe to Factory Reset button.
    Wipe Data TWRP Recovery Android
    Wipe TWRP Recovery
  6. Now back to the TWRP main menu then you need to tap the Install button. And then choose the ROM zip file you previously transferred to your device's storage on step 2.
    Install Button TWRP Recovery Android
    Choose Zip File TWRP Recovery
  7. Now confirm the installation by simply swiping the Swipe to Confirm Flash option. You will see the installation will begin.
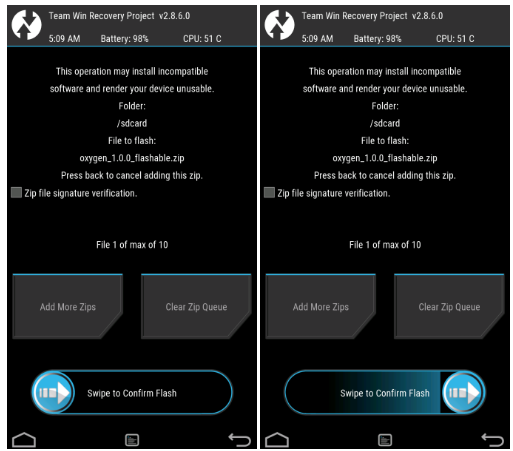
    Swipe To Confirm
    TWRP Finished Install
  8. Now you need to tap Wipe cache/dalvik button in case you experience bootloop or other technical problem.
  9. Now you need to tap the Reboot System button.
    TWRP Reboot System
  10. Done.
Some tutorials I recommend you to read how to install SuperSU on Android via TWRP recovery. and how to root and unroot with Framaroot.

You did it my friend because you just followed the entire steps to install NitrogenOS Android 7.1 Nougat ROM on your Nexus 4. You should be happy now. And tell all your friends about this wonderful news now.

Thursday, 29 September 2016

How To Flash CM14 Android 7.0 ROM On Nexus 4

Here you will be guided to install Android 7.0 CM14 custom ROM on Nexus 4 device. If you own that this device then you are welcomed to follow the full instructions on this post. Because one thing, you know that Google has dropped developments for this device quite while, therefore don't expect to get the latest Nougat coming to your device officially.
Advertisements.

But thanks to a development made by third party developer to bring CyanogenMod 14 delivering Android 7.0 Nougat to you.

If you are interested then you can continue reading this post and once you have installed the CM14 on your Nexus 4 you will learn what great things it has for you guys.
How To Flash CM14 Android 7.0 Nougat ROM On Nexus 4
Preconditions.
  • CM14 is based on AOSP and a stock ROM, to flash it you need to firstly unlock your device's bootloader.
  • Your Nexus 4 should already have CWM or TWRP recovery installed. On this I use CWM.
  • Your device should already be rooted.
  • Your device's warranty will be nullified for flashing this modified ROM.
  • CM14 doesn't include Google apps therefore we will need to install Google apps separately.
  • Enable USB debugging mode of your Nexus 4 first.
  • Make necessary backups before starting.
  • A computer with a USB cable.
  • You need to charge your battery power first if it's low.
Download these files to your computer.

How To Flash CM14 Android 7.0 Nougat ROM On Nexus 4

  1. Now transfer all the zip files you previously downloaded to PC to your Nexus 7 by connecting your device to PC using your USB cable.
  2. After all the zip files transferred, just disconnect your device from PC.
  3. We will need to boot into the CWM recovery by firstly powering off your device, then press these buttons; Volume UP + Home + Power.
  4. Inside the CWM recovery just choose this option; Wipe Data/Factory Reset.
    Wipe Data Factory Reset CWM
  5. Then select the Wipe Cache Partition. Followed with selecting the Wipe Dalvik Cache.
    CWM Wipe Cache Parition

    Wipe Dalvik Cache
  6. Now choose the Install Zip From SD Card -> Choose Zip From SD Card to search the ROM zip file and then install the zip file.
    Install zip from SDCard
    Choose Zip From SD Card
  7. Just choose the *****Go Back***** -> Reboot System Now once the zip file was successfully installed.
    Reboot System Now CWM Recovery
  8. Repeat the above process to flash the Google Apps.
  9. Once done just restart your device.
Advertisements.

Congratulation because you have successfully flashed CM14 Android 7.0 Nougat ROM on your Nexus 4. You can check it via Settings -> About phone.

How To Flash AOSP Android 7.0 ROM On Nexus 7 (2013)

Here I bring to you full tutorials to flash AOSP based on Android 7.0 Nougat on your Nexus 7 (2013). This is a custom ROM not the official released by Google. However things great are already included in this ROM. So you can expect awesome surprises once it's fully installed.
Advertisements.

Anyway this AOSP ROM is still under development though, therefore you can expect some bugs. One of the bugs reported is 1080p video doesn't perform well. But in overall AOSP Android 7.0 Nougat ROM is great and can be used as your daily ROM.

And if you want give this ROM a try then you are invited to continue reading this post to follow the flashing instructions.
How To Flash AOSP Android 7.0 ROM On Nexus 7 (2013)

Preconditions.
  • AOSP is not a stock ROM, you need to have a bootloader unlocked device to flash it.
  • Your device should already be powered with a custom recovery images such as CWM, TWRP, etc. On this post we use CWM recovery.
  • Root access is needed.
  • Installing this kind of ROM will effect of losing your device's warranty.
  • AOSP ROM doesn't come with Google Apps therefore you need to flash this ROM separately.
  • Your device's USB debugging mode should be firstly enabled.
  • Create backups before starting anything.
  • Prepare your computer, a USB cable as we will need to connect your device to PC.
  • Charge your device's batter power if it is low.
Files you need to download to your PC.

How To Flash AOSP Android 7.0 ROM On Nexus 7 (2013).

  1. Now transfer all the zip files you previously downloaded to PC to your Nexus 7 by connecting your device to PC using your USB cable.
  2. After all the zip files transferred, just disconnect your device from PC.
  3. We will need to boot into the CWM recovery by firstly powering off your device, then press these buttons; Volume UP + Home + Power.
  4. Inside the CWM recovery just choose this option; Wipe Data/Factory Reset.
    Wipe Data Factory Reset CWM
  5. Then select the Wipe Cache Partition. Followed with selecting the Wipe Dalvik Cache.
    CWM Wipe Cache Parition

    Wipe Dalvik Cache
  6. Now choose the Install Zip From SD Card -> Choose Zip From SD Card to search the ROM zip file and then install the zip file.
    Install zip from SDCard
    Choose Zip From SD Card
  7. Just choose the *****Go Back***** -> Reboot System Now once the zip file was successfully installed.
    Reboot System Now CWM Recovery
  8. Repeat the above process to flash the Google Apps.
  9. Once done just restart your device.
Advertisements.

You can now enjoy all the good things offered by AOSP Android 7.0 Nougat ROM on your Nexus 7 (2013).