And we will use manual roads to bring the G531HUBU0AOH3 Android 5.1.1 Lollipop firmware and that will help those who have not getting any update notifications either via Samsung KIES or Over The Air / OTA.
Advertisements.
And as always we will be using the computer and Odin tool to flash the firmware to your device. And be sure you already understand that installing an official firmware like this could effect of losing your root access, custom recovery image and probably the existing custom ROM that you might have.
Preconditions.
- A Windows based computer, USB drivers installed and a USB cable.
- Be sure you already have set your device's USB debugging enabled. If you haven't head to the how to enable USB debugging mode. Learn it then.
- Make necessary backups to the data you regard need to be saved.
- Charge your device's battery power if it's low.
- Do not skip any steps written on this post but follow them entirely.
- Chile G531HUBU0AOH3_G531HUUB0AOH3_CHO.
- Uruguay G531HUBU0AOH3_G531HUUB0AOH3_UPO.
- Panama G31HUBU0AOH3_G531HUUB0AOH3_TPA.
- Trinidad and Tobago G531HUBU0AOH3_G531HUUB0AOH3_TTT.
- Brazil G531HVJU0AOH3_G531HZTO0AOH3_ZTO.
- Download ODIN v3.09.
How to Update Samsung Galaxy Grand Prime VE SM-G531H to G531HUBU0AOH3 Android 5.1.1 Lollipop.
- You need to enter the Download Mode, by powering off your device then press and hold these keys; Power Down + Home + Power.
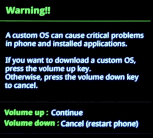
- Once you see a warning like in the picture, just release all the keys you are pressing, followed with pressing Volume Up to access to the Download Mode.
- If your device's in Download Mode, now go to your computer to find and open Odin by clicking its .exe file.
- Connect your device to computer using your USB cable once Odin is opened.
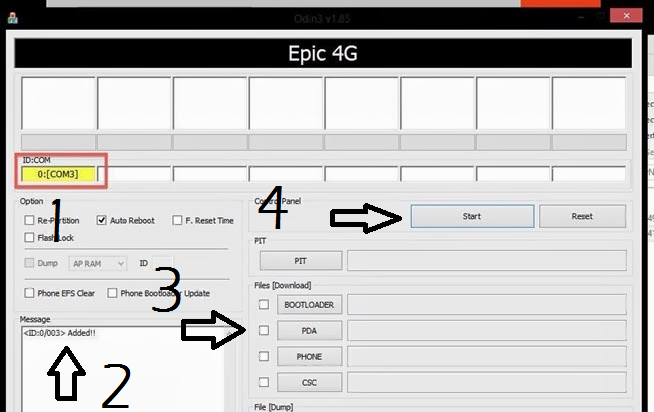
- Odin will detect your device. And you will a notification saying Added and you will also see your ID:COM color turns to yellow.
- Click PDA button on Odin interface then find the firmware file you previously downloaded and extracted to your computer.
- Then hit the Start button on Odin to start the flashing process.
- Pass notification will show up indicating that the firmware was successfully installed on your device.
- Reboot your device now to finish all the steps.
Advertisements.
You may verify it by heading to Settings -> About Phone -> See the firmware that is now running on your device guys.


No comments:
Post a Comment