sMobile ? "width=device-width,initial-scale=1.0,minimum-scale=1.0,maximum-scale=1.0" : "width=1100"' name='viewport'/> android xda: OnePlus Tutorials
Showing posts with label OnePlus Tutorials. Show all posts

Monday, 30 January 2017

Update OnePlus One To Android 7.1.1 With AOSPlusOne ROM

There is a good custom ROM dedicated to OnePlus One, and this ROM will deliver Android 7.1.1 Nougat to your device. And of course having this ROM installed will give you so many awesomeness brought by Nougat 7.1.1 plus with additional features planted by the ROM developer.

And of course you want to know the ROM name, its name is AOSPlusone, and brought every thing considered great for you all.
Advertisements.

Albeit the root access is not necessary, but having it will be better for you and of course the custom recovery such as CWM or TWRP is needed in order to flash the ROM zip file. You will find this ROM awesome guys.

If you want to update your Sony Xperia Z5 to Android 7.0 Nougat then you can follow the full instructions from this post. And as the result your Sony Xperia Z5 device will be running on the Android 7.0 software.

Update OnePlus One To Android 7.1.1 With AOSPlus One ROM
Preconditions.
  • You should only flash the AOSPlusOne Android 7.1.1 ROM on OnePlus One only.
  • The AOSPLUSOne ROM is based on AOSP therefore your device's bootloader should be firstly unlocked to flash this ROM.
  • Firstly I recommend you to make backups before proceeding.
  • You need to already have either CWM or TWRP recovery installed on your OnePlus One. Haven't done it? Then please to visit the how to install TWRP on any Android device instructions.
  • One more thing, you must enable USB debugging mode first.
  • Follow all the written instructions on this post and do not skip any steps.
  • AOSPlus One ROM doesn't include Google Apps therefore you need to flash them separately.
  • You need to prepare your OS Windows computer and a USB cable device.
  • Now check your device's battery power, if it's less, then charge it first.
  • Wish you all the best guys.

You need to download the following files to your computer.


How to update OnePlus One to Android 7.1.1 Nougat with AOSPlus One custom ROM

Well guys follow the updating instructions and all the possible risks are yours to bear and nobody should be taken responsible if anything wrong happen to your device such as brick.
Advertisements.

  1. Now connect your OnePlus One to computer using a USB cable and then transfer all the zip files (AOSPlus One and Google Apps) you downloaded earlier to PC to your Nexus's SD card.
  2. Now power off your OnePlus One then unplug it from USB cable.
  3. Now enter to the Recovery Mode / TWRP mode.
  4. Inside the TWRP mode, perform the following action full data wipe by choosing the Wipe button -> Swipe to Factory Reset button.
    Wipe Data TWRP Recovery Android
    Wipe TWRP Recovery
  5. Now back to the TWRP main menu then you need to tap the Install button. And then choose the Android 7.1.1 AOSPlus One ROM zip file you previously transferred to your device's storage on step 2.
    Install Button TWRP Recovery Android
    Choose Zip File TWRP Recovery
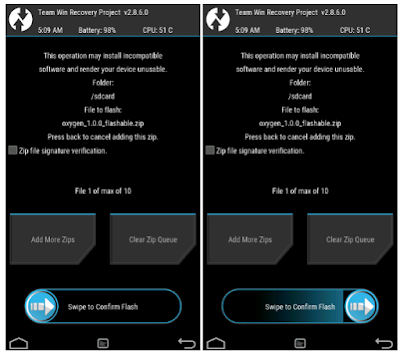
  6. Now confirm the installation by simply swiping the Swipe to Confirm Flash option. You will see the installation will begin.
    Swipe To Confirm
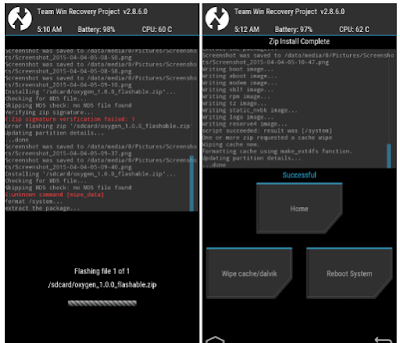
  7. Once the installation has been completed then repeat the above action to flash the Gapps.
    TWRP Finished Install
  8. Now you need to tap Wipe cache/dalvik button in case you experience bootloop or other technical problem.
  9. Now you need to tap the Reboot System button.
    TWRP Reboot System
  10. Done.
That's all guys your OnePlus One is already updated to the Android 7.1.1 Nougat with AOSPlus One custom ROM. And you can try it for a few days, test it guys, if you like it then set it to be your daily driver. And as usual. See you again in the next posts.

Monday, 26 December 2016

Download OxygenOS 3.5.5 OTA For OnePlus 2

Download OxygenOS 3.5.5 OTA for OnePlus 2. OnePlus 2 receives an update now, the stock firmware released recently for the phone is OxygenOS 3.5.5 OTA and it brings the most anticipated features which is a feature to enable VoLTE functionality. And the absence of this wonderful feature was a big disappointment when the phone was initially released at July, 2105!

For some people without VoLTE functionality is a pain in the back since with that feature we can force to have 4G LTE network only when doing voice call. Since then people put their head together to bring a tweak for enabling VoLTE on OnePlus 2.
Advertisements.

But now OxygenOS 3.5.5 was introduced this week includes VoLTE enabler functionality for us. However the feature can be used only on the select carriers. That means not all carriers can enjoy this feature.

Beside VoLTE, OxygenOS 3.5.5 is also armed with app lock, battery saving mode, gaming mode and other wonderful features. If you want to see the whole logs that are added with this stock ROM. Then you can read the change log list.

See the list.

Change logs.
  • Enabled VoLTE functionality for select carriers.
  • Added App Lock.
  • Added Battery Saving Mode ( Settings > Battery > More ).
  • Added Gaming Mode ( Settings > Developer Options ).
  • Added Additional Options for the Alert Slider.
  • Redesign of the Volume Adjustment Bar.
  • Shelf Optimizations.
  • Updated OxygenOS UI.
  • Updated Interface and UI of the Clock app.
  • Updated Android Security Patch Level to 1/12/16.
  • Increased System Stability.
  • General Bug Fixes.
Download OxygenOS 3.5.5 OTA for OnePlus 2

Download OxygenOS 3.5.5 OTA for OnePlus 2


How to install OxygenOS 3.5.5 OTA on OnePlus 2?

Make sure you have made backups before proceeding.
Advertisements.


  1. Now you need to firstly setup ADB and fastboot on your PC.
  2. Download the OTA zip file of the OxygenOS 3.5.5 then change the file into the ota.zip.
  3. You need to enable your OnePlus 2 USB debugging mode.
  4. You need to connect your OnePlus 2 to computer.
  5. Now on your PC, head to the folder where you stored OTA.zip then right-click + shit to open command prompt window here.
    ADB Open Command Window Here VoLTE
  6. On the command window box just execute this command to boot your device into the recovery mode.
    adb reboot recovery
    How to install OxygenOS 3.5.5 OTA on OnePlus 2 recovery
  7. On the recovery mode, just choose the “Install from USB” option.
  8. Then type the command below.
    adb sideload ota.zip
    How to install OxygenOS 3.5.5 OTA on OnePlus 2
  9. The flashing process will then begin just wait till the whole procedures to complete. 
  10. If they are finish just reboot your device from the reboot option available on the recovery menu.
Well done guys because you have successfully installed OxygenOS 3.5.5 on OnePlus 2.

Tuesday, 6 December 2016

Install crDroid Android 7.1 ROM On OnePlus One

How to install crDroid Android 7.1 ROM on OnePlus One. Here we will explain to you how to install Android 7.1 crDroid Nougat ROM on OnePlus One, so as the owners of the device you are given with another ROM based on Android 7.1 ROM. crDroid is one of the decent Nougat based ROMs available on that can be flashed on the OnePlus, beside Slim7 ROM, you are invited to flash this ROM right now if you are interested.

And crDroid Nougat ROM is offering a lot of tweaks, fast and stability and you will enjoy everything that were installed within the crDroid ROM.
Advertisements.

Since your device will not receive Android 7.1 Nougat update officially therefore the existence of this ROM will give you joy.
Install crDroid Android 7.1 ROM On OnePlus One
crDroid features here.
  • Pixel look and feel.
  • CyanogenMod 14.1 – all mods and features
  • StatusBar: Network Traffic
  • StatusBar: SU icon toggle
  • StatusBar: Ticker
  • StatusBar: Hide/Show icons
  • StatusBar: BatteryBar customization
  • StatusBar: Battery styles
  • StatusBar: Tap to Sleep
  • StatusBar: Clock styles
  • StatusBar: crDroid logo customization
  • QuickSettings: Tiles customization
  • QuickSettings: Brightness slider toggle
  • QuickSettings: Optional brightness icon
  • QuickSettings: Vibrate on Touch
  • QuickSettings: WiFi easy toggle
  • QuickSettings: Bluetooth easy toggle
  • QuickSettings: Data easy toggle
  • Navigation: Toggle navbar
  • Navigation: PIE navigation
  • Navigation: DUI – SmartBar / Fling Toggle
  • Navigation: Pulse – smart visualization
  • Notifications: Power notification controls
  • Notifications: Force expanded notifications
  • Notifications: Toggle immersive mode messages
  • Notifications: Breathing notifications
  • Notifications: Headsup Snooze
  • Notifications: Headsup Timeout customization
  • LockScreen: Screen shortcuts
  • LockScreen: Toggle longpress for screen shortcuts
  • LockScreen: Swipe shortcuts
  • LockScreen: Toggle media cover art
  • LockScreen: Toggle clock
  • LockScreen: Toggle date
  • LockScreen: Toggle alarm
  • LockScreen: Tap to sleep
  • LockScreen: Toggle longpress torch
  • LockScreen: Cutomize number of notifications
  • LockScreen: Toggle power menu for secure lockscreen
  • Recents: Immersive Recents
  • Recents: Hidden apps
  • Recents: Toggle OmniSwitch as default Recents
  • Sound: Toggle screenshot sound
  • Sound: Live customization for number of volume steps
  • Sound: Less frequent notification sounds
  • Sound: DND customizations
  • Miscellaneous: Clock Widget
  • Miscellaneous: Expanded Desktop customization
  • Miscellaneous: Transparency customization
  • Miscellaneous: Partial / Full screenshot selection option
  • Miscellaneous: Toggle suggestions on Settings dashboard
  • Miscellaneous: Toggle summaries in Settings
  • Miscellaneous: Toggle auto-start music player on headset detection
  • Settings/Sound: Increasing Ringtone
  • 12 New Quick Settings Tiles including Caffeine mode, Expanded Desktop and Sync.
  • Settings/Security: Quick PIN/Password Unlock
  • Default sounds from latest Nexus image.
  • Stability and performance improvements.
Preconditions.

How to update OnePlus One to Android 7.1 Nougat with crDroid ROM

Follow the guides from this post at your choice, blame none but yourself, if you brick or damage your device..
Advertisements.


  1. Now you must download Android 7.1 crDroid ROM and Gapps to the computer of yours.
  2. Now you need to use your USB cable to connect your device to PC. Once they're connected then transfer all the zip files to your device's SD card.
  3. Now power off your OnePlus One then unplug it from USB cable.
  4. Now enter to the Recovery Mode / TWRP mode.
  5. Inside the TWRP mode, perform the following action full data wipe by choosing the Wipe button -> Swipe to Factory Reset button.
    Wipe Data TWRP Recovery Android
    Wipe TWRP Recovery
  6. Now back to the TWRP main menu then you need to tap the Install button. And then choose the crDroid ROM zip file you previously transferred to your device's storage on step 2.
    Install Button TWRP Recovery Android
    Choose Zip File TWRP Recovery
  7. Now confirm the installation by simply swiping the Swipe to Confirm Flash option. You will see the installation will begin.
    Swipe To Confirm
  8. Once the installation has been completed then repeat the above action to flash the Gapps.
    TWRP Finished Install
  9. Now you need to tap Wipe cache/dalvik button in case you experience bootloop or other technical problem.
  10. Now you need to tap the Reboot System button.
    TWRP Reboot System
  11. Done.
You did it my friend because now your OnePlus One is powered with the crDroid based on the Android 7.1 Nougat. You can verify that by going to Settings -> About phone and then find out what OS is running on your phone now.

Thursday, 1 December 2016

How To Install TWRP & Root OnePlus 3T

Here is probably the most awaited tutorials for the OnePlus 3T users, yes on here you will learn to install TWRP to root OnePlus 3T device. Those who want to lift their devices to the higher level, then it's recommended to flash the custom recovery such as TWRP and root it afterward.

OnePlus 3T comes with a considerable specifications both on the hardware and software areas, as the owner of the phone you are now enjoying the powerful Qualcomm MSM8996 Snapdragon 821 chipset, and Adreno 530 GPU also Quad-Core CPU. Everything wrapped on this phone is definitely top-notch specification.
Advertisements.

And with all those decent specifications on your hand, would be shame if you don't beef up its performance and dig deepest to find out the phone at its best level by flashing TWRP and root it. On this post we will guide you through the entire processes needed to flash the TWRP recovery on your OnePlus 3T to further root it.
How To Install TWRP & Root OnePlus 3T
Preconditions.
  • Before you begin, check whether your device's bootloader is unlocked. If it's not. Then unlock it first because it's a requirement.
  • Make necessary backups before starting to follow the flashing tutorials below.
  • Your computer should already has ADB & Fastboot drivers installed. How to install ADB & Fastboot drivers on PC now.
  • Charge your device's batter power first in case it's less power.
  • Good luck guys.

Download TWRP recovery for OnePlus 3T


Install OxygenOS 3.5.3 On OnePlus 3T.

How to Install TWRP to root OnePlus 3T

Remember to follow and to perform all the steps to flash TWRP and root OnePlus 3T but all the risks are yours to bear.
Advertisements.


  1. After you have downloaded the TWRP .img file, then put it on the same folder of the ADB and Fastboot.
  2. After the file is in ADB & Fastboot folder, then rename it to a name that's easy for you to remember such as recovery.img.
  3. Now boot your OnePlus 3T to the Fasboot mode, afterward connect your OnePlus 3T to computer.
  4. Now open command window, then type and execute these 2 commands.
    fastboot flash recovery recovery.img
    fastboot reboot
  5. Your phone will then reboot, and the TWRP is installed successfully.
  6. Now, since the TWRP recovery is already installed on your OnePlus 3T. do you want to root it? Then head to this page; How To Flash SuperSU using TWRP Recovery.
  7. Done.
Well done my friend because you have successfully followed all the steps to install TWRP recovery on OnePlus 3T.

Tuesday, 29 November 2016

Install OxygenOS 3.5.3 On OnePlus 3T

Today we are going to discuss about how to download and install OxygenOS 3.5.3 on OnePlus 3T. This is the phone that was recently announced, those who don't know that OnePlus announced it at November, which is this month guys.

Not to mislead with the name OnePlus 3T and relate the phone as the successor of OnePlus 3, because it is not guys. OnePlus just want to make a surprise for us to end this year. Well from the report I red previously that many have bought the phone and now they are enjoying the features that the firmware is offering.
Advertisements.

For those who own the OnePlus 3T, then let me tell you one thing! OnePlus recently rolled out a new official update for your device, the build name is OxygenOS 3.5.3 that comes with some great new features and native apps for you guys.

Now I am taking my part to guide you to the process of flashing the OxygenOS 3.5.3 on OnePlus 3T device. You can follow the full instructions on this post. At the end your device will be powered with OxygenOS 3.5.3 and enjoy everything that is offered by the OS.

For you to know that the update is official and it's for worldwide, that means it's now rolling and will knocking your door. But since it's a global update. Therefore it takes sometime to reach you, no matter where you are, probably your turn is still in queue. But if you dislike of waiting that long then you are welcomed to follow the manual instructions from this post to flash the OxygenOS 3.5.3 on OnePlus 3T device.
How To Download And Install OxygenOS 3.5.3 On OnePlus 3T

Features offered by the OxygenOS 3.5.3.
  • Added emergency calling for India (triple press the power button to trigger).
  • Added motion detection in camera and enhanced image capturing quality.
  • Added OnePlus community app.
  • Updated touch panel firmware and optimized touch precision.
  • Updated GPS library and optimized location accuracy.
  • Redesigned clock UI.
  • Redesigned calling UI.
  • Increased stability and implemented various bug fixes.
Preconditions.
  • You need to firstly install ADB & Fastboot on your Windows PC or Mac OS X.
  • One thing to remember that this instruction is only fo OnePlus 3T, therefore if you don't have this device, then back away.
  • Albeit flashing this firmware is a safe thing to do, but it's always wise, to make backups.
  • Charge your device's battery power if it's now sufficient.
  • Good luck guys.

Download OxygenOS 3.5.3 from below

How to install Oxygen 3.5.3 on OnePlus 3T

  • Now download the OxygenOS 3.5.3 zip file from the above link to your device's internal memory.
  • Once done then reboot your OnePlus 3T into the recovery mode.
  • Inside the recovery mode, then select Install from ADB Sideload.
  • Now you can connect your OnePlus 3T to PC.
  • You need to launch the command window from the ADB folder by pressing Shift + Right click and then choose the Open Command Window.
    Open Command Window Here
  • Verify whether your device's properly connected to PC or not, by executing this command.
    adb devices
  • (After executing the above command and you see your device's information and details, it means your device's properly connected and it's fully prepared to flash the OxygenOS 3.5.3 firmware).
  • Now type the following command and then hit the Enter to start flashing the OxygenOS 3.5.3 on your OnePlus 3T.
    adb sideload File Name.zip
  • (Just as the example, the adb sideload will likely be like this; OnePlus3TOxygen_16_OTA_008_all_1606122244_e0cfc5ffc8bf411a.zip).
  • After the flashing processes are complete, just reboot your device guys, that will be great now.
  • Finish.
Advertisements.


Well done because you have successfully installed the OxygenOS 3.5.3 firmware on OnePlus 3T device.

Monday, 28 November 2016

How To Enable VoLTE On OnePlus 2

About a year ago, precisely 2015, July, a new phone arrived called OnePlus 2 that came out with Qualcomm MSM8994 Snapdragon 810 chipset and Android 5.1 Lollipop OS out of the box. The phone ran so great and amazing. As the owner of the phone, you know better than I do regarding its performance.

However for some reasons it is regarded otherwise, the phone was considered a failure and some who bought it feeling unsatisfied. Times go by and we found out the culprit was OxygenOS neither because the phone's hardware nor software. Well, that's the time we are thankful for the existence of the custom ROMs.
Advertisements.

If you are one of the lucky owners of the phone then you have fully noticed the phone doesn't has the Qualcomm MSM8994 Snapdragon 810 ability, when it's a great one that makes us able to perform voice calls a 4G LTE network, rather than the 2G or 3G connections. If your existing carrier support this kind of feature thus you will be happy if the phone has it.

And on this post I would like to guide you on how to enable VoLTE support on your OnePlus 2 running on HyadorgenOS 2.5. The processes require you to flash the newest version of modem file from HydrogenOS 2.5 (The Chinese version of firmware).

The firmware is regularly maintained and it comes with VoLTE support. So if you are interested then read on. Hope you all the best.

Update. You can simply download OxygenOS 3.5.5 OTA to enable VoLTE functionality. It applies to select carriers.

Prerequisites.

Download Modem File from HydrogenOS 2.5.

How to enable VoLTE support on OnePlus 2

Note. You are the one responsible for applying the guides written here. Because none forcing you to do so.
Advertisements.


  1. Power off your phone now and then power it on to boot into the recovery mode.
  2. When you are inside the TWRP recovery mode, then find and tap the Install button, and search the Modem file you downloaded earlier.
    Install Button TWRP Recovery Android
    Choose Zip File TWRP Recovery
  3. Install it by swiping the Swipe To Confirm Flash button to start the installation process.
    Swipe To Confirm
  4. Once done, just reboot your device using the Reboot button, from TWRP main menu interface screen.
    TWRP Reboot System
  5. Done.
You did it my friend for enabling the VoLTE feature on your OnePlus 2.

Thursday, 24 November 2016

Update OnePlus One To Android 7.1 Tutorials

You can now flash Android 7.1 Nougat Slim7 ROM on OnePlus One of yours. The Slim7 ROM is one of the best ROMs available today for your OnePlus flagships that offering Android 7.1 software as the latest version of Nougat.
Advertisements.

The Slim7 is indeed a slim ROM, offering simply the experience of Nougat without features that we don't really need. Once this ROM is fully installed you will enjoy great performance with a strong battery life feature. And the ROM itself is very smooth, stable and fast. You will enjoy it guys.

OnePlus One is a great phone comes with decent specifications however it's not going to receive the official Nougat update. Therefore you need to flash the non-stock ROM like the Slim7 ROM if you wish to experience the same Nougat along with the additional features added by the developers.

How To Install Slim7 Android 7.1 Nougat On OnePlus One
Preconditions and information.
  • Remember that this instruction only for the OnePlus One.
  • You need to already have installed a custom recovery such as CWM or TWRP. On this post I use TWRP recovery. (See the how to install TWRP recovery on Android).
  • Prepare your computer and a USB cable.
  • Your OnePlus One's bootloader should already be unlocked. (How to unlock OnePlus One bootloader).
  • Make sure that you already have enabled USB debugging mode of your OnePlus One.
  • Charge your battery to the full or at least % 60 power.
  • Flashing this kind of custom ROM will void your device's warranty.
  • Slim7 custom ROM doesn't include the Gapps therefore we will flash the apps separately.
  • Backup first before starting to do unofficial activities to your device.
  • Follow the entire guides without skipping anything.
See also guys.

How to update OnePlus One to Android 7.1 Nougat with Slim7 ROM Tutorials

Your warranty will be voided. Perform the guides written on the post and all the risks are yours to take.
Advertisements.


  1. Download Slim-bacon-7.1.0.build.0.1-DEV-DM-20161120-1725.zip and Gapps to your PC.
  2. Now you need to use your USB cable to connect your device to PC. Once they're connected then transfer all the zip files to your device's SD card.
  3. Now power off your OnePlus One then unplug it from USB cable.
  4. Now enter to the Recovery Mode / TWRP mode.
  5. Inside the TWRP mode, perform the following action full data wipe by choosing the Wipe button -> Swipe to Factory Reset button.
    Wipe Data TWRP Recovery Android
    Wipe TWRP Recovery
  6. Now back to the TWRP main menu then you need to tap the Install button. And then choose the ROM zip file you previously transferred to your device's storage on step 2.
    Install Button TWRP Recovery Android
    Choose Zip File TWRP Recovery
  7. Now confirm the installation by simply swiping the Swipe to Confirm Flash option. You will see the installation will begin.
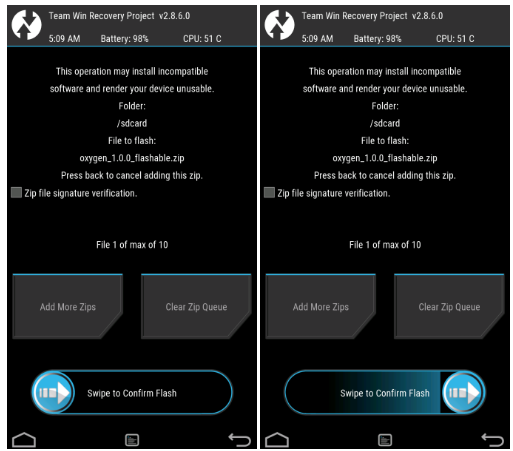
    Swipe To Confirm
  8. Once the installation has been completed then repeat the above action to flash the Gapps.
    TWRP Finished Install
  9. Now you need to tap Wipe cache/dalvik button in case you experience bootloop or other technical problem.
  10. Now you need to tap the Reboot System button.
    TWRP Reboot System
  11. Done.
Congratulations because you have successfully updated your OnePlus One to Android 7.1 Nougat using Slim7 custom ROM.

Tuesday, 22 November 2016

How To Install Android 7.0 Nougat CypherOS On OnePlus 2

How to install Android 7.0 Nougat on OnePlus 2. You as the OnePlus 2 owners are offered with a new custom ROM that brings the latest Android version, the ROM name is CypherOS that is designed to offer simplicity yet comes with very tremendous additional features for you. CypherOS Android 7.0 ROM is here to be another options for OnePlus 2 to taste the Nougat environment.
Advertisements.

Surely you have already known that the custom ROM flashing procedures require you to have a custom recovery running. You can use either CWM or TWRP to flash the ROM zip file. However on this post I use TWRP recovery. You are free to use any other recoveries that you like most.

If you are interested to install CypherOS Android 7.0 Nougat on your OnePlus 2 device then you are welcomed to follow the guides written on this post.

How to update OnePlus 2 Android 7.0 Nougat CypherOS custom ROM
Preconditions and information.
  • The CypherOS Android 7.0 N ROM only supports OnePlus 2, therefore don't flash it on any other device's models.
  • You need to use CWM or TWRP to flash the CypherOS ROM.
  • Prepare your Windows PC and a USB cable.
  • Don't you forget to also enabled USB debugging mode of your OnePlus X.
  • Charge your device's battery power.
  • Follow the entire guides without skipping any steps.
  • Backup your data if you think it's must.

How to update OnePlus 2 Android 7.0 Nougat CypherOS custom ROM

Remember that flashing a custom ROM like this will void your device's warranty therefore proceed at your own risk.
Advertisements.

  1. Download the Android 7.0 CypherOS.Cstom ROM and Gapps to your PC.
  2. Now you need to use your USB cable to connect your device to PC. Once they're connected then transfer all the zip files to your device's SD card.
  3. Now power off your OnePlus 2 then unplug it from USB cable.
  4. Now enter to the recovery mode.
  5. Inside the TWRP mode, perform the following action full data wipe by choosing the Wipe button -> Swipe to Factory Reset button.
    Wipe Data TWRP Recovery Android
    Wipe TWRP Recovery
  6. Now back to the TWRP main menu then you need to tap the Install button. And then choose the ROM zip file you previously transferred to your device's storage on step 2.
    Install Button TWRP Recovery Android
    Choose Zip File TWRP Recovery
  7. Now confirm the installation by simply swiping the Swipe to Confirm Flash option. You will see the installation will begin.
    Swipe To Confirm
  8. Once the installation has been completed then repeat the above action to flash the Gapps.
    TWRP Finished Install
  9. Now you need to tap Wipe cache/dalvik button in case you experience bootloop or other technical problem.
  10. Now you need to tap the Reboot System button.
    TWRP Reboot System
  11. Done.
Youd did it guys because you just finished flashing the Android 7.0 Nougat CypherOS ROM on your OnePlus 2 and I say congratulations.

Friday, 11 November 2016

Update OnePlus X To Android 7.0 Nougat With CM14.1 ROM

How to update OnePlus X to Android 7.0 Nougat with CM14.1 ROM. Hey guys you can update your OnePlus X to Android Nougat 7.0 using the CM14.1 ROM. And if you have been waiting for the Nougat officially release for your device then for you to know it won't happen, because the device is reported will not be getting Nougat update. So to deal with the problem and having Android 7.0 Nougat then you can use the custom ROM.
Advertisements.

It is Sarthak Narang an XDA senior member who brought this ROM to us and therefore we are invited to give this ROM a try on our OnePlus X device. So if you are interested and think this is your chance then come on flash it. And lucky you because the post you are reading now will guide you through the entire processes to flash the CM14 Android 7.0 Nougat ROM on your OnePlus X device.

And before you doing that then I would like you to learn about this ROM first. This ROM is based on AOSP therefore your device should already be in bootloader unlocked condition. Having this custom ROM installed will void your device's warranty and therefore hope you already notice about that.
Update OnePlus X To Android 7.0 Nougat With CM14.1 ROM
Preconditions and information.
  • The CM14.1 ROM must be flashed only if you own the OnePlus X device.
  • You need to have either CWM or TWRP recovery installed on your device, as for me I use the TWRP recovery, it's better user interface I guess.
  • A computer and a USB cable are needed.
  • Make sure you have enabled USB debugging mode of your OnePlus X because it's a requirement.
  • If your device's battery power is less then charge it.
  • You need to follow all the steps and don't skip any steps.
  • Backup first before doing anything.
Advertisements.

How to update OnePlus X Android 7.0 Nougat CM14.1 custom ROM

Your warranty will be voided. Perform the guides below and all the risks are yours to take.
  1. Download the Android 7.0 CM14.1 custom ROM and Gapps to your PC.
  2. Now you need to use your USB cable to connect your device to PC. Once they're connected then transfer all the zip files to your device's SD card.
  3. Now power off your OnePlus X then unplug it from USB cable.
  4. Now enter to the recovery mode.
  5. Inside the TWRP mode, perform the following action full data wipe by choosing the Wipe button -> Swipe to Factory Reset button.
    Wipe Data TWRP Recovery Android
    Wipe TWRP Recovery
  6. Now back to the TWRP main menu then you need to tap the Install button. And then choose the ROM zip file you previously transferred to your device's storage on step 2.
    Install Button TWRP Recovery Android
    Choose Zip File TWRP Recovery
  7. Now confirm the installation by simply swiping the Swipe to Confirm Flash option. You will see the installation will begin.
    Swipe To Confirm
  8. Once the installation has been completed then repeat the above action to flash the Gapps.
    TWRP Finished Install
  9. Now you need to tap Wipe cache/dalvik button in case you experience bootloop or other technical problem.
  10. Now you need to tap the Reboot System button.
    TWRP Reboot System
  11. Done.
Well done guys you did it to update your OnePlus X to Android 7.0 Nougat using CM14.1 ROM.