sMobile ? "width=device-width,initial-scale=1.0,minimum-scale=1.0,maximum-scale=1.0" : "width=1100"' name='viewport'/> android xda: Install Android ROM
Showing posts with label Install Android ROM. Show all posts

Monday, 30 January 2017

Update Huawei Nexus 6P To Android Nougat 7.1.1 With LineageOS 14.1 Nightly ROM

Update Huawei Nexus 6P to Android Nougat (7.1.1) with LineageOS 14.1 Nightly ROM, hi every Nexus 6P owners instead of waiting you better flash this custom ROM, because the LineageOS 14.1 Nightly is offering the Android 7.1.1 Nougat for you. And of course since it's still in Nightly then don't expect everything runs smoothly guys.

Albeit the Nexus 6P is spoiled with the Android 7.1.1 update officially by Google, but for you to know that this ROM has something more to offer then the stock ROM. Let alone this ROM is CyanogenMod, because it's the new name of that very famous ROM, it was developed as the CyanogenMod was along with additional features within.
Advertisements.

So you can expect something similar with CM14.1 Build, but with only a new name, it offers great customization and performance improvements.

Update Huawei Nexus 6P to Android Nougat (7.1.1) with LineageOS 14.1 Nightly ROM
Preconditions.
  • Be sure only flash the Lineage OS Android 7.1.1 Nougat 14.1 Nightly ROM only on the Huawei Nexus 6P.
  • Be sure that Huawei Nexus 6P's bootloader is unlocked before flashing this ROM.
  • Backup your data first guys.
  • Be sure that your device's has the CWM or TWRP recovery installed to flash this custom ROM. I invite you to head to now how to install TWRP on any Android device guides.
  • You must also enable USB debugging mode first.
  • All the instructions on this post must be followed as whole without you to skip any steps.
  • Lineage 14.1 ROM doesn't come with Google Apps and so you need to install them separately.
  • Your computer and USB cable must be ready to use.
  • In case your device's battery power is less then charge it first.
  • All the best for you.

You need to download the following files to your computer.


How to update Huawei Nexus 6P to Android 7.1.1 Nougat with Lineage 14.1 Nightly custom ROM

Well guys follow the updating instructions and all the possible risks are yours to bear and nobody should be taken responsible if anything wrong happen to your device such as brick.
Advertisements.

  1. Now connect your Huawei Nexus 6P to computer using a USB cable and then transfer all the zip files (Lineage 14.1 Nightly and Google Apps) you downloaded earlier to PC to your Nexus's SD card.
  2. Now power off your Huawei Nexus 6P then unplug it from USB cable.
  3. Now enter to the Recovery Mode / TWRP mode.
  4. Inside the TWRP mode, perform the following action full data wipe by choosing the Wipe button -> Swipe to Factory Reset button.
    Wipe Data TWRP Recovery Android
    Wipe TWRP Recovery
  5. Now back to the TWRP main menu then you need to tap the Install button. And then choose the Android 7.1.1 Lineage OS ROM zip file you previously transferred to your device's storage on step 2.
    Install Button TWRP Recovery Android
    Choose Zip File TWRP Recovery
  6. Now confirm the installation by simply swiping the Swipe to Confirm Flash option. You will see the installation will begin.
    Swipe To Confirm
  7. Once the installation has been completed then repeat the above action to flash the Gapps.
    TWRP Finished Install
  8. Now you need to tap Wipe cache/dalvik button in case you experience bootloop or other technical problem.
  9. Now you need to tap the Reboot System button.
    TWRP Reboot System
  10. Done.
Congratulation my friend because you have successfully updated your Huawei Nexus 6P to Android 7.1.1 Nougat using the LineageOS Nightly 14.1 ROM. Tell your friend about this news. And as always see you again on my next posts on the Install Android ROMs blog.

Update Galaxy S3 I9300 To Android 7.1.1 Nougat With LineageOS ROM

How to update Samsung Galaxy S3 I9300 to Android 7.1.1 Nougat instructions. Hi guys as we know that Samsung Galaxy S3 will not receive the Android 7.1.1 N update, therefore do not expect any official announcements on your OTA or Samsung KIES features. Because that would be impossible.

And if you want Nougat to run on your Samsung Galaxy S3 I9300 phone then you must use the third party ROM designed by Android developers, known as custom ROM, and on this post you will be offered to flash the LineageOS ROM to bring the Android 7.1.1 Nougat on your Samsung Galaxy S3 I9300 phone and then enjoy every awesomeness this ROM is offering for your. And I hope you will like it guys. And usual good luck guys.
Advertisements.

And flashing this ROM requires an unlocked bootloader device and have already have CWM or TWRP recovery installed. Remember that flashing a custom ROM is not encouraged by Samsung therefore it will nullify your device's warranty.

Preconditions.
  • Make sure you only flash the LineageOS Android 7.1.1 ROM on Samsung Galaxy S3 I9300 only and do not try it on any other models.
  • Remember that the LineageOS ROM is based on AOSP therefore flashing it requires a bootloader unlocked device.
  • Make backups first.
  • Be sure that your device's already powered with either CWM or TWRP. Head to this how to install TWRP on any Android device tutorials.
  • Of course you are going to need to enable USB debugging mode first.
  • Do all the steps written on this post without skipping any steps.
  • LineageOS Android 7.1.1 ROM has no Google Apps therefore install them after you install the ROM.
  • Do not forget to prepare your computer and a USB cable.
  • Charge your device's battery power if it's less.
  • Good luck for you guys.

You need to download the following files to your computer.


How to update Galaxy S3 I9300 to Android 7.1.1 Nougat with LineageOS custom ROM

Well guys follow the updating instructions and all the possible risks are yours to bear and nobody should be taken responsible if anything wrong happen to your device such as brick.
Advertisements.

  1. Now connect your Galaxy S3 I9300 to computer using a USB cable and then transfer all the zip files (LineageOS and Google Apps) you downloaded earlier to PC to your Nexus's SD card.
  2. Now power off your Galaxy S3 I9300 then unplug it from USB cable.
  3. Now enter to the Recovery Mode / TWRP mode.
  4. Inside the TWRP mode, perform the following action full data wipe by choosing the Wipe button -> Swipe to Factory Reset button.
    Wipe Data TWRP Recovery Android
    Wipe TWRP Recovery
  5. Now back to the TWRP main menu then you need to tap the Install button. And then choose the Android 7.1.1 LineageOS ROM zip file you previously transferred to your device's storage on step 2.
    Install Button TWRP Recovery Android
    Choose Zip File TWRP Recovery
  6. Now confirm the installation by simply swiping the Swipe to Confirm Flash option. You will see the installation will begin.
    Swipe To Confirm
  7. Once the installation has been completed then repeat the above action to flash the Gapps.
    TWRP Finished Install
  8. Now you need to tap Wipe cache/dalvik button in case you experience bootloop or other technical problem.
  9. Now you need to tap the Reboot System button.
    TWRP Reboot System
  10. Done.
You did it guys because you have successfully updated your Galaxy S3 I9300 to Android 7.1.1 ROM.

Update OnePlus One To Android 7.1.1 With AOSPlusOne ROM

There is a good custom ROM dedicated to OnePlus One, and this ROM will deliver Android 7.1.1 Nougat to your device. And of course having this ROM installed will give you so many awesomeness brought by Nougat 7.1.1 plus with additional features planted by the ROM developer.

And of course you want to know the ROM name, its name is AOSPlusone, and brought every thing considered great for you all.
Advertisements.

Albeit the root access is not necessary, but having it will be better for you and of course the custom recovery such as CWM or TWRP is needed in order to flash the ROM zip file. You will find this ROM awesome guys.

If you want to update your Sony Xperia Z5 to Android 7.0 Nougat then you can follow the full instructions from this post. And as the result your Sony Xperia Z5 device will be running on the Android 7.0 software.

Update OnePlus One To Android 7.1.1 With AOSPlus One ROM
Preconditions.
  • You should only flash the AOSPlusOne Android 7.1.1 ROM on OnePlus One only.
  • The AOSPLUSOne ROM is based on AOSP therefore your device's bootloader should be firstly unlocked to flash this ROM.
  • Firstly I recommend you to make backups before proceeding.
  • You need to already have either CWM or TWRP recovery installed on your OnePlus One. Haven't done it? Then please to visit the how to install TWRP on any Android device instructions.
  • One more thing, you must enable USB debugging mode first.
  • Follow all the written instructions on this post and do not skip any steps.
  • AOSPlus One ROM doesn't include Google Apps therefore you need to flash them separately.
  • You need to prepare your OS Windows computer and a USB cable device.
  • Now check your device's battery power, if it's less, then charge it first.
  • Wish you all the best guys.

You need to download the following files to your computer.


How to update OnePlus One to Android 7.1.1 Nougat with AOSPlus One custom ROM

Well guys follow the updating instructions and all the possible risks are yours to bear and nobody should be taken responsible if anything wrong happen to your device such as brick.
Advertisements.

  1. Now connect your OnePlus One to computer using a USB cable and then transfer all the zip files (AOSPlus One and Google Apps) you downloaded earlier to PC to your Nexus's SD card.
  2. Now power off your OnePlus One then unplug it from USB cable.
  3. Now enter to the Recovery Mode / TWRP mode.
  4. Inside the TWRP mode, perform the following action full data wipe by choosing the Wipe button -> Swipe to Factory Reset button.
    Wipe Data TWRP Recovery Android
    Wipe TWRP Recovery
  5. Now back to the TWRP main menu then you need to tap the Install button. And then choose the Android 7.1.1 AOSPlus One ROM zip file you previously transferred to your device's storage on step 2.
    Install Button TWRP Recovery Android
    Choose Zip File TWRP Recovery
  6. Now confirm the installation by simply swiping the Swipe to Confirm Flash option. You will see the installation will begin.
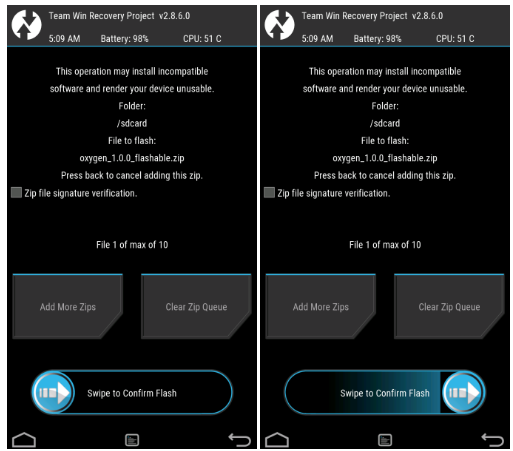
    Swipe To Confirm
  7. Once the installation has been completed then repeat the above action to flash the Gapps.
    TWRP Finished Install
  8. Now you need to tap Wipe cache/dalvik button in case you experience bootloop or other technical problem.
  9. Now you need to tap the Reboot System button.
    TWRP Reboot System
  10. Done.
That's all guys your OnePlus One is already updated to the Android 7.1.1 Nougat with AOSPlus One custom ROM. And you can try it for a few days, test it guys, if you like it then set it to be your daily driver. And as usual. See you again in the next posts.

Friday, 23 December 2016

How To Update Sony Xperia Z5 To Android 7.0 Nougat With CM14.1 ROM

How to update Sony Xperia Z5 to Android 7.0 Nougat with CM14.1 ROM. Hi guys, do you own a Sony Xperia Z5 and want to update it to Android 7.0 Nougat? Then I invite you to follow the full instructions to install Android 7.0 Nougat CM14.1 on your Sony Xperia Z5. And the steps to flashing the custom ROM is quite easy, all you need is having a custom recovery.

And CM14.1 ROM is one of the few best Android 7.0 Nougat based custom ROMs, you will enjoy the fastness, stability and also the ROM is so smooth once it's installed on your Sony Xperia Z5. And of course you will also enjoy the features from it.
Advertisements.

If you want to update your Sony Xperia Z5 to Android 7.0 Nougat then you can follow the full instructions from this post. And as the result your Sony Xperia Z5 device will be running on the Android 7.0 software.

How To Update Sony Xperia Z5 To Android 7.0 Nougat With CM14.1 ROM
Preconditions.
  • I must remind you to only flash the CM14.1 ROM on Sony Xperia Z5, do not flash it on any other Xperia models, okey?
  • Since the CM14.1 Nougat ROM is based on AOSP then you need to firstly unlock your device's bootloader. Therefore learn to unlock bootloader of Sony Xperia device. If you haven't done so guys.
  • Be sure to firstly make necessary backups before starting the guides from this post.
  • Your device's should already have either CWM or TWRP recovery installed. Visit this page; how to install TWRP on any Android device, if you haven't flashed the custom recovery.
  • One more thing you need to firstly enable USB debugging mode if you haven't done so.
  • Remember that you need to follow all the steps written on this post and do not skip anything.
  • CM14.1 Android 7.0 Nougat doesn't come with the Google Apps therefore you will need to install the Gapps zip file separately after you have finished installing the CM14.1 Nougat ROM.
  • Prepare your computer to download the zip files and a USB cable to transfer the zip files to your device's SD storage.
  • Check your device's battery power, if it's less power, then charge it.
  • I wish you all the best guys.

You need to download the following files to your computer.


How to update Sony Xperia Z5 to Android 7.0 Nougat with CM14.1 custom ROM

Well guys follow the updating instructions and all the possible risks are yours to bear and nobody should be taken responsible if anything wrong happen to your device such as brick.
Advertisements.

  1. Now connect your Sony Xperia Z5 to computer using a USB cable and then transfer all the zip files (CM14.1 ROM and Google Apps) you downloaded earlier to PC to your Nexus's SD card.
  2. Now power off your Sony Xperia Z5 then unplug it from USB cable.
  3. Now enter to the Recovery Mode / TWRP mode.
  4. Inside the TWRP mode, perform the following action full data wipe by choosing the Wipe button -> Swipe to Factory Reset button.
    Wipe Data TWRP Recovery Android
    Wipe TWRP Recovery
  5. Now back to the TWRP main menu then you need to tap the Install button. And then choose the Android 7.0 Nougat CM14.1 ROM zip file you previously transferred to your device's storage on step 2.
    Install Button TWRP Recovery Android
    Choose Zip File TWRP Recovery
  6. Now confirm the installation by simply swiping the Swipe to Confirm Flash option. You will see the installation will begin.
    Swipe To Confirm
  7. Once the installation has been completed then repeat the above action to flash the Gapps.
    TWRP Finished Install
  8. Now you need to tap Wipe cache/dalvik button in case you experience bootloop or other technical problem.
  9. Now you need to tap the Reboot System button.
    TWRP Reboot System
  10. Done.
You did it my friend because you have successfully updated your Sony Xperia Z5 to Android 7.0 Nougat with CM14.1 ROM and see you again guys.

Wednesday, 7 December 2016

How To Update Galaxy S3 To Android 7.0 Nougat Using CM14.1 ROM

Update Galaxy S3 to Android 7.0 Nougat using CM14.1 ROM. The International Samsung Galaxy S3 is without a doubt, a great smartphone because it was armed with so many stuff that can assist us to undergo our daily live. Because of that, the phone is not left behind by the third-party developers, because it's regarded can handle a tough Android version such as Android 7.0.

Recently we are handed with a news that people behind the CyanogenMod team had released a CM14.1 to deliver the modified Android 7.0 Nougat to Samsung Galaxy S3, and the zip file of the ROM is currently available for any Samsung Galaxy S3's users to download and install for their need.
Advertisements.

However, it's still not yet in the final stage, therefore don't expect it will 100% stable once it's fully installed on your device and some new features of ROM are not included yet. But it's an official nightly build therefore you will get the upcoming OTA updates daily.

How To Update Galaxy S3 To Android 7.0 Nougat Using CM14.1 ROM
Preconditions.
  • You need to firstly backup your precious data before starting.
  • Make sure that you already have USB debugging mode enabled. (How to enable USB debugging mode on Android).
  • Make sure that your device is International Samsung Galaxy S3 and do not apply the guides written here on any other models.
  • Your device should already in the unlocked bootloader condition.
  • Be sure that you already have installed either CWM or TWRP recovery software on your Samsung Galaxy S3. (How to install TWRP recovery on any Android devices).
  • A computer and a USB cable are needed to perform the guides from this post.
  • Do not forget to follow the CM14.1 flashing instructions on this post as whole and not to skip any steps.

How to update International Samsung Galaxy S3 to Android 7.0 Nougat with CM14.1 ROM

Follow the guides from this post at your choice, blame none but yourself, if you brick or damage your device..
Advertisements.

  1. Now you must download Android 7.1 CM14.1 ROM and Gapps to the computer of yours.
  2. Now you need to use your USB cable to connect your device to PC. Once they're connected then transfer all the zip files to your device's SD card.
  3. Now power off your Samsung Galaxy S3 then unplug it from USB cable.
  4. Now enter to the Recovery Mode / TWRP mode.
  5. Inside the TWRP mode, perform the following action full data wipe by choosing the Wipe button -> Swipe to Factory Reset button.
    Wipe Data TWRP Recovery Android
    Wipe TWRP Recovery
  6. Now back to the TWRP main menu then you need to tap the Install button. And then choose the Android 7.0 CM14.1 Nougat ROM zip file you previously transferred to your device's storage on step 2.
    Install Button TWRP Recovery Android
    Choose Zip File TWRP Recovery
  7. Now confirm the installation by simply swiping the Swipe to Confirm Flash option. You will see the installation will begin.
    Swipe To Confirm
  8. Once the installation has been completed then repeat the above action to flash the Gapps.
    TWRP Finished Install
  9. Now you need to tap Wipe cache/dalvik button in case you experience bootloop or other technical problem.
  10. Now you need to tap the Reboot System button.
    TWRP Reboot System
  11. Done.
You did it my friend because you have updated your Samsung Galaxy S3 to Android 7.0 Nougat using the CM14.1 ROM and now you can enjoy everything that the CM14.1 ROM is offering for you.

How To Update OPPO R5 To Android 7.0 With CM14.1 ROM

How to update OPPO R5 to Android 7.0 with CM14.1 ROM. OPPO R5 gets an exciting news now because CyanogenMod team has added the 5.2" phone as the supported device to receive CM14.1 based on Android 7.0 Nougat. You can take this oppurtunity to adorn your Qualcomm MSM8939 Snapdragon 615 chipset powered phone with Android 7.0 software. CM14.1 is one of the best custom ROMs that already reap very good comments from Android users worldwide. And the ROM is stable, smooth and fast. You should take it now guys.

The CM14.1 ROM is based on AOSP therefore to flash it your device's bootloader should already be unlocked. And since this is a modified ROM wrapped with .zip extension therefore to install it on your OPPO R5 then you are going to need a custom recovery such as CWM or TWRP. I choose TWRP because it has a better user interface.

Advertisements.

And if you are interested then you can start by firstly read the following preconditions to give you useful information about what to prepare before you begin.

How To Update OPPO R5 To Android 7.0 With CM14.1 ROM
Preconditions.
  • Before you start I recommend you to backup every data you regard important.
  • You need to enable USB debugging mode of your Android powered device. (How to enable USB debugging mode on Android).
  • And remember that this guide is only for OPPO R5, forget about the guide, if you don't own the phone.
  • Do not forget to firstly unlock your OPPO R5's bootloader before starting.
  • This is also a requirement, your OPPO R5 device should already be powered with either CWM or TWRP recovery. (How to install TWRP recovery on any Android devices).
  • Remember that you need to have a computer or a USB cable.
  • Follow all the instructions from A to Z and skip not anything.

How to update OPPO R5 to Android 7.0 Nougat with CM14.1 ROM

Follow the guides from this post at your choice, blame none but yourself, if you brick or damage your device..
Advertisements.

  1. Now you must download Android 7.1 CM14.1 ROM and Gapps to the computer of yours.
  2. Now you need to use your USB cable to connect your device to PC. Once they're connected then transfer all the zip files to your device's SD card.
  3. Now power off your OPPO R5 then unplug it from USB cable.
  4. Now enter to the Recovery Mode / TWRP mode.
  5. Inside the TWRP mode, perform the following action full data wipe by choosing the Wipe button -> Swipe to Factory Reset button.
    Wipe Data TWRP Recovery Android
    Wipe TWRP Recovery
  6. Now back to the TWRP main menu then you need to tap the Install button. And then choose the Android 7.0 CM14.1 Nougat ROM zip file you previously transferred to your device's storage on step 2.
    Install Button TWRP Recovery Android
    Choose Zip File TWRP Recovery
  7. Now confirm the installation by simply swiping the Swipe to Confirm Flash option. You will see the installation will begin.
    Swipe To Confirm
  8. Once the installation has been completed then repeat the above action to flash the Gapps.
    TWRP Finished Install
  9. Now you need to tap Wipe cache/dalvik button in case you experience bootloop or other technical problem.
  10. Now you need to tap the Reboot System button.
    TWRP Reboot System
  11. Done.
Great my friend because you have successfully installed CM14.1 based on Android 7.0 Nougat ROM on your OPPO R5 using the full instructions written on this post. If you regard this post is useful. Then tell your friends about this post.

Tuesday, 6 December 2016

How To Update Sony Xperia Z2 To Android 7.0 Nougat

Those of you who own a Xperia Z2 then here is your good news, because now you can update your Sony Xperia Z2 to Android 7.0 Nougat. As we know, that the said smartphone is not yet receiving any update except Lollipop. Albeit Sony itself had promised to pour the Android Marshmallow to the phone. But if you want to have the Nougat running on your device. Then you can flash a custom ROM brought by Brandon Nel, an XDA senior member.
Advertisements.

The ROM is reported to support several devices, one of which is Sony Xperia Z2, therefore you should not let this chance get away from your sight. You are welcomed to flash it on your device. And try yourself whether the ROM works nearly good for you. Who knows you might end up making this ROM as your daily driver guys.

And remember one thing, Sony Xperia Z2 is a good phone, but making the phone better is your job and one of the ways to do so is installing Android 7.0 Nougat based ROM. And the post you are reading now containing all the needed steps to flash Android 7.0 Nougat custom ROM on you Sony Xperia Z2 phone.

How To Update Sony Xperia Z2 To Android 7.0 Nougat
Preconditions.

How to update Sony Xperia Z2 to Android 7.0 Nougat unofficially

Follow the guides from this post at your choice, blame none but yourself, if you brick or damage your device..
Advertisements.

  1. Now you must download Android 7.1 ROM and Gapps to the computer of yours.
  2. Now you need to use your USB cable to connect your device to PC. Once they're connected then transfer all the zip files to your device's SD card.
  3. Now power off your Sony Xperia Z2 then unplug it from USB cable.
  4. Now enter to the Recovery Mode / TWRP mode.
  5. Inside the TWRP mode, perform the following action full data wipe by choosing the Wipe button -> Swipe to Factory Reset button.
    Wipe Data TWRP Recovery Android
    Wipe TWRP Recovery
  6. Now back to the TWRP main menu then you need to tap the Install button. And then choose the Android 7.0 Nougat ROM zip file you previously transferred to your device's storage on step 2.
    Install Button TWRP Recovery Android
    Choose Zip File TWRP Recovery
  7. Now confirm the installation by simply swiping the Swipe to Confirm Flash option. You will see the installation will begin.
    Swipe To Confirm
  8. Once the installation has been completed then repeat the above action to flash the Gapps.
    TWRP Finished Install
  9. Now you need to tap Wipe cache/dalvik button in case you experience bootloop or other technical problem.
  10. Now you need to tap the Reboot System button.
    TWRP Reboot System
  11. Done.
Well done my friend because you have done everything needed to update your Sony Xperia Z2 to Android 7.0 Nougat and you can verify it by going to Settings -> About phone and to check what is ROM running on your beloved device guys.