Check Out The Video Below!

Note: You must have ClockworkMod Recovery or TWRP installed on your Nexus 5, if you don't follow this rooting guide.
Getting your device rooted and having the ability to install custom ROMS to your Nexus 5 gives you a huge amount of freedom to what you can do to your phone! Installing custom ROMS allows you to be on the latest Android version much faster than waiting for an OTA update also there are tons of mods you can add to your phone!
Mods that make your phone faster, improve battery life, and even give you a better software experience. Some of these mods are so good that Google sometimes put similar mods into official Android versions!
Also with installing custom ROMS you get to experience some of most popular available ROMS like Paranoid Android, CyanogenMod, and AOKP!
Follow the guide below to install custom ROMS on a Nexus 5!
Note: All data will be wiped, make sure you backup anything important!
Best places to download Nexus 5 custom ROMS:
XDA - Android Development
XDA - Original Development
Install Custom ROMS using TWRP:
1. Download a Nexus 5 custom ROM to your phone. Links above for best place to download custom ROMS for Nexus 5.
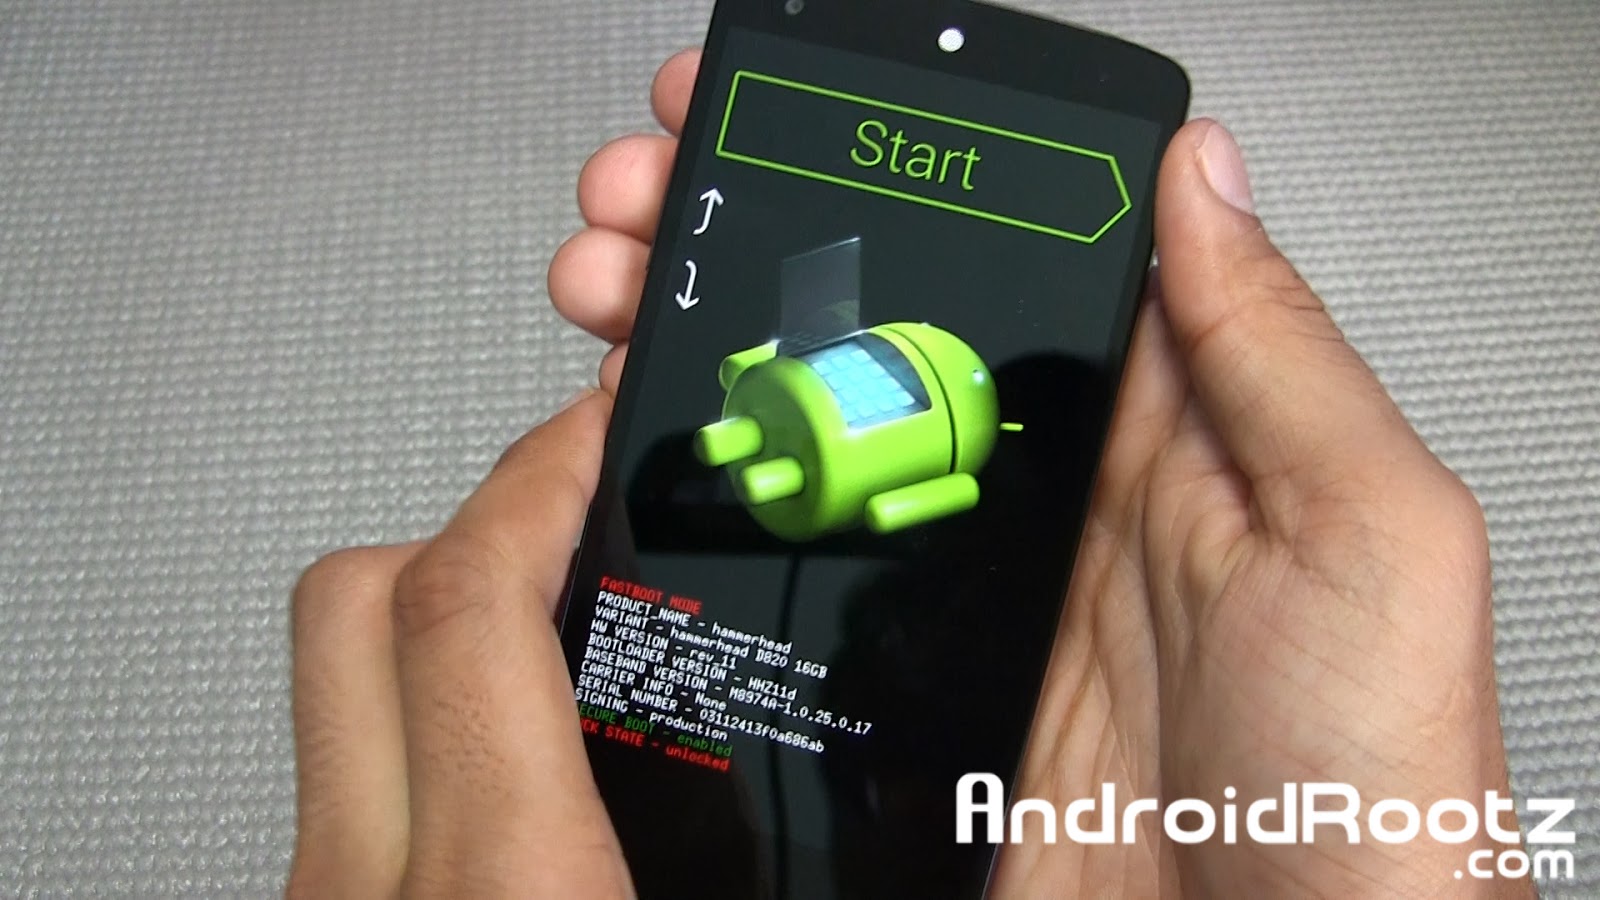
2. Enter into Bootloader Mode. Power off your phone, press the volume up, volume down, and power button all at the same time. When your phone vibrates let go of the power button, but keep holding onto the volume up and down buttons.
3. You should now see a green start screen. Press the volume up 2x and press the power button to enter into "Recovery" mode.
4. Select "Backup" and slide to your finger to backup everything. This will create a backup file that you can later restore just in case if you get stuck in a bootloop or want to go back to your older ROM.
4. Go back, select "Wipe", and slide your finger to confirm. Note: "Wipe" will remove all user data!
5. Once complete go back and choose "Install".
6. Locate where you downloaded the ROM, if you downloaded the ROM directly to your phone it will be in the "Download" folder.
7. Select the ROM and then slide your finger to install it. (Installation will take about 5 minutes)
8. Once complete select "reboot system" and your phone will now boot up into your new custom ROM. (Boot up will take around 5-7 minutes)
Install Custom ROMS using ClockworkMod:
1. Download a Nexus 5 custom ROM to your phone. Links above for best place to download custom ROMS for Nexus 5.
Getting your device rooted and having the ability to install custom ROMS to your Nexus 5 gives you a huge amount of freedom to what you can do to your phone! Installing custom ROMS allows you to be on the latest Android version much faster than waiting for an OTA update also there are tons of mods you can add to your phone!
Mods that make your phone faster, improve battery life, and even give you a better software experience. Some of these mods are so good that Google sometimes put similar mods into official Android versions!
Also with installing custom ROMS you get to experience some of most popular available ROMS like Paranoid Android, CyanogenMod, and AOKP!
Follow the guide below to install custom ROMS on a Nexus 5!
Note: All data will be wiped, make sure you backup anything important!
Best places to download Nexus 5 custom ROMS:
XDA - Android Development
XDA - Original Development
Install Custom ROMS using TWRP:
1. Download a Nexus 5 custom ROM to your phone. Links above for best place to download custom ROMS for Nexus 5.
2. Enter into Bootloader Mode. Power off your phone, press the volume up, volume down, and power button all at the same time. When your phone vibrates let go of the power button, but keep holding onto the volume up and down buttons.
3. You should now see a green start screen. Press the volume up 2x and press the power button to enter into "Recovery" mode.
4. Select "Backup" and slide to your finger to backup everything. This will create a backup file that you can later restore just in case if you get stuck in a bootloop or want to go back to your older ROM.
4. Go back, select "Wipe", and slide your finger to confirm. Note: "Wipe" will remove all user data!
5. Once complete go back and choose "Install".
6. Locate where you downloaded the ROM, if you downloaded the ROM directly to your phone it will be in the "Download" folder.
7. Select the ROM and then slide your finger to install it. (Installation will take about 5 minutes)
8. Once complete select "reboot system" and your phone will now boot up into your new custom ROM. (Boot up will take around 5-7 minutes)
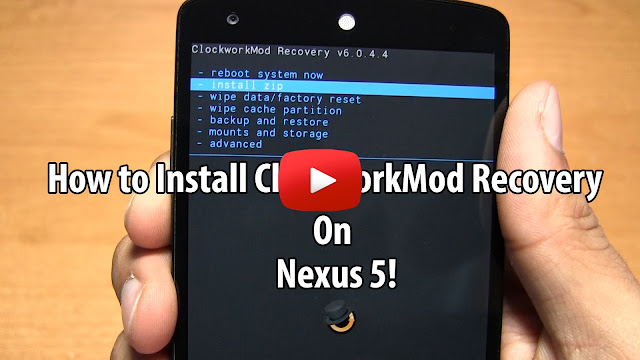
Install Custom ROMS using ClockworkMod:
1. Download a Nexus 5 custom ROM to your phone. Links above for best place to download custom ROMS for Nexus 5.
2. Enter into Bootloader Mode. Power off your phone, press the volume up, volume down, and power button all at the same time. When your phone vibrates let go of the power button, but keep holding onto the volume up and down buttons.
3. You should now see a green start screen. Press the volume up 2x and press the power button to enter into "Recovery" mode.
4. Select "backup and restore" > "backup" and select "yes". This will create a backup of all your data on your phone so you can restore this if you get stuck in a bootloop or want to remove the current ROM your on.
5. Navigate to "Wipe Data/Factory Reset" and select "yes".
6. Go to "Wipe cache partition" and select "yes".
7. Go into "advanced" and select "wipe dalvik cache" and choose "yes".
8. Choose "+++++Go Back+++++".
9. Select "Install zip from sd card" then "choose zip from sd card" and finally "0/" folder.
10. Locate the ROM and install the ROM, it will take about 2-5 minutes.
11. Now choose "+++++Go Back+++++" and "Reboot System Now".
12. Wait for your phone to boot up, which will take about 5 minutes and start using your custom ROM!
FAQ:
Q: My phone is stuck on the bootup screen for over 5 minutes after installing a custom ROM.
A: If your on TWRP repeat step 12 and if your on ClockworkMod repeat steps 5-7.
Q: After installing the ROM I don't have apps like Play Store or Gmail installed.
A: Some ROMS require you to install Gapps (Google Apps) after the ROM, go back to the place where you downloaded the ROM and check.
-----------------------------------------------------------------------------------------------------------------------------7. Go into "advanced" and select "wipe dalvik cache" and choose "yes".
8. Choose "+++++Go Back+++++".
9. Select "Install zip from sd card" then "choose zip from sd card" and finally "0/" folder.
10. Locate the ROM and install the ROM, it will take about 2-5 minutes.
11. Now choose "+++++Go Back+++++" and "Reboot System Now".
12. Wait for your phone to boot up, which will take about 5 minutes and start using your custom ROM!
FAQ:
Q: My phone is stuck on the bootup screen for over 5 minutes after installing a custom ROM.
A: If your on TWRP repeat step 12 and if your on ClockworkMod repeat steps 5-7.
Q: After installing the ROM I don't have apps like Play Store or Gmail installed.
A: Some ROMS require you to install Gapps (Google Apps) after the ROM, go back to the place where you downloaded the ROM and check.
Need Help With Your Android Device? Follow Me / Add Me / Like Me
Google Plus
-----------------------------------------------------------------------------------------------------------------------------
Check Out Our YouTube Channel For More Great Guides!
YouTube and Subscribe
-----------------------------------------------------------------------------------------------------------------------------
Nexus 5 FAQ
How to Root Nexus 5!
How to Unroot Nexus 5!
Please Check Out The Nexus 5 FAQ Section Before Commenting!
-----------------------------------------------------------------------------------------------------------------------------