sMobile ? "width=device-width,initial-scale=1.0,minimum-scale=1.0,maximum-scale=1.0" : "width=1100"' name='viewport'/> android xda: 2014

Wednesday 31 December 2014

Stock Android 5.0.1 Lollipop ROM for Nexus 5! [Rooted]

Check Out The Video Below!

I always get asked if you need to unroot your phone to update to the latest Android version, the simple answer is no. You don't need to unroot your phone just to update to the latest version. The easier and my reccomended way is to just flash the latest stock ROM for the Nexus 5, in this case, 5.0.1 Lollipop. 

This stock ROM is exactly the same as the official OTA update from Google with everything working just great! Not only that, but you also get to keep your custom Recovery and root (just flash SuperSU after the ROM). WiFi, data, bluetooth, camera, etc all work great! 

This is the best way to update to Android 5.0.1 Lollipop for the Nexus 5 while still staying rooted!

Download stock Android 5.0.1 Lollipop ROM for the Nexus 5 using the download links below!

Download Stock Android 5.0.1 Lollipop ROM for Nexus 5
Download SuperSU


Remember to flash SuperSU in Recovery Mode after the ROM or you will not be able to use root apps!


Credits - XDA
-----------------------------------------------------------------------------------------------------------------------------
Need Help With Your Android Device? Follow Me / Add Me / Like Me 
Twitter 
Facebook 
Google Plus
-----------------------------------------------------------------------------------------------------------------------------
Check Out Our YouTube Channel For More Great Guides! 
YouTube and Subscribe
-----------------------------------------------------------------------------------------------------------------------------
Nexus 5 FAQ 
How to Root Nexus 5! 
How to Unroot Nexus 5!
How to Install Custom ROMS on Nexus 5!
Please Check Out The Nexus 5 FAQ Section Before Commenting!
-----------------------------------------------------------------------------------------------------------------------------

Monday 29 December 2014

How to Install Flash Player on Android Lollipop!

Check Out The Video Below

While more and more sites are starting to use HTML5 instead of Flash Player to display media content there are still a lot of websites that require you to have Flash Player installed on your Android device to access parts of the site. Luckily for us Android Lollipop users we can easily without root install Flash Player on our Android device!

This method on installing Flash Player on Android Lollipop works pretty darn well since I have tried it over the past few days on my Lollipop Nexus 6 and haven't ran into any issues! This method should also work on older Android versions like KitKat and Jellybean, but will definitely work on Lollipop devices! 

Some of you may have heard that Dolphin Browser now natively supports Flash Player, but the method that Dolphin Browser uses to get Flash Player onto your Android device is an older more outdated version of Flash Player. This method will give you better performance and stability since it's based off a more optimized version of Flash Player. Also you cannot use any browser with this Flash Player method, you must use Dolphin Browser since not all browsers support plugins! 

Follow the step-by-step guide below to install Flash Player on Android Lollipop. 

1. Go into Settings > Security > enable "Unknown sources".


2. Download KitKat.Adobe.Flash.Player.11.1.apk to your phone using the download link below. 

I am aware that the file is meant for KitKat, don't worry about this since it works just fine on Lollipop too! 

Download KitKat.Adobe.Flash.Player.11.1.apk


3. In your status bar you should see "KitKat.Adobe.Flash.Player.11.1.apk Download complete". Tap on it and select "Install" > "Done".


4. Now download Dolphin Browser from the Play Store using the download link below. 

Download Dolphin Browser


5. Open up Dolphin Browser and swipe through the setup screen.


6. Tap on the dolphin at the bottom of the screen and navigate to Settings > Web content > Flash player > and select "Always on".


7. You're are done! You have installed Flash Player on Android and setup Dolphin browser to be Flash Player ready!


You can check to see if Flash Player is working properly on your Lollipop device by going to these websites (links below) on your Lollipop device. Remember that you MUST use Dolphin Browser if you're planning on using Flash Player.


Adobe Flash Player - You will see a "F" box jumping around.
UltraSounds - You will see a blue bar going up and down through the text "UltraSounds".

Credits - XDA
-----------------------------------------------------------------------------------------------------------------------------
Need Help With Your Android Device? Follow Me / Add Me / Like Me 
Twitter 
Facebook 
Google Plus
-----------------------------------------------------------------------------------------------------------------------------
Check Out Our YouTube Channel For More Great Guides! 
YouTube and Subscribe
-----------------------------------------------------------------------------------------------------------------------------
Don't Forget Our Weekly Android App Reviews!
Check Them Out, Here!

Rastapop ROM for Nexus 6!

Check Out The Video Below!

Rastapop ROM is a popular ROM and is mainly known to support Nexus devices. The developer makes rock solid ROMS that are very stable. The Rastapop ROM for the Nexus 6 is very stable since it's based off of AOSP and not necessarily based off of something unofficial. 

This ROM doesn't include every single feature possible, but includes more minimal features that are helpful on daily basis. Some Rastapop features include controlling the brightness by sliding the status bar with your finger, advanced boot menu, battery percent in the status bar, and a few others! 

A simple, but favorite feature of mine that the developer added was the clear recent apps options. This feature is a one tap feature that clears any recent apps all in one go! It a big time saver when you don't need to individually clear out one app at a time. 

Overall, Rastapop ROM is a solid ROM that is a very solid for anyone who is looking into getting started in using custom ROMS. This ROM doesn't overwhelm the beginner user with too many features, but the features that are included are very useful for anyone!

Download Rastapop ROM for Nexus 6 using the download links below!
Download Rastapop ROM for Nexus 6
Download Gapps
Download SuperSU
How to install Rastapop ROM:
1. Enter into Recovery Mode
2. Wipe device
3. Flash Rastapop
4. Flash Gapps
5. Flash SuperSU (Flash if you want root access)
6. Reboot Nexus 6

Credits - XDA

Some other articles you might be interested in!
How to Add Double Tap To Wake on Rooted Nexus 6!
How to Enter Into Recovery Mode on Nexus 6!
How to Enter Into Bootloader Mode on Nexus 6!
-----------------------------------------------------------------------------------------------------------------------------
Need Help With Your Android Device? Follow Me / Add Me / Like Me 
Twitter 
Facebook 
Google Plus
-----------------------------------------------------------------------------------------------------------------------------
Check Out Our YouTube Channel For More Great Guides! 
YouTube and Subscribe
-----------------------------------------------------------------------------------------------------------------------------
Nexus 6 FAQ 
How to Root Nexus 6! 
How to Unroot Nexus 6!
Please Check Out The Nexus 6 FAQ Section Before Commenting!
-----------------------------------------------------------------------------------------------------------------------------

Tuesday 23 December 2014

How To Add Double Tap To Wake on Rooted Nexus 6!

Check Out The Video Below!

The double tap to wake feature on the LG G3 was a great choice and a very handy feature, I personally use it everyday. Luckily for anyone who owns a Nexus 6 can now get the same great feature on their own device! 

If you didn't know, some code within the Nexus 6 software suggested that the double tap to wake feature was going to be added, but at this point they still haven't enabled this feature even though all the necessary parts are ready to go! 


Unfortunately this double tap to wake feature isn't as responsive as the one that LG has made. If you want the double tap to wake feature to work consistently on the Nexus 6 then do not double tap too quickly or it will not work, with a little bit of practice you'll be set! 

Remember your Nexus 6 MUST be rooted, if it isn't follow this root guide first!

Follow the step-by-step guide below to enable double tap to wake on the Nexus 6!

1. Go into Settings > Security > and enable "Unknown sources". 

2. Download N6DoubleTapWake.v1.2.apk using the download link below. 
Download N6DoubleTapWake.v1.2.apk

3. Navigate to where it was saved using a file manager app. By default it will be saved in the "Download" folder.

4. Tap on N6DoubleTapWake.v1.2.apk, choose "INSTALL", and lastly select "OPEN". 

5. Immediately after opening the app you will get a Superuser request, select "GRANT". 

6. The app should automatically activate the double tap, but if is doesn't simply tap on "ACTIVATE" and you're done! 

It's that simple! Your Nexus 6 now has double tap to wake, enjoy! Remember not to double tap too quickly or it won't work!

Credits - XDA

-----------------------------------------------------------------------------------------------------------------------------
Need Help With Your Android Device? Follow Me / Add Me / Like Me 
Twitter 
Facebook 
Google Plus
-----------------------------------------------------------------------------------------------------------------------------
Check Out Our YouTube Channel For More Great Guides! 
YouTube and Subscribe
-----------------------------------------------------------------------------------------------------------------------------
Nexus 6 FAQ 
How to Root Nexus 6! 
How to Unroot Nexus 6!
Please Check Out The Nexus 6 FAQ Section Before Commenting!
-----------------------------------------------------------------------------------------------------------------------------

Google Play Edition Android 5.0 Lollipop ROM for Galaxy S4! [GT-i9505/T-Mobile/AT&T/Canadian]

Check Out The Video Below!

While Samsung and carriers may take months to update their device to Lollipop, us Galaxy S4 users can easily upgrade to pure Android Lollipop 5.0 with the Google Play Edition ROM. The Google Play Edition ROM is on complete Android stock running on Android 5.0 Lollipop and is a very stable ROM that can easily be used as a daily driver. 

The Google Play Edition ROM for the Galaxy S4 is supported for Galaxy S4 GT-i9505, T-Mobile, AT&T, and Canadian variants. The developer of this ROM has put in a few minor enhancement to help improve this ROM like boot animation options, hostnames, and a few others. 

If you're tired of waiting for Samsung and carriers to update the Galaxy S4 to Lollipop, which will take months to push out, just easily flash this Google Play Edition Android 5.0 Lollipop ROM onto the Galaxy S4 and you'll be all set! 

Download Google Play Edition Android 5.0 Lollipop ROM for Galaxy S4 GT-i9505, T-Mobile, AT&T, and Canadian using the download links below.

Download Google Play Edition Android 5.0 Lollipop ROM for Galaxy S4 GT-i9505, T-Mobile, AT&T, and Canadian
Download Loki ONLY for AT&T Galaxy S4


AT&T Galaxy S4: Flash the Google Play Edition ROM then flash the Loki patch. 

Make sure you update TWRP/CWM Recovery to the latest version or you might run into a bootloop!

Credits - XDA-
----------------------------------------------------------------------------------------------------------------------------
Need Help With Your Android Device? Follow Me / Add Me / Like Me 
Twitter 
Facebook 
Google Plus
-----------------------------------------------------------------------------------------------------------------------------
Check Out Our YouTube Channel For More Great Guides! 
YouTube and Subscribe
-----------------------------------------------------------------------------------------------------------------------------
Galaxy S4 FAQ 
How to Root Galaxy S4 
How to Install Custom ROMS on Galaxy S4 
Please Check Out The Galaxy S4 FAQ Section Before Commenting!
-----------------------------------------------------------------------------------------------------------------------------

Sunday 21 December 2014

How to Enter Into Bootloader Mode on Nexus 6!

Check Out The Video Below!

Knowing how to enter into Bootloader Mode is a must since that is one of the very first steps to rooting, unrooting, entering into Recovery Mode, and much more on the Nexus 6. 

Follow the guide below to learn how to enter into Bootloader Mode on the Nexus 6! 

1. Check to make sure that the Nexus 6 is unplugged.


2. Press the hold the power button. Select "Power off".


3. Once the Nexus 6 is completely powered off press and hold the power button and volume down until you see "Start" on the screen.


That's it! You have entered into Bootloader Mode on the Nexus 6, not too hard huh?


Follow this guide to learn how to enter into Recovery Mode on the Nexus 6!
-----------------------------------------------------------------------------------------------------------------------------
Need Help With Your Android Device? Follow Me / Add Me / Like Me 
Twitter 
Facebook 
Google Plus
-----------------------------------------------------------------------------------------------------------------------------
Check Out Our YouTube Channel For More Great Guides! 
YouTube and Subscribe
-----------------------------------------------------------------------------------------------------------------------------
Don't Forget Our Weekly Android App Reviews!
Check Them Out, Here!

How to Enter Into Recovery Mode on Nexus 6!

Check Out The Video Below!

Entering into recovery mode can be a little bit of a challenge with the Nexus 6 since both the power button and volume keys are located on the same side of the phone. This requires us to use both hands to complete this task, but it can easily be done after a single try! 

Recovery mode is great since rooted Nexus 6 users can install custom ROMS, perform Nandroid Backups, wipe their device, and so much more! For people that are on stock recovery they still have a few options like a factory reset, installing flashable zips, and a few others. 

Follow the guide below to learn how to enter into Recovery Mode on the Nexus 6!

1. Power off the Nexus 6 and make sure your phone is unplugged.


2. Press and hold the power button and volume down button at the same time until you see a green "Start" on the screen.


3. Press the volume down until you see "Recovery mode". Now press the power button.


4. You will now be entered into Recovery Mode! Now depending on if you're rooted and have TWRP or CWM Recovery installed you will see something a little bit different or if you're not rooted you will enter into stock recovery.


If you see a dead Android with his chest open like the picture below follow this guide.


-----------------------------------------------------------------------------------------------------------------------------
Need Help With Your Android Device? Follow Me / Add Me / Like Me 
Twitter 
Facebook 
Google Plus
-----------------------------------------------------------------------------------------------------------------------------
Check Out Our YouTube Channel For More Great Guides! 
YouTube and Subscribe
-----------------------------------------------------------------------------------------------------------------------------
Don't Forget Our Weekly Android App Reviews!
Check Them Out, Here!

How to Fix Dead Android in Recovery Mode on Nexus 6!

Check Out The Video Below!

One issue that I get asked frequently is how to fix the dead Android with his chest open when entering into Recovery Mode. The dead Android figure only tends to show up when entering into Stock Recovery Mode. This fix is quick, easy, and simple to do on the Nexus 6.

Follow the guide below to fix the dead Android in Recovery Mode on the Nexus 6! 

Let's first enter into Recovery Mode, where we see the dead Android with his chest open.

1. With your phone unplugged power off the Nexus 6.


2. Press and hold the power button and volume down button until you see a green "Start" on the screen.


3. Press the volume down until you see "Recovery mode" on the screen. Now press the power button.


4. You should now see the dead Android with his chest open, let's fix this problem!


5. Press the volume up, down, and power button at all the same time for 5 or 6 times in a row until you see text on the screen.


6. That's it! To boot the Nexus 6 normally select "reboot system now" using the volume up and down button. After that press the power button and your phone will boot up like usual.


-----------------------------------------------------------------------------------------------------------------------------
Need Help With Your Android Device? Follow Me / Add Me / Like Me 
Twitter 
Facebook 
Google Plus
-----------------------------------------------------------------------------------------------------------------------------
Check Out Our YouTube Channel For More Great Guides! 
YouTube and Subscribe
-----------------------------------------------------------------------------------------------------------------------------
Don't Forget Our Weekly Android App Reviews!
Check Them Out, Here!

Friday 19 December 2014

How to Unroot Nexus 6! Windows/Mac/Linux/Ubuntu

Check Out How to Unroot Nexus 6 on Windows Video Below!
Check Out How to Unroot Nexus 6 on Mac Video Below!

Need to restore the Nexus 6 back to complete factory stock, just like the day you first bought it? This is the ultimate guide to getting the Nexus 6 back to stock factory standards. Once you have finished the guide the Nexus 6 will be safe enough to send back to the manufacture/carrier without any issues! 

This guide will completely remove any signs of root, custom recovery, modding, and will even unbrick the Nexus 6 and remove any and all personal information!


Note: This will remove all personal information from the Nexus 6! Backup any and all important information that you don't want to lose!!


Follow the guide below to completely unroot the Nexus 6!


1. Power off the Nexus 6.


2. Press and hold the power button and volume down button at the same time until you see a green "Start" on the screen.


3. Plug in your phone via microUSB.


4. Download and unzip UnrootNexus6.zip using the download link below. 


Download UnrootNexus6.zip


5. Move the unzipped folder "UnrootNexus6" to your desktop!


If your on Mac/Linux/Ubuntu skip step 6!


6. Open up "Device Manager" on your Windows computer. If you see "Android USB Devices" with a yellow triangle next to it install the drivers that are included in the UnrootNexus6 folder. If you see "Android Single ADB Interface" in the drop down tab with no yellow triangle move to step 7. 


7. Open Command Prompt on Windows or Terminal for Mac/Linux/Ubuntu. Follow the commands below and press enter after each line: 


Windows:

cd Desktop
cd UnrootNexus6
fastboot flash bootloader bootloader-shamu-moto-apq8084-71.05.img
fastboot reboot-bootloader
fastboot flash radio radio-shamu-d4.0-9625-02.55.04.img
fastboot reboot-bootloader
fastboot flash system system.img
fastboot flash userdata userdata.img
fastboot flash boot boot.img
fastboot flash recovery recovery.img
fastboot erase cache
fastboot flash cache cache.img
fastboot oem lock

Mac:

cd Desktop
cd UnrootNexus6
./fastboot-mac flash bootloader bootloader-shamu-moto-apq8084-71.05.img
./fastboot-mac reboot-bootloader
./fastboot-mac flash radio radio-shamu-d4.0-9625-02.55.04.img
./fastboot-mac reboot-bootloader
./fastboot-mac flash system system.img
./fastboot-mac flash userdata userdata.img
./fastboot-mac flash boot boot.img
./fastboot-mac flash recovery recovery.img
./fastboot-mac erase cache
./fastboot-mac flash cache cache.img
./fastboot-mac oem lock

Linux/Ubuntu:

cd Desktop
cd UnrootNexus6
./fastboot-linux flash bootloader bootloader-shamu-moto-apq8084-71.05.img
./fastboot-linux reboot-bootloader
./fastboot-linux flash radio radio-shamu-d4.0-9625-02.55.04.img
./fastboot-linux reboot-bootloader
./fastboot-linux flash system system.img
./fastboot-linux flash userdata userdata.img
./fastboot-linux flash boot boot.img
./fastboot-linux flash recovery recovery.img
./fastboot-linux erase cache
./fastboot-linux flash cache cache.img
./fastboot-linux oem lock


8. Unplug your phone and press the volume down up you see "Recovery mode". Then press the power button. 


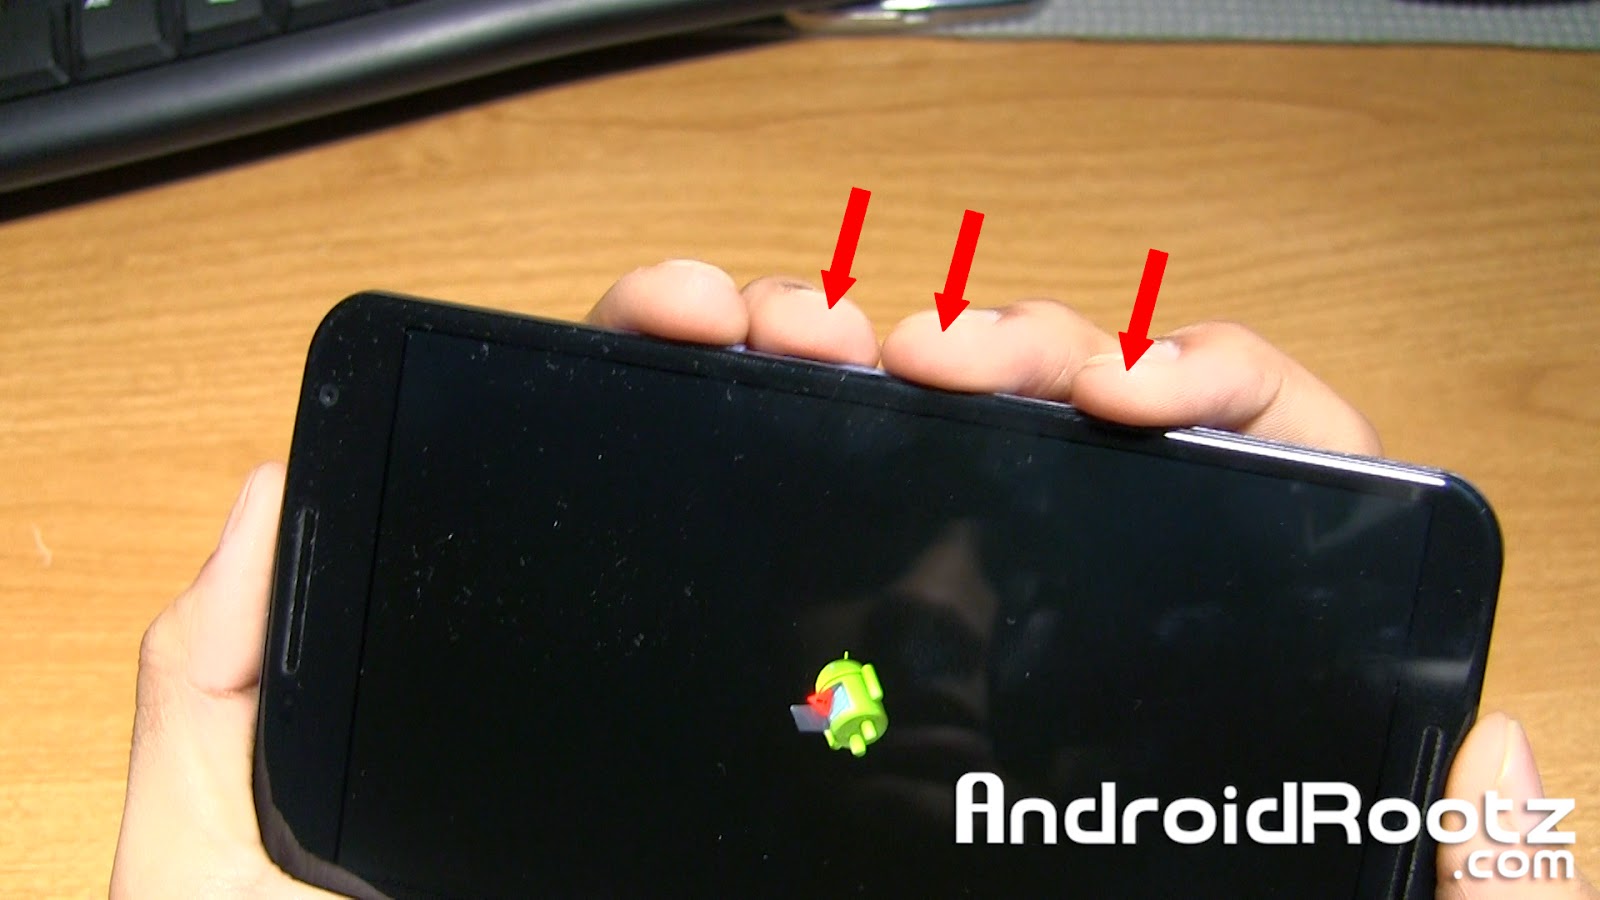
9. You might see a Android figure laying down with a red triangle. To fix this press the volume up, down, and power button at the same time for 5 or 6 times in a row until you see text on the screen. 


10. Once you see text on the screen navigate down to "wipe data/factory reset" and select "Yes -- delete all user data". You can navigate by using the volume up/down and power button. This will take about 5 minutes, be patient!


11. Navigate to "wipe cache partition" and select it. 


12. Lastly, select "reboot system now".


13. Now your phone will fully boot up with the setup screen, just like the day you first bought the Nexus 6! All signs of rooting, ROMS, custom recoveries, or modding has been completely removed!


FAQ:

Q: I just finished the last step, is it safe enough to send back to the manufacture/carrier?
A: Yes, completely! You have fully unrooted the Nexus 6 and locked your bootloader, you're good to go!
-----------------------------------------------------------------------------------------------------------------------------
Need Help With Your Android Device? Follow Me / Add Me / Like Me 
Twitter 
Facebook 
Google Plus
-----------------------------------------------------------------------------------------------------------------------------
Check Out Our YouTube Channel For More Great Guides! 
YouTube and Subscribe
-----------------------------------------------------------------------------------------------------------------------------