Thursday 29 September 2016
MAME v0.177 to v0.178 Update ROMs
MAME v0.177 to v0.178 Update ROMs
Size: 16.2 MB
Hosting: zippyshare.com
Number of links: 1
Download MAME v0.177 to v0.178 Update ROMs
How To Flash CM14 Android 7.0 ROM On Nexus 4
Here you will be guided to install Android 7.0 CM14 custom ROM on Nexus 4 device. If you own that this device then you are welcomed to follow the full instructions on this post. Because one thing, you know that Google has dropped developments for this device quite while, therefore don't expect to get the latest Nougat coming to your device officially.
But thanks to a development made by third party developer to bring CyanogenMod 14 delivering Android 7.0 Nougat to you.
If you are interested then you can continue reading this post and once you have installed the CM14 on your Nexus 4 you will learn what great things it has for you guys.
Preconditions.
Congratulation because you have successfully flashed CM14 Android 7.0 Nougat ROM on your Nexus 4. You can check it via Settings -> About phone.
Advertisements.
But thanks to a development made by third party developer to bring CyanogenMod 14 delivering Android 7.0 Nougat to you.
If you are interested then you can continue reading this post and once you have installed the CM14 on your Nexus 4 you will learn what great things it has for you guys.
Preconditions.
- CM14 is based on AOSP and a stock ROM, to flash it you need to firstly unlock your device's bootloader.
- Your Nexus 4 should already have CWM or TWRP recovery installed. On this I use CWM.
- Your device should already be rooted.
- Your device's warranty will be nullified for flashing this modified ROM.
- CM14 doesn't include Google apps therefore we will need to install Google apps separately.
- Enable USB debugging mode of your Nexus 4 first.
- Make necessary backups before starting.
- A computer with a USB cable.
- You need to charge your battery power first if it's low.
How To Flash CM14 Android 7.0 Nougat ROM On Nexus 4
- Now transfer all the zip files you previously downloaded to PC to your Nexus 7 by connecting your device to PC using your USB cable.
- After all the zip files transferred, just disconnect your device from PC.
- We will need to boot into the CWM recovery by firstly powering off your device, then press these buttons; Volume UP + Home + Power.
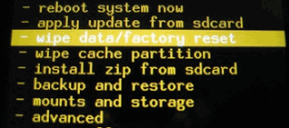
- Inside the CWM recovery just choose this option; Wipe Data/Factory Reset.
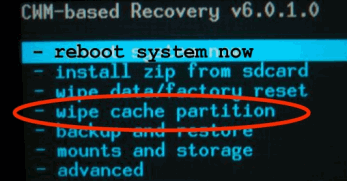
- Then select the Wipe Cache Partition. Followed with selecting the Wipe Dalvik Cache.
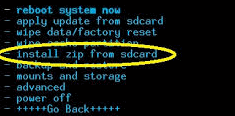
- Now choose the Install Zip From SD Card -> Choose Zip From SD Card to search the ROM zip file and then install the zip file.
- Just choose the *****Go Back***** -> Reboot System Now once the zip file was successfully installed.
- Repeat the above process to flash the Google Apps.
- Once done just restart your device.
Advertisements.
Congratulation because you have successfully flashed CM14 Android 7.0 Nougat ROM on your Nexus 4. You can check it via Settings -> About phone.
How To Flash AOSP Android 7.0 ROM On Nexus 7 (2013)
Here I bring to you full tutorials to flash AOSP based on Android 7.0 Nougat on your Nexus 7 (2013). This is a custom ROM not the official released by Google. However things great are already included in this ROM. So you can expect awesome surprises once it's fully installed.
Anyway this AOSP ROM is still under development though, therefore you can expect some bugs. One of the bugs reported is 1080p video doesn't perform well. But in overall AOSP Android 7.0 Nougat ROM is great and can be used as your daily ROM.
And if you want give this ROM a try then you are invited to continue reading this post to follow the flashing instructions.
Preconditions.
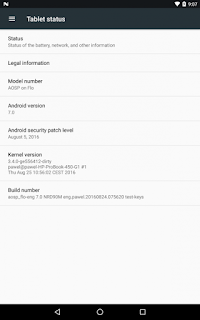
You can now enjoy all the good things offered by AOSP Android 7.0 Nougat ROM on your Nexus 7 (2013).
Advertisements.
Anyway this AOSP ROM is still under development though, therefore you can expect some bugs. One of the bugs reported is 1080p video doesn't perform well. But in overall AOSP Android 7.0 Nougat ROM is great and can be used as your daily ROM.
And if you want give this ROM a try then you are invited to continue reading this post to follow the flashing instructions.
Preconditions.
- AOSP is not a stock ROM, you need to have a bootloader unlocked device to flash it.
- Your device should already be powered with a custom recovery images such as CWM, TWRP, etc. On this post we use CWM recovery.
- Root access is needed.
- Installing this kind of ROM will effect of losing your device's warranty.
- AOSP ROM doesn't come with Google Apps therefore you need to flash this ROM separately.
- Your device's USB debugging mode should be firstly enabled.
- Create backups before starting anything.
- Prepare your computer, a USB cable as we will need to connect your device to PC.
- Charge your device's batter power if it is low.
- Download Android 7.0 AOSP ROM.
- Google Apps.
How To Flash AOSP Android 7.0 ROM On Nexus 7 (2013).
- Now transfer all the zip files you previously downloaded to PC to your Nexus 7 by connecting your device to PC using your USB cable.
- After all the zip files transferred, just disconnect your device from PC.
- We will need to boot into the CWM recovery by firstly powering off your device, then press these buttons; Volume UP + Home + Power.
- Inside the CWM recovery just choose this option; Wipe Data/Factory Reset.
- Then select the Wipe Cache Partition. Followed with selecting the Wipe Dalvik Cache.
- Now choose the Install Zip From SD Card -> Choose Zip From SD Card to search the ROM zip file and then install the zip file.
- Just choose the *****Go Back***** -> Reboot System Now once the zip file was successfully installed.
- Repeat the above process to flash the Google Apps.
- Once done just restart your device.
Advertisements.
You can now enjoy all the good things offered by AOSP Android 7.0 Nougat ROM on your Nexus 7 (2013).
Wednesday 28 September 2016
LG Flash Tool All Latest Versions
Download LG Flash Tool latest and all versions from this post. Those who have LG flagship devices should install this handy tool, because it will help you perform very crucial things to your device.
LG Flash Tool can be used to update your device by flashing the stock firmware released by LG. This will of course essential to keep your device OS up-to-date and secure from any potential app's attacks because the security improvements brought by the firmware.
And if your device having technical problem such as stuck at bootloop or just want to restore back to the official stock image from stock ROMs, simply use LG Flash Tool.
One more thing that this LG Flash Tool is already patched, that means to use it you don't need to firstly sign-up or register, just download, install and launch the program to your computer based on Windows and you can do everything this tool provide to optimize your LG powered smartphone or tablet guys.
You can use LG Flash Tool to restore to the stock firmware from either custom ROM or Kernel. That would be useful to reclaim your warranty or simply to fix some errors.
Features.
Screenshot.
Hope you find this download LG Flash Tool all new versions useful for you.
LG Flash Tool can be used to update your device by flashing the stock firmware released by LG. This will of course essential to keep your device OS up-to-date and secure from any potential app's attacks because the security improvements brought by the firmware.
Advertisements.
And if your device having technical problem such as stuck at bootloop or just want to restore back to the official stock image from stock ROMs, simply use LG Flash Tool.
One more thing that this LG Flash Tool is already patched, that means to use it you don't need to firstly sign-up or register, just download, install and launch the program to your computer based on Windows and you can do everything this tool provide to optimize your LG powered smartphone or tablet guys.
You can use LG Flash Tool to restore to the stock firmware from either custom ROM or Kernel. That would be useful to reclaim your warranty or simply to fix some errors.
Features.
- Can flash big file. You can flash 1GB KDZ files using this tool.
- Supports many LG devices. You don't need to worry whether your device is supported or not by this tool because it supports almost all devices as long as they are produced by LG. And you need a correct USB driver installed on your computer.
- Executable file. This tool comes with a single executable package that can be running on your computer. You need to use your USB cable to connect your device to computer once the program is running.
- Logging feature. To track any errors then you can utilize logs to identify what causing the malfunction or error. So you will discover the cause of the errors.
- Small size. The file size of this tool is only 307.28KB.
- It is already being patched. You don't need to login to use it.
- This is a free tool.
- Windows XP, Windows 7, 8, 8.1 and Windows 10 and yes this tool only supports Windows operating system, at least now.
- Your computer should already has Visual C++ installed because this is needed to launch the .exe file to your computer.
- LG USB drivers should already be installed on your PC.
Advertisements.
Download LG Flash Tool for Windows from the following link.
Screenshot.
 |
| Credits to @ieatacid – xda-developers. |
Root Galaxy S6 Edge SM-G925R4
Here you will learn on how to root Samsung Galaxy S6 Edge SM-G925R4. Then you will enjoy all the exciting goodies from root. And this post will help you get root access on your Samsung Galaxy S6 Edge.
But let me remind you that rooting will give you one and unvoidable consequence which is losing your warranty. If that's the case you can restore to the official stock firmware update to reclaim your warranty.
Anyway if you are ready we can start by firstly reading the preconditions below.
Preconditions.
Well done my friend because you have done all the steps to root Samsung Galaxy S6 Edge SM-G925R4 and now enjoy all the candies.
But let me remind you that rooting will give you one and unvoidable consequence which is losing your warranty. If that's the case you can restore to the official stock firmware update to reclaim your warranty.
Advertisements.
Anyway if you are ready we can start by firstly reading the preconditions below.
Preconditions.
- A Windows computer with already have USB drivers installed and a USB cable.
- Your Samsung Galaxy S6 Edge SM-G925R4 must already be updated to the Android 6.0.1, built id MMB29K.G925R4TYU3CPB4.
- You need to also enable Android USB debugging mode.
- Charge your device's batter power if you consider it's less power.
- Backup any data you regard important.
- Follow all the steps without skipping any step.
Remember to follow the rooting instructions on this post but all the possible risks which may happen are your responsible.Files you must download and extract to your computer.
Instructions to root Samsung Galaxy S6 Edge SM-G925R4
- Power off your device to enter to the Download Mode.(Visit this page how enter download mode for Samsung Galaxy).
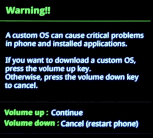
- Once you see these warning notification, just press the Volume Up to get into the Download Mode.
- Open Odin now when your device is in Download Mode.
- Connect your device to computer once Odin is opened.
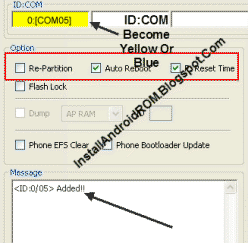
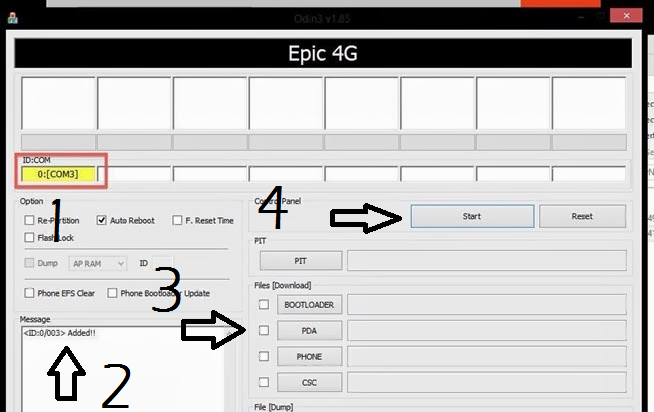
- If Odin managed to detect your device then it will display this notification; Added!!!.
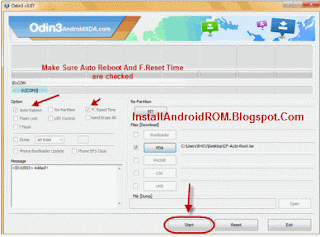
- Click the PDA (For Odin3 v3.07) button to get the CF-Auto-Root file you downloaded and extracted earlier on your PC.
- Now click the Start button to flash the CF-Auto-Root tool on your Samsung Galaxy device.
- PASS notification will be appearing once the CF-Auto-Root package installed on your Samsung Galaxy device.
- Reboot your device to complete all the rooting procedures.
Advertisements.
Well done my friend because you have done all the steps to root Samsung Galaxy S6 Edge SM-G925R4 and now enjoy all the candies.
Download SUT L3 Tool (Latest Version)
Download SUT L3 Tool (latest version). SUT L3 Tool to flash stock firmware on the Intel Chipset powered device. Using it you can update your U8850 Vision smart device to the newest stock firmware.
To use SUT L3 Tool you need to firstly connect your device to computer and then choose the image file containing the update, and you will see this tool will execute the needed components.
You can utilize this tool to fix several technical issues like bootloop, force close to apps, mistakenly install the wrong apps. The SUT L3 Tool can be used to install update so the problems may be solved.
The features offered by SUT L3 Tool are.
To use SUT L3 Tool you need to firstly connect your device to computer and then choose the image file containing the update, and you will see this tool will execute the needed components.
Advertisements.
You can utilize this tool to fix several technical issues like bootloop, force close to apps, mistakenly install the wrong apps. The SUT L3 Tool can be used to install update so the problems may be solved.
The features offered by SUT L3 Tool are.
- User friendly interface. You will easily navigate and use this tool because all the existing menu and interface are so descriptive.
- Installer. You need to firstly install the package to your computer to use it.
- Inbuilt Drivers. That means you will find USB drivers with all the needed setup file that will be installed automatically on your PC with SUT L3 tool. However if you want to uninstall SUT L3 Tool in the future, the drivers will not removed along. You need to uninstall the drivers separately.
How To Root Samsung Galaxy A9 (2016) On ZCU1BPE2
Here is the full instructions to root ZCU1BPE2 Android 6.0.1 running on the Samsung Galaxy A9 (2016) device. If you want to know the entire procedures of bringing root access to your device then read this post now.
If you recently updated your Samsung Galaxy A9 to the ZCU1BPE2 Android 6.0.1 firmware then you notice now that your root access is gone. That means the powerful ability you previously enjoyed, it is no more, you need to bring it back.
And luckily the rooting method for the ZCU1BPE2 Android Marshmallow is here. And we should thank to the CF-Auto-Root developer who have brought this excitements. If you are interested to use the CF-Auto-Root. Then go on read this post.
Preconditions.
Finish and now your ZCU1BPE2 Android 6.0.1 powered Samsung Galaxy A9 (2016) is now rooted.
If you recently updated your Samsung Galaxy A9 to the ZCU1BPE2 Android 6.0.1 firmware then you notice now that your root access is gone. That means the powerful ability you previously enjoyed, it is no more, you need to bring it back.
Advertisements.
And luckily the rooting method for the ZCU1BPE2 Android Marshmallow is here. And we should thank to the CF-Auto-Root developer who have brought this excitements. If you are interested to use the CF-Auto-Root. Then go on read this post.
Preconditions.
- A Windows computer with USB cable and of course has already installed USB drivers.
- Since we will use Odin then I suggest you to temporarily disable your Samsung KIES and antivirus programs on your PC. Because these kind of programs will interrupt Odin from running.
- Your Galaxy A9 (2016) should already be powered with ZCU1BPE2 if not then learn to update the Samsung Galaxy A9 (2016) to ZCU1BPE2 Android 6.0.1 Marshmallow.
- Enable Android USB debugging mode.
- Backup everything you regard important.
- Do not forget that the unavoidable effect of rooting is losing your device's warranty.
- Follow the entire steps written on this, do not skip any step, okey?
How to root Samsung Galaxy A9 (2016).
- Shut down your device now to enter to the Download Mode and once it's shut down just press these keys altogether; Volume Down + Home + Power (Or you can learn on how enter download mode for Samsung Galaxy).
- Keep pressing the keys till you see this warning then release them, followed with pressing the Volume Up to confirm entering to Download Mode.
- You can now open Odin once your device's in Download Mode.
- If Odin is opened, then connect your device to computer using your USB cable.
- Odin will try to detect your device and showing the Added!!! notification if it successfully detected your device.
- Click the AP (For Odin3 v3.09 or newer) or click the PDA (For Odin3 v3.07) button to find the CF-Auto-Root file within your computer.
- Now leave other options behind then click the Start button to Odin to start installing the CF-Auto-Root tool on your Samsung Galaxy device.
- PASS notification will appear if Odin has installed the CF-Auto-Root package on your Samsung Galaxy A9 (2016) device.
- Reboot your device now.
Advertisements.
Finish and now your ZCU1BPE2 Android 6.0.1 powered Samsung Galaxy A9 (2016) is now rooted.
How To Update Galaxy A9 A9000 (2016) To ZCU1BPE2 Android 6.0.1
Here is the full instructions to update Samsung Galaxy A9 A9000 (2016) to the ZCU1BPE2 Android 6.0.1 Marshmallow as the latest official firmware released recently by Samsung. The instructions are combined with pictures to assist you in installing the ZCU1BPE2 Android 6.0.1 Marshmallow to you Galaxy A9 A9000 device.
And we will use manual roads to bring the ZCU1BPE2 Android 6.0.1 Marshmallow firmware and that will help those who have not getting any update notifications either via Samsung KIES or Over The Air / OTA.
And as always we will be using the computer and Odin tool to flash the firmware to your device. And be sure you already understand that installing an official firmware like this could effect of losing your root access, custom recovery image and probably the existing custom ROM that you might have.
Preconditions.
You may verify it by heading to Settings -> About Phone -> See the firmware that is now running on your device guys.
And you can now root Samsung Galaxy A9 (2016) device.
And we will use manual roads to bring the ZCU1BPE2 Android 6.0.1 Marshmallow firmware and that will help those who have not getting any update notifications either via Samsung KIES or Over The Air / OTA.
Advertisements.
And as always we will be using the computer and Odin tool to flash the firmware to your device. And be sure you already understand that installing an official firmware like this could effect of losing your root access, custom recovery image and probably the existing custom ROM that you might have.
Preconditions.
- A Windows based computer, USB drivers installed and a USB cable.
- Be sure you already have set your device's USB debugging enabled. If you haven't head to the how to enable USB debugging mode. Learn it then.
- Make necessary backups to the data you regard need to be saved.
- Charge your device's battery power if it's low.
- Do not skip any steps written on this post but follow them entirely.
How to Update Galaxy A9 A9000 (2016) to ZCU1BPE2 Android 6.0.1 Marshmallow.
- You need to enter the Download Mode, by powering off your device then press and hold these keys; Power Down + Home + Power.
- Once you see a warning like in the picture, just release all the keys you are pressing, followed with pressing Volume Up to access to the Download Mode.
- If your device's in Download Mode, now go to your computer to find and open Odin by clicking its .exe file.
- Connect your device to computer using your USB cable once Odin is opened.
- Odin will detect your device. And you will a notification saying Added and you will also see your ID:COM color turns to yellow.
- Click PDA button on Odin interface then find the firmware file you previously downloaded and extracted to your computer.
- Then hit the Start button on Odin to start the flashing process.
- Pass notification will show up indicating that the firmware was successfully installed on your device.
- Reboot your device now to finish all the steps.
Advertisements.
You may verify it by heading to Settings -> About Phone -> See the firmware that is now running on your device guys.
And you can now root Samsung Galaxy A9 (2016) device.
Saturday 24 September 2016
Rom Hack - Boat Race
Platform: Nintendo Entertainment System
Game: BB Car
Hack: Boat Race
File: BB Car (Unl)[h Boat Race v1.0].nes
CRC32: 45B3E5F5
MD5: 4B5B34418EECA00A376662992339577B
SHA1: D420226C92674630F0481DCDC9DAB5FA03D58706
Hack Release Date: 19/09/2016
Source: Romhacking
Download Boat Race for NES
Rom Hack - Final Fantasy II - Playable Golbez Edition
Platform: Super Nintendo Entertainment System
Game: Final Fantasy II
Hack: Playable Golbez Edition
File: Final Fantasy II (U) (V1.1)[h Playable Golbez Edition v3.0].smc
CRC32: 13677580
MD5: C4FFDE63ED2AD436FEAF488E82285880
SHA1: FAE80D3B2CA275ECB97518FAA3F2703D620718FE
Hack Release Date: 23/08/2016
Source: Romhacking
Download Final Fantasy II - Playable Golbez Edition for SNES
Rom Hack - Musashi’s Sword 4 Kendo Forever
Platform: Nintendo Entertainment System
Game: Musashi no Ken: Tadaima Shugyou Chuu
Hack: Musashi’s Sword 4 Kendo forever
File: Musashi no Ken - Tadaima Shugyou Chuu (Japan)[h Musashi’s Sword 4 Kendo forever v1.0].nes
CRC32: DC50F572
MD5: CE4F65E56B0CEB2E05DC583B3BE5F2E5
SHA1: B90D45CBFFE0425BF4F17341C257A7BC75E8ED2B
Hack Release Date: 24/09/2016
Source: Romhacking
Download Musashi’s Sword
Tuesday 20 September 2016
without itune flash ios ipsw
i new way to flash any frimware of iphone, i pod, and ios devices without using itune.
most reliable thing it can download the firmware for your.
you can flash it activate it as well.
most useful thing you can do jailbreak and all that stuff as well.
this tool allow you to flash very easy process.
you can also download shsh and upload them as well.
gave you full history of you phone baseband, ipsw, udid, etc.
many more features work for windows user only xp, 7, 8, 8.1, and 10.
i recommend to try this Download free
Monday 19 September 2016
How To Enable Root Access On CM14 ROM
You can follow the instructions to enable root access on CyanogenMod 14 / CM14 ROM on your Android powered device. And those who haven't been notified yet that CM14 ROM is simply a pre-rooted ROM, that means the modified ROM is presented with root manager.
However the root manager itself it deactivated by default on the settings area. We need to enable it first through manual way to enjoy root access offered by CyanogenMod 14 ROM.
And fortunately the procedures needed to enable root access on CM14 ROM is not a hard task. Because the ROM's developer has made it easy to things to do. You are given with choices to allow what apps should be given root access. The process is simply like giving root Apps only or ADB only, or both of them.
Of course CM14 is offering more than the stock ROM, the developers behind the CM team have planted number of handy tweaks and features to make it more user friendly.
Requirements.
Easy and simply, right? Your CM14 ROM powered device has root access now. Just enjoy it.
However the root manager itself it deactivated by default on the settings area. We need to enable it first through manual way to enjoy root access offered by CyanogenMod 14 ROM.
Advertisements.
And fortunately the procedures needed to enable root access on CM14 ROM is not a hard task. Because the ROM's developer has made it easy to things to do. You are given with choices to allow what apps should be given root access. The process is simply like giving root Apps only or ADB only, or both of them.
CyanogenMod is one of the most used non-official Android software today. The CM14 itself is based on Android 7.0 Nougat. And it's not going to give you any bloatware and other stuffs you rarely need. And as one of the few ROMs that offering almost 100% similar to the stock firmware.
Of course CM14 is offering more than the stock ROM, the developers behind the CM team have planted number of handy tweaks and features to make it more user friendly.
Requirements.
- Your device has already have CyanogenMod 14 ROM running.
- Backup everything you regard important.
- Charge your device's battery power.
How to enable root access on CM14 / CyanogenMod 14 ROM
- Now enable developer option and USB debugging on your Android powered device.
- Then launch Developer Options now.
- Search for the Root Access option, then choose the option you need whether you want seti it Apps only or ADB only or both of them which is Apps and ADB.
- Reboot your device.
- Done.
Advertisements.
Easy and simply, right? Your CM14 ROM powered device has root access now. Just enjoy it.
Sunday 18 September 2016
Pat and Mat in a Movie
"A wonderful movie of Lubomír Beneš and Vladimír Jiránek, is directed by Lubomír Beneš and Marek Beneš, follows a couple of friends who face mostly self-made problems, so that they have to solve them by any possible and impossible tools. This makes even more problems and yet, ultimately, the two get mostly surprising solutions.
Saturday 17 September 2016
Rom Hack - Pac-Man Xtreme for NES
Platform: Nintendo Entertainment System
Game: Ms. Pac-Man (Namco)
Hack: Pac-Man Xtreme
File: Ms. Pac-Man (USA)[h Pac-Man Xtreme v1-0-000-00].nes
CRC32: EE653AC8
MD5: 6328F3C151E78DD7C0E4B642D4AE2D86
SHA1: BFF408F3DF07EC1D6AB5CE31035CD585DB9976F2
Hack Release Date: 17/09/2016
Source: Romhacking
Download Pac-Man Xtreme for NES
Friday 16 September 2016
Infinix Flash Tool
Download Infinix Flash Tool for your Infinix smartphone or tablet based on Mediatex chip-set. With Inifinix Flash Tool you can do several useful things one of which is flashing firmware to your device. It supports only Windows based computer, precisely Windows XP, Windows 7, Windows 8, Windows 8.1 and Windows 10.
Features offered by Infinix Flash Tool.
User friendly interface. This tool offers a very easy to use interface to prevent you from getting confused. You will find a simple yet straight-forward interface to operate. On its window there are three buttons to use such as Browse, Start and Stop. Of course Browse is used to get the file on your PC, while Start button is used to begin the file flashing and Stop button to be used to stop the flashing procedures anytime you need guys.
No need to be installed. You don't need to install Infinix Flash Tool to your computer. Simply download the file and then extract it, to launch the tool just click on the flash_tool.exe.
Install stock firmware. You can flash stock firmware using this tool on your Mediatek based device. The process requires only one-single click. Browse the file, then hit the Start button. And then wait for the firmware flashing processes to be done.
It supports CDC and VCOM drivers. Your computer must have either Android CDC or VCOM driver to use Infinix Flash Tool. That's needed for the tool to detect your Android device.
It's a free tool. No need to spend a dollar to get this tool. Just grab it to your computer. Then do the needed activities.
Advertisements.
Features offered by Infinix Flash Tool.
User friendly interface. This tool offers a very easy to use interface to prevent you from getting confused. You will find a simple yet straight-forward interface to operate. On its window there are three buttons to use such as Browse, Start and Stop. Of course Browse is used to get the file on your PC, while Start button is used to begin the file flashing and Stop button to be used to stop the flashing procedures anytime you need guys.
No need to be installed. You don't need to install Infinix Flash Tool to your computer. Simply download the file and then extract it, to launch the tool just click on the flash_tool.exe.
Install stock firmware. You can flash stock firmware using this tool on your Mediatek based device. The process requires only one-single click. Browse the file, then hit the Start button. And then wait for the firmware flashing processes to be done.
Advertisements.
It supports CDC and VCOM drivers. Your computer must have either Android CDC or VCOM driver to use Infinix Flash Tool. That's needed for the tool to detect your Android device.
It's a free tool. No need to spend a dollar to get this tool. Just grab it to your computer. Then do the needed activities.
Download Infinix Flash Tool
icloud unlock
i cloud or cloud unlock is now available on facebook in reasonable price you should have a look and try it
device iphone 4, 4s,5, 5s, 5c, 6, 6s, 6plus
Unlock Cloud
device iphone 4, 4s,5, 5s, 5c, 6, 6s, 6plus
Unlock Cloud
How To Root Samsung Galaxy A5 (2016) A510M
This is the tutorial to root Samsung Galaxy A5 (2016) A510M running on the official UBU2BPF3 Android 6.0.1 Marshmallow. Those who own the smartphone and already updated to the said firmware can read the online instructions to bring root access on Samsung Galaxy A5 device.
On this post we will use CF-Auto-Root package that already supports Android 6.0.1 UBU2BPF3 firmware. And of course Odin tool that is made to flash the zip file of the rooting package to our Samsung Galaxy A5 (2016) A510M.
Once you have root access then you can flash root apps and Mods to make your device perform the way you want it to perform. And not to mention you can also install third-party customized ROMs, such as CyanogenMOD, ParanoidAndroid, AOKP custom ROM, Slim Bean and etc.
Preconditions.
Well done my friend because you have successfully rooted your Samsung Galaxy A5 (2016) A510M.
Advertisements.
On this post we will use CF-Auto-Root package that already supports Android 6.0.1 UBU2BPF3 firmware. And of course Odin tool that is made to flash the zip file of the rooting package to our Samsung Galaxy A5 (2016) A510M.
Once you have root access then you can flash root apps and Mods to make your device perform the way you want it to perform. And not to mention you can also install third-party customized ROMs, such as CyanogenMOD, ParanoidAndroid, AOKP custom ROM, Slim Bean and etc.
Preconditions.
- Be sure your device is Galaxy A5 (2016) A510M, check it via About Phone, do not apply the rooting guides here if your device is not that model.
- Your Samsung Galaxy A5 must be powered with UBU2BPF3 Android 6.0.1 Marshmallow firmware.
- Root is not an official activity and Samsung doesn't approve it, therefore you will loose your warranty.
- Be sure you firstly make necessary backups before starting.
- And do not forget to make your device's USB Debugging Mode enabled.
- Prepare your Windows OS computer, a USB cable and USB drivers originally from Samsung.
- Charge your device battery if its power too low.
- Follow the whole instructions and do not skip any steps.
- Good luck guys.
Perform the full instructions written on this post but remember that all the risks which may happen during or after applying the rooting procedures are your responsible. Do not blame anyone. Bear the consequences which rarely may happen.Download and extract the zip files below to your Windows PC.
- Download CF-Auto-Root Package.
- Download Odin3 v3-09 (No need to re-download if you already have it on your computer).
How to root Samsung Galaxy A5 (2016) A510M.
- Now power off your device, to boot into the Download Mode. Press and hold these buttons; Volume Down + Home + Power (Learn to how enter download mode for Samsung Galaxy).
- Once your Galaxy A5 screen display the Warning notification like in the following screenshot. Release the buttons and then press the Volume Up for entering the Download Mode.
- Now open Odin stored on your Windows computer by double-clicking on the file.
- After Odin is opened, you need to connect your Samsung Galaxy A5 using a USB cable.
- Odin will detect your device, and showing Added!!! notification if your device's detected by Odin.
- Now click the AP (For Odin3 v3.09 or newer) or click the PDA (For Odin3 v3.07) button search the CF-Auto-Root inside your Windows computer.
- Leave other options untouched, then click the Start button to begin installing the CF-Auto-Root tool on your Samsung Galaxy device.
- PASS notification will show up if Odin has successfully flashed the CF-Auto-Root package on your Samsung Galaxy A5 2016 device.
- Reboot your device now to finish the whole rooting procedures.
Advertisements.
Well done my friend because you have successfully rooted your Samsung Galaxy A5 (2016) A510M.
Subscribe to:
Posts (Atom)

