sMobile ? "width=device-width,initial-scale=1.0,minimum-scale=1.0,maximum-scale=1.0" : "width=1100"' name='viewport'/> android xda: November 2016

Wednesday 30 November 2016

Download And Install CM14.1 Nightly Android 7.0 ROM For Xiaomi Redmi 1S

Install CM14.1 Nightly Android 7.0 ROM for Xiaomi Redmi 1S. A good new just arrived for the Xiaomi Redmi 1S users as they are given with the Android 7.0 Nougat based ROM, namely CM14.1, so they can have the best Android version running on their devices.

Especially when we know that Xiaomi will not be giving the device with Android 7.0 Nougat update officially. So the offer of CyanogenMod team with the official build of CM14.1 must be a great news for you all.

However the ROM is simply a nightly one and it doesn't come up with all the the CyanogenMod specific utilities, one of which is CM Theme Manager. In case the feature is so essential for you then you probably want to wait for the next version.
Advertisements.

Again I must remind you that the CM14.1 is neither developed nor released by Xiami, instead it's a modified ROM developed by the third-party developers in the CyanogenMod team. Therefore to install it you are going to need a Custom Recovery such as CWM or TWRP or the kind in order to flash zip file of the ROM on your device.

And the ROM is the first official release from CyanogenMod for the Xiaomi Redmi 1S device. Flashing it will void your warranty. And you are required to already have unlocked your device's bootloader.

Download And Install CM14.1 Nightly Android 7.0 ROM For Xiaomi Redmi 1S
Preconditions.
  • The ROM is only for the Xiaomi Redmi 1S device.
  • Backup all the data you regard precious before starting to follow the tutorials.
  • Your device should already be powered with either CWM or TWRP recovery. Haven't done it? Then please head to the install TWRP on any Android device post.
  • Don't forget to also enable USB debugging mode on Android device.
  • You are going to need a computer and a USB cable.
  • Remember that you need to follow each step written on the tutorial section without skipping any step if you want to be successful in flashing the CM14.1 Nightly ROM on your Xiaomi Redmi 1S device.
Don't forget to see Xiaomi Stock ROM (Complete List).

Download CM14.1 Nightly ROM zip


Download Gapps zip


(Supports all ARM64, ARM & x86 devices)

How to install CM14.1 Nightly ROM on Xiaomi Redmi 1S device


Perform the instructions written on this. However about all the risks which may happen during or after the flashing processes are yours to bear. Don't blame anyone.
Advertisements.


  1. Now transfer the CM14.1 ROM zip file from computer to your device's SD Card.
  2. Once done, boot your device into the TWRP recovery mode, do it guys.
  3. When you are inside the TWRP recovery mode, do the following action; full data wipe by selecting the Wipe button -> Swipe to Factory Reset button.
    Wipe Data TWRP Recovery Android
    Wipe TWRP Recovery
  4. Back to the TWRP main menu, then select the Install button. Continue your step with search for the ROM zip file that you transferred earlier to your device's SD card on first step above.
    Install Button TWRP Recovery Android
    Choose Zip File TWRP Recovery
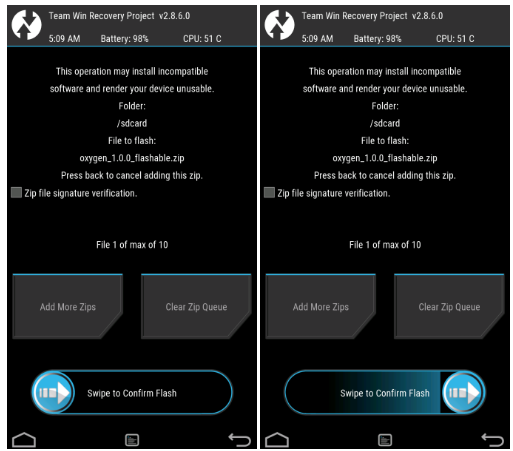
  5. You need to confirm installations swiping the Swipe to Confirm Flash button. The flashing process will start.
    Swipe To Confirm
  6. After the installation is complete, then install the Gapps if you have, okey?
    TWRP Finished Install
  7. Once finished, just tap Wipe cache/dalvik button only if you face the bootloop or errors.
  8. You need to tap the Reboot System button.
    TWRP Reboot System
  9. Finish.
You did it my friend because you have successfully updated Xiaomi Redmi 1S to Android 7.0 nougat using CM14.1 Nightly ROM zip.

Tuesday 29 November 2016

How To Install MIUI 8 On Moto G 2015

How to install MIUI 8 ROM on Moto G 2015. Moto G 2015 is a decent phone, albeit it's not a high-end one, that could be the reason the manufacture and the OEM don't put their attentions to much on it. However since it's an Android powered phone. We have outsiders called third-party developers that in many times be helpers to delivers goodies to the forgotten phone.
Advertisements.

As for this case, you as the owner of Moto G 2015 are awarded with the MIUI 8 ROM, it's the Xiaomi owned firmware to serve the Xiaomi's devices. But in the hand of the very creative people the firmware was juggled to support the Moto G 2015 phone. And the one who actualize this amazingness is jhenrique09 at XDA. Now we are handed with the MIUI 8 ROM's port.

On this post I am offering you to taste the flavors offered by the MIUI 8 ROM on your Moto G 2015. See how well it runs, how stable it performs, how smooth it delivers. So you will get the new experiences of having the ROM that are not for you.
How To Install MIUI 8 On Moto G 2015
Preconditions.
  • Only perform the MIUI 8 flashing instructions if your device is Moto G 2015.
  • Now backup your device's data before proceeding.
  • Your Moto G 2015 should already has CWM or TWRP recovery. On this post, I use TWRP recovery. Learn to install TWRP on any Android device.
  • Make sure you have already enabled your USB debugging mode. Learn to enable USB debugging mode on Android device.
  • Be sure that your computer and a USB cable are ready to use.
  • Follow the instructions on this post without you skipping any steps.
Download MIUI 8.

How to install MIUI 8 ROM on Moto G 2015

Perform the instructions written on this. However about all the risks which may happen during or after the flashing processes are yours to bear. Don't blame anyone.
Advertisements.


  1. Now transfer the MIUI 8 ROM file from computer to your device's SD Card.
  2. Once done, boot your device into the TWRP recovery mode, do it guys.
  3. When you are inside the TWRP recovery mode, do the following action; full data wipe by selecting the Wipe button -> Swipe to Factory Reset button.
    Wipe Data TWRP Recovery Android
    Wipe TWRP Recovery
  4. Back to the TWRP main menu, then select the Install button. Continue your step with search for the ROM zip file that you transferred earlier to your device's SD card on first step above.
    Install Button TWRP Recovery Android
    Choose Zip File TWRP Recovery
  5. You need to confirm installations swiping the Swipe to Confirm Flash button. The flashing process will start.
    Swipe To Confirm
  6. After the installation is complete, then install the Gapps if you have, okey?
    TWRP Finished Install
  7. Once finished, just tap Wipe cache/dalvik button only if you face the bootloop or errors.
  8. You need to tap the Reboot System button.
    TWRP Reboot System
  9. Finish.
Well done your Moto G 2015 is now powered with MIUI 8 ROM.

Install OxygenOS 3.5.3 On OnePlus 3T

Today we are going to discuss about how to download and install OxygenOS 3.5.3 on OnePlus 3T. This is the phone that was recently announced, those who don't know that OnePlus announced it at November, which is this month guys.

Not to mislead with the name OnePlus 3T and relate the phone as the successor of OnePlus 3, because it is not guys. OnePlus just want to make a surprise for us to end this year. Well from the report I red previously that many have bought the phone and now they are enjoying the features that the firmware is offering.
Advertisements.

For those who own the OnePlus 3T, then let me tell you one thing! OnePlus recently rolled out a new official update for your device, the build name is OxygenOS 3.5.3 that comes with some great new features and native apps for you guys.

Now I am taking my part to guide you to the process of flashing the OxygenOS 3.5.3 on OnePlus 3T device. You can follow the full instructions on this post. At the end your device will be powered with OxygenOS 3.5.3 and enjoy everything that is offered by the OS.

For you to know that the update is official and it's for worldwide, that means it's now rolling and will knocking your door. But since it's a global update. Therefore it takes sometime to reach you, no matter where you are, probably your turn is still in queue. But if you dislike of waiting that long then you are welcomed to follow the manual instructions from this post to flash the OxygenOS 3.5.3 on OnePlus 3T device.
How To Download And Install OxygenOS 3.5.3 On OnePlus 3T

Features offered by the OxygenOS 3.5.3.
  • Added emergency calling for India (triple press the power button to trigger).
  • Added motion detection in camera and enhanced image capturing quality.
  • Added OnePlus community app.
  • Updated touch panel firmware and optimized touch precision.
  • Updated GPS library and optimized location accuracy.
  • Redesigned clock UI.
  • Redesigned calling UI.
  • Increased stability and implemented various bug fixes.
Preconditions.
  • You need to firstly install ADB & Fastboot on your Windows PC or Mac OS X.
  • One thing to remember that this instruction is only fo OnePlus 3T, therefore if you don't have this device, then back away.
  • Albeit flashing this firmware is a safe thing to do, but it's always wise, to make backups.
  • Charge your device's battery power if it's now sufficient.
  • Good luck guys.

Download OxygenOS 3.5.3 from below

How to install Oxygen 3.5.3 on OnePlus 3T

  • Now download the OxygenOS 3.5.3 zip file from the above link to your device's internal memory.
  • Once done then reboot your OnePlus 3T into the recovery mode.
  • Inside the recovery mode, then select Install from ADB Sideload.
  • Now you can connect your OnePlus 3T to PC.
  • You need to launch the command window from the ADB folder by pressing Shift + Right click and then choose the Open Command Window.
    Open Command Window Here
  • Verify whether your device's properly connected to PC or not, by executing this command.
    adb devices
  • (After executing the above command and you see your device's information and details, it means your device's properly connected and it's fully prepared to flash the OxygenOS 3.5.3 firmware).
  • Now type the following command and then hit the Enter to start flashing the OxygenOS 3.5.3 on your OnePlus 3T.
    adb sideload File Name.zip
  • (Just as the example, the adb sideload will likely be like this; OnePlus3TOxygen_16_OTA_008_all_1606122244_e0cfc5ffc8bf411a.zip).
  • After the flashing processes are complete, just reboot your device guys, that will be great now.
  • Finish.
Advertisements.


Well done because you have successfully installed the OxygenOS 3.5.3 firmware on OnePlus 3T device.

Monday 28 November 2016

TOSEC-v2016-11-11 Update Pack

TOSEC team is back with a new release and here's update pack for you. This one is about Commodore. Download the latest DAT pack and use a ROM manager to rebuild your sets. No pass (just like always since I'm back).

Download TOSEC-v2016-11-11 Update Pack:

http://www92.zippyshare.com/v/cJZIKRxc/file.html
http://www40.zippyshare.com/v/iC6GvWDN/file.html
http://www102.zippyshare.com/v/Gjn22OZH/

How To Enable VoLTE On OnePlus 2

About a year ago, precisely 2015, July, a new phone arrived called OnePlus 2 that came out with Qualcomm MSM8994 Snapdragon 810 chipset and Android 5.1 Lollipop OS out of the box. The phone ran so great and amazing. As the owner of the phone, you know better than I do regarding its performance.

However for some reasons it is regarded otherwise, the phone was considered a failure and some who bought it feeling unsatisfied. Times go by and we found out the culprit was OxygenOS neither because the phone's hardware nor software. Well, that's the time we are thankful for the existence of the custom ROMs.
Advertisements.

If you are one of the lucky owners of the phone then you have fully noticed the phone doesn't has the Qualcomm MSM8994 Snapdragon 810 ability, when it's a great one that makes us able to perform voice calls a 4G LTE network, rather than the 2G or 3G connections. If your existing carrier support this kind of feature thus you will be happy if the phone has it.

And on this post I would like to guide you on how to enable VoLTE support on your OnePlus 2 running on HyadorgenOS 2.5. The processes require you to flash the newest version of modem file from HydrogenOS 2.5 (The Chinese version of firmware).

The firmware is regularly maintained and it comes with VoLTE support. So if you are interested then read on. Hope you all the best.

Update. You can simply download OxygenOS 3.5.5 OTA to enable VoLTE functionality. It applies to select carriers.

Prerequisites.

Download Modem File from HydrogenOS 2.5.

How to enable VoLTE support on OnePlus 2

Note. You are the one responsible for applying the guides written here. Because none forcing you to do so.
Advertisements.


  1. Power off your phone now and then power it on to boot into the recovery mode.
  2. When you are inside the TWRP recovery mode, then find and tap the Install button, and search the Modem file you downloaded earlier.
    Install Button TWRP Recovery Android
    Choose Zip File TWRP Recovery
  3. Install it by swiping the Swipe To Confirm Flash button to start the installation process.
    Swipe To Confirm
  4. Once done, just reboot your device using the Reboot button, from TWRP main menu interface screen.
    TWRP Reboot System
  5. Done.
You did it my friend for enabling the VoLTE feature on your OnePlus 2.

Enable Partial Screenshot On CM14.1 ROM

Today I would like to share tutorials to enable Partial Screenshot on CM14.1 ROM. As we know that  recently we are given with great news from CyanogenMod team about the upcoming of finished nightly build of CM for many devices.

The news say that devices such as Nexus 5X, Nexus 6P, OnePlus One, OnePlus 2 and 3 are among others supported device. Therefore prepare yourself for the coming of CM14.1 final build with all the tremendous features along to your device.
Advertisements.

However there is something that is apparently left behind from this build, the one we like too much, which is the Partial Screenshot feature. The CM14.1 doesn't make this feature enable by default. We need to enable it first to use it.
Enable Partial Screenshot On CM14.1 ROM

Those who don't know, Partial Screenshot feature allows us to take screenshoot only on the selected area of your screen. Thus you don't need to take the whole screen while taking a screenshot, only the parts you after. This feature is already there on Samsung Galaxy devices for long time. Somehow Google has not placed it on the Android stock yet.

Therefore on this post, I will share to you the trick to enable the Partial Screenshot on your device, the requirement you need to have to apply the trick is; your device's powered with CM14.1 ROM, or else install it first guys!

Useful tutorials here.
Preconditions.
  • Apply the guides written on this post only if your device using CM14.1.
  • Be sure you make backups first.
  • Your device should have CWM or TWRP recovery. Learn to install TWRP on any Android device.
  • Charge your device's battery power if it's considered has less power.
  • Enable USB debugging mode of your Android OS powered device.
  • Follow the guides and don't skip any steps, oke, guys?
  • Good luck guys.

Download Mod Partial Screenshot file.

How to enable Partial Screenshot on CM14.1 ROM

Note. Perform the instructions written on the post at your own risk. Make sure you have made backups.
Advertisements.


  1. If your device is on, then power it off and boot it into the recovery mode.
  2. On the CWM or TWRP recovery mode, head to Install, then choose the file you previously downloaded from the download link above.
  3. Now install it, by swiping to confirm the installation / flash, and the flashing processes will start.
  4. You need to reboot your device now once the file is installed.
  5. Finish.
Well done my friend because you have successfully enabled Partial Screenshot feature on CM14.1 ROM. If you have any questions on your mind. Then don't be shy to reveal them on the provided comment area below. Tell all your friends about this post. Will you guys?

Sunday 27 November 2016

Install Android 7.1 Nougat On Galaxy S4 LTE I9505

Samsung Galaxy S4 LTE I9505 is awarded with another gift, is the custom ROM that is offering the Android 7.1 Nougat, namely Substratum. Unfortunately the ROM doesn't offer too many joyful, it brings only minor tweaks and enrichment. But you will enjoy battery optimization to keep your device ON longer and Advanced Reboot also Ambient Display again to save your battery life. Substratum is still in Beta. Therefore don't expect too much from it. You are invited to flash it guys.
Advertisements.

Flashing this kind of software to your device will require you to already have either CWM or TWRP recovery installed, doing so will also force you to unlock your device's bootloader, and again your device's warranty will be voided as the unavoidable consequence.

But in regard of testing and finding the best Android Nougat based custom for your Samsung Galaxy S4 LTE then there is no wrong for taking the risk. But of course the choice is yours to take. You are the decision maker of what to do to your device. My part is only sharing the guides. Okey?

Preconditions.
  • Make backups before starting the guides.
  • Don't forget to enable your device USB debugging mode.
  • Be sure you follow all the steps written on this post and don't get sleepy and skip any steps.
  • Prepare your computer and a USB cable, if you don't have ones, borrow from friends.
  • Gapps are included in the ROM zip file.

How to update Samsung Galaxy S4 LTE I9505 to Android 6.0.1 Norma N7 Custom ROM Tutorials

Your warranty will be voided. Perform the guides written on the post and all the risks are yours to take.
Advertisements.


  1. Download Android 7.1 Substratum ROM to your PC.
  2. Now you need to use your USB cable to connect your device to PC. Once they're connected then transfer all the zip files to your device's SD card.
  3. Now power off your Samsung Galaxy S4 LTE I9505 then unplug it from USB cable.
  4. Now enter to the Recovery Mode / TWRP mode.
  5. Inside the TWRP mode, perform the following action full data wipe by choosing the Wipe button -> Swipe to Factory Reset button.
    Wipe Data TWRP Recovery Android
    Wipe TWRP Recovery
  6. Now back to the TWRP main menu then you need to tap the Install button. And then choose the ROM zip file you previously transferred to your device's storage on step 2.
    Install Button TWRP Recovery Android
    Choose Zip File TWRP Recovery
  7. Now confirm the installation by simply swiping the Swipe to Confirm Flash option. You will see the installation will begin.
    Swipe To Confirm
  8. Once the installation has been completed then repeat the above action to flash the Gapps.
    TWRP Finished Install
  9. Now you need to tap Wipe cache/dalvik button in case you experience bootloop or other technical problem.
  10. Now you need to tap the Reboot System button.
    TWRP Reboot System
  11. Done.
What can I say, you did it to flash the Android 7.1 Nougat Substratum on Samsung Galaxy S4 LTE I9505, now you can check the OS powering your device by heading to the Settings -> About phone -> Find out whether Substratum is there or not guys.

How To Install CM14.1 Android 7.1 On Nexus 7 (2013)

It is already reported and widely known that the Asus Nexus 7 (2013) will not be one of the lucky device to get the Android Nougat updates officially. But do not be dissapointed with the fact because you still can go to the custom ROM. And yes there is a custom ROM, a famous one, CM14.1 that brings Android 7.1 Nougat for your Nexus 7.
Advertisements.

And CM14.1 is not the only custom ROM to serve the device with Nougat, but there are others too, and on this blog I have previously shared the tutorials to update Nexus 7 (2013) and you can read the instructions from this page and from this page.

Back to the main topic, you can follow the flashing processes by the instructions written here, but remember that doing so will require you to unlock bootloader and install a csutom ROM, on this post I use TWRP. As the result your device's warranty will be nullified. So all the risks are your to face!
How To Install CM14.1 Android 7.1 On Nexus 7 (2013)

How to update Asus Nexus 7 (2013) to Android 7.1 Nougat with CM14.1 Custom ROM Tutorials

Your warranty will be voided. Perform the guides written on the post and all the risks are yours to take.
Advertisements.


  1. Download CM14.1.zip and Gapps to your PC.
  2. Now you need to use your USB cable to connect your device to PC. Once they're connected then transfer all the zip files to your device's SD card.
  3. Now power off your Asus Nexus 7 (2013) then unplug it from USB cable.
  4. Now enter to the Recovery Mode / TWRP mode.
  5. Inside the TWRP mode, perform the following action full data wipe by choosing the Wipe button -> Swipe to Factory Reset button.
    Wipe Data TWRP Recovery Android
    Wipe TWRP Recovery
  6. Now back to the TWRP main menu then you need to tap the Install button. And then choose the ROM zip file you previously transferred to your device's storage on step 2.
    Install Button TWRP Recovery Android
    Choose Zip File TWRP Recovery
  7. Now confirm the installation by simply swiping the Swipe to Confirm Flash option. You will see the installation will begin.
    Swipe To Confirm
  8. Once the installation has been completed then repeat the above action to flash the Gapps.
    TWRP Finished Install
  9. Now you need to tap Wipe cache/dalvik button in case you experience bootloop or other technical problem.
  10. Now you need to tap the Reboot System button.
    TWRP Reboot System
  11. Done.
You are the man because you have successfully update your Asus Nexus 7 (2013) to Android 7.1 Nougat with CM14.1 ROM. You should be happy now. And tell your friend about this wonderful news.

How To Flash Helios Android 7.0 ROM On Galaxy S7 Edge G935F

Hey guys here I would like to share the tutorials on how to update Samsung Galaxy S7 Edge G935F to Android Nougat using Helios Android 7.0 custom ROM, yes it is a custom ROM comes with Android 7.1 Nougat.
Advertisements.

Why you want to flash this ROM to your device? It is because the ROM is the combination with the official Samsung firmware along with the Grace UI. Within the ROM you will find the Android 7.1 environments and features and then the features added by the ROM's developers.

On this post you will be guided to flash the custom ROM and then enjoy everything offered once it's fully installed. However I must remind you that flashing this kind of ROM requires you to firstly unlock your device's bootloader because it's an AOSP based custom ROM.
How To Flash Helios Android 7.0 ROM On Galaxy S7 Edge G935F
Preconditions and information.
  • Your device bootloader must already be unlocked.
  • You already installed CWM or TWRP recovery. On this post I use TWRP recovery. Learn to install it from the tutorials here; how to install TWRP recovery on Android.
  • Your both computer and a USB cable should already be ready to use.
  • Be sure that you have already enabled USB debugging mode.
  • Charge your device battery power if it's less power.
  • Your device's warranty will be voided for installing this ROM.
  • Helios custom is not armed with Gapps therefore install the Google apps separately.
  • Make backups first before proceeding.
  • All the steps on this post should be followed as whole.

How to update Samsung Galaxy S7 Edge G935F to Android 7.1 With Helios Android 7.0 custom ROM

Your warranty will be voided. Perform the guides written on the post and all the risks are yours to take.
Advertisements.


  1. Download G93X-Helios-Nougat-v3.zip and Gapps to your PC.
  2. Now you need to use your USB cable to connect your device to PC. Once they're connected then transfer all the zip files to your device's SD card.
  3. Now power off your Samsung Galaxy S7 Edge G935F then unplug it from USB cable.
  4. Now enter to the Recovery Mode / TWRP mode.
  5. Inside the TWRP mode, perform the following action full data wipe by choosing the Wipe button -> Swipe to Factory Reset button.
    Wipe Data TWRP Recovery Android
    Wipe TWRP Recovery
  6. Now back to the TWRP main menu then you need to tap the Install button. And then choose the ROM zip file you previously transferred to your device's storage on step 2.
    Install Button TWRP Recovery Android
    Choose Zip File TWRP Recovery
  7. Now confirm the installation by simply swiping the Swipe to Confirm Flash option. You will see the installation will begin.
    Swipe To Confirm
  8. Once the installation has been completed then repeat the above action to flash the Gapps.
    TWRP Finished Install
  9. Now you need to tap Wipe cache/dalvik button in case you experience bootloop or other technical problem.
  10. Now you need to tap the Reboot System button.
    TWRP Reboot System
  11. Done.
You have done all the necessary steps to flash the Helios ROM on your Samsung Galaxy S7 Edge G935F now you can enjoy all the goodies within. If you have any questions. Don't be shy to ask.

Friday 25 November 2016

Download Stock ROM For Lenovo A10-70F

You can download stock ROM for Lenovo A10-70F here and then be guided to install the stock ROM by following the full instructions from this post. And as the result your device's existing errors will be fixed completely and your device will be reverted back to its initial condition.
Advertisements.

And remember that installing this stock ROM will wipe all your device, therefore you are recommended to firstly make necessary backups before beginning. Because you can restore later once the stock ROM is fully installed.

The Lenovo A10-70F stock ROM has the stock ROM itself, SP Flash Tool and USB drivers. You will find all the said files once you extract the zip file from the download link provided on this post. And keep reading to download the stock ROM and install it afterward.

Download these files to your computer and then install.
Requirements.
  • A computer and a USB cable.
  • Your root access will be wiped out.
  • Your existing custom ROM will be removed unless you make backups first.

How to install stock ROM on Lenovo A10-70F?

Follow the instructions without skipping anything and be sure you have made backups.
Advertisements.


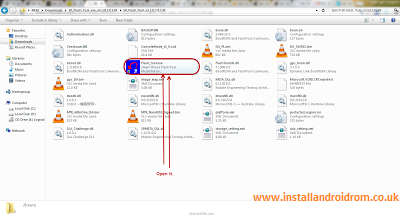
  1. Launch the SP Flash Tool you installed earlier on your PC.
    Install Stock ROM On Android SP Flash Tool Tutorials
  2. You need to click the Scatter Loading button just like on the picture below.
    Scatter File Stock ROM Install
  3. Then browse and select the scatter file on the folder where you kept the Lenovo A10-70F .txt extension.
    Install Stock ROM on Lenovo Device
  4. The Lenovo A10-70F stock ROM scatter file will be loaded by the SP Flash Tool.
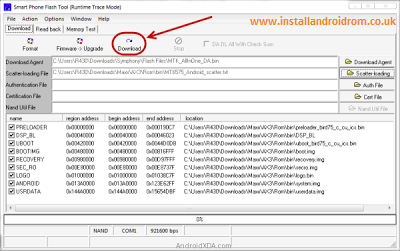
  5. Now you must click the Download button just like in the picture below.
    How to install Lenovo A616 stock ROM
  6. Remove your device's battery while your phone is turned off (Remember while your phone's turned off or if your device's battery un-removable just connect USB to PC then connect to your device while pressing Up button).
  7. Connect USB cable to PC then connect USB cable to your Lenovo device, then put the battery back to your Lenovo while pressing Volume Up (+), this will automatically begin the flashing process.
  8. Wait for the flashing process to finish, you can take a cup of tea while waiting, :)).
  9. When you see this round green notification that means the Lenovo A10-70F stock ROM was successfully installed, congratulation then guys.
    Install Lenovo Stock ROM Tutorials
  10. Unplug your device from its USB cable now then take off the battery of your Lenovo device.
  11. Then place the battery again on the Lenovo of yours and then power on your device.
Great job because the stock ROM for Lenovo A10-70F was fully installed successfully.