But of course making the device to a higher level is always what we want, and Sprint Galaxy Note 7 can be lifted up to more level by rooting it. And lucky us because there is already a working method to bring root access for the Sprint Galaxy Note 7. However I must tell you the method is a bit complicate for us to flash several files.
Advertisements.
Rooting method for Sprint Samsung Galaxy Note 7 takes a leaked version of PH3 firmware. The firmware contains a user debug mode that has SU binary. Therefore we need to install the firmware intact in order to claim the root over Sprint Note 7. Because once the firmware is fully installed then we can execute a several commands to get root access.
How To Root Galaxy Note 7.
Preconditions.
- Make sure you have a computer with a USB cable.
- Make a necessary backups before proceeding as the rooting process will wipe out your entire data.
- Be sure you have USB drivers originally from Samsung. Or go to Samsung Galaxy Note 7 USB drivers.
- Make sure you enable your USB debugging mode first to bridge connection between your device to PC.
- Setup ADB and Fasboot on your PC -- or you can simply go and install Minimal Fasboot / ADB tool.
- Follow the entire steps without skipping anything.
- Rooted Userdebug PH3 firmware file (.tar.md5, 2GB).
- Grab this file now; SuperSU for Note 7 (Only for Qualcomm based devices) and extract it.
- You need this file too; Odin 3.12.4 and unzip it.
How to root Sprint Samsung Galaxy Note 7 using Rooted PH3 Firmware
- Now launch Odin 3.12.4 you previously downloaded and extracted on your PC.
- When Odin is opened on your computer. Now you must enter to Download Mode, head to how to boot Samsung Galaxy Note 7 to Download Mode.
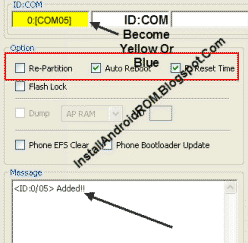
- If your device is in Download Mode now you can connect your device to PC using a USB cable. Then Odin will try to detect your device.
- If Odin manages to detect your device, you will see notification saying Added!!! on Odin interface.
- You must now click AP / PDA tab on Odin to search and select .tar.md5 (Firmware file you downloaded earlier).
└ Note. Just leave other options untouched. Simply click on AP / PDA tab and that's it.
- It is time for you to hit the Start button on Odin for the tool to begin flashing process.
- When it's done, Odin will show a message saying Pass.
- Your device will take an automatic reboot, then disconnect your device form PC.
- The rebooting period will be longer than usual because it will load the new PH3 firmware.
- Once the booting process done, restore your Google account and all apps but don't restore or install SuperSU app.
Advertisements.
Install SuperSU on Sprint Samsung Galaxy Note 7 via ADB
Congratulations because you have rooted your Sprint Samsung Galaxy Note 7 by flashing the PH3 firmware. su binaries and root access are yours now. But your device has not yet SuperSU app installed as the result there is no GUI for you to deal with Supersu permissions.
So to deal with that, then you need to install SuperSU for your Sprint Samsung Galaxy Note 7 from ADB.
The instructions to flash a specific SuperSU app on Galaxy Note 7 as follow.
- If you have setup ADB and Fasboot on your computer. Go to step 2.
- Enable USB debugging mode.
- Open command prompt window via your PC, remember to launch command prompt outside the folder where there is the extracted SuperSU app.
- Launch command prompt by pressing Shift + Right on empty space on the folder screen then choose Open command window here on the text menu.
- Now you need to connect your Sprint Galaxy Note 7 to computer. Choose OK if you are asked to allow USB debugging.
- Type the following command to push the sun7 folder to your device.
adb push sun7 /data/local/tmp/su
- Alter the permissions of the sun7 folder using the following command.
adb shell chmod 0777 /data/local/tmp/su/*
- Go to the su folder using this command one by one.
adb shell
cd /data/local/tmp/su/
- Now claim the root access with this command.
su
- To complete it, use the command below to execute root.sh script file.
./root.sh
- The command will push script to install SuperSU, then setup root and then automatically restart your device.
- Then install Busybox on rails via Google Play Store to your Sprint Samsung Galaxy Note 7.


No comments:
Post a Comment