If you recently updated your Samsung Galaxy A9 to the ZCU1BPE2 Android 6.0.1 firmware then you notice now that your root access is gone. That means the powerful ability you previously enjoyed, it is no more, you need to bring it back.
Advertisements.
And luckily the rooting method for the ZCU1BPE2 Android Marshmallow is here. And we should thank to the CF-Auto-Root developer who have brought this excitements. If you are interested to use the CF-Auto-Root. Then go on read this post.
Preconditions.
- A Windows computer with USB cable and of course has already installed USB drivers.
- Since we will use Odin then I suggest you to temporarily disable your Samsung KIES and antivirus programs on your PC. Because these kind of programs will interrupt Odin from running.
- Your Galaxy A9 (2016) should already be powered with ZCU1BPE2 if not then learn to update the Samsung Galaxy A9 (2016) to ZCU1BPE2 Android 6.0.1 Marshmallow.
- Enable Android USB debugging mode.
- Backup everything you regard important.
- Do not forget that the unavoidable effect of rooting is losing your device's warranty.
- Follow the entire steps written on this, do not skip any step, okey?
How to root Samsung Galaxy A9 (2016).
- Shut down your device now to enter to the Download Mode and once it's shut down just press these keys altogether; Volume Down + Home + Power (Or you can learn on how enter download mode for Samsung Galaxy).
- Keep pressing the keys till you see this warning then release them, followed with pressing the Volume Up to confirm entering to Download Mode.
- You can now open Odin once your device's in Download Mode.
- If Odin is opened, then connect your device to computer using your USB cable.
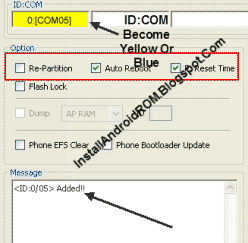
- Odin will try to detect your device and showing the Added!!! notification if it successfully detected your device.
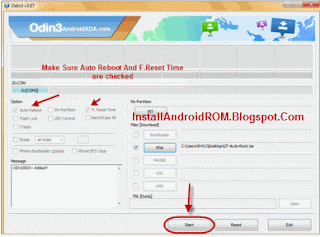
- Click the AP (For Odin3 v3.09 or newer) or click the PDA (For Odin3 v3.07) button to find the CF-Auto-Root file within your computer.
- Now leave other options behind then click the Start button to Odin to start installing the CF-Auto-Root tool on your Samsung Galaxy device.
- PASS notification will appear if Odin has installed the CF-Auto-Root package on your Samsung Galaxy A9 (2016) device.
- Reboot your device now.
Advertisements.
Finish and now your ZCU1BPE2 Android 6.0.1 powered Samsung Galaxy A9 (2016) is now rooted.


No comments:
Post a Comment